


Likes
Comments
Share


@ChitownCannaChica
Follow
She’s cruising along! Had some very hot days this week and no rain, but then got hit with a downpour. Going to have to up the feedings soon to accommodate the washout. Doing great otherwise! Topping again soon too

Likes
5
Share


@TGriner420
Follow
This week went by fast! They're growing really fast and always hungry! They're getting ready for the flower stage and entering Bloom. They're getting 2L of H20 per day that's pH at 6.8. I water 2x a day! I turn them on at 6am and give them 1L of H20 at 9am that way they're awake and 1L of H2O at 9pm that way they're split. I feed my nutrients at the 9am watering. I pH my nutrient mix somewhere between 5.8 and 6.2. I also have amended the soil with Soil Recharge and that's once a week as well as the Fish Shit and The Stash Blend. Then, I always flush with only pH H20 the day after any nutrient mix. Overall, the plants are healthy and I'm waiting to see how they turn out!

Processing
Likes
12
Share


@li0nhe4rt
Follow
Looking strong for the 2nd week. Looking at repotting this baby this week.

Likes
12
Share


@Livewire99
Follow
This week I assembled the new 48x48x80 Mars Hydro tent and installed the new FOHSE Aries 600W LED light. I set the dim to 75%, but after two days, it was clearly too much, especially for 20 hours per day. I will dim it way down and shorten the hours until the plants appear to be doing better.


Likes
18
Share


@Canadian
Follow
Unfortunately I don't have any better pictures because once I remove the net that was giving support to the buds and they were so big that the plant could barely hold the weight anymore so taking pictures holding everything with one hand using the device in the other was it a little bit of a challenge oh well I guess it's a good problem to have I will update when they are completely dry and cure.
I have cut down in jar everything the wait was 105 grams please consider that when they comes to my scale weight i wait until the main stem breaks with a loud crunch and the buds are really dry to the touch reason for it I have a very busy life and at the end of the day this is just a hobby so I cannot be opening those jars many times a day at most one in the morning and one in night so I want to avoid mold on them.so I push in a Boveda pack to keep them nice.
After two weeks in jars the send hose cheese has incremented a lot and the scent of Barry as well it has a very powerful High but Pleasant very nice strain to grow incredibly vigorous and with a high yield capability another win for Dinafem
Thank you for reading have a happy grow.

Likes
3
Share


@High_Class
Follow
I veg them for 10 weeks. The two on each end are Blue Dream, the back left is Purple Urkle, the back right is Grandaddy Purple, and the one up from in the middle is Wifi OG.
Likes
46
Share


@Daweed83
Follow
So i’ve learned this week that the plant at the back has “foxtail” buds which is probably due to some sort of light stress. Im not too worried about because apparently the quality isn’t damaged at all. Just very curious on why only one has it out of the 2 peanut butter. Anyway getting closer to harvest. Caaannot wait 😍🙏🏽
🖖🏽🖖🏽

Likes
3
Share


@Smashleyb123
Follow
Started the week with a sledgehammer flush. Noted the tips to be turning down and browning. Might be nutrient lock out so flushed with sledgehammer. Then three hours later a gallon fresh water flush. Two days later re-added nutrients as listed. Not sure how much longer these will go. Assume another 4-6 weeks before they tell me they are ready. No amber yet.

Likes
2
Share


@eldruida_lamota
Follow
Que pasa familia, vamos con la novena semana de floración de estas Orange Sherbet Fast Flowering, de FastBuds.
Agradezco a Agrobeta todos los kits obtenidos de ellos 🙏.
Vamos al lío, El ph se controla en 6.2 , la temperatura la tenemos entre 22/24 grados y la humedad ronda el 50%, añadimos ya varios productos de la gama de Agrobeta.
Las próximas semanas veremos cómo avanzan.
Agrobeta:
https://www.agrobeta.com/agrobetatiendaonline/36-abonos-canamo
Hasta aquí todo, Buenos humos 💨💨💨


Processing
Likes
5
Share


@CRIPPYGROWS
Follow
she's grown so nice ...topped her at the third node...spilled a little bit of nutes on one of the leaves any suggestions on what to do? cut it off leave alone? fan leaves are really nice and big..i also have a container with eggshells and banana peels fermenting in water that i mix in with her nutes..
Processing
Likes
6
Share


topped August 28th 2018
Likes
2
Share

@grimm420
Follow
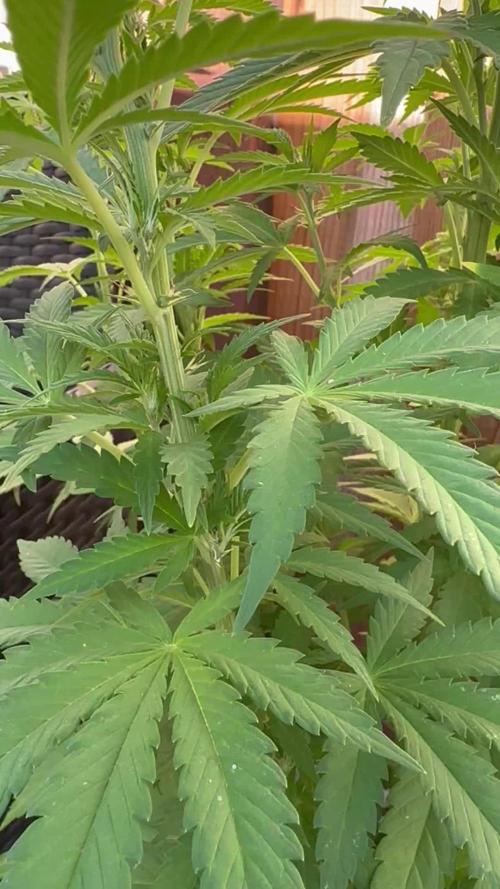
This is the only plant I’ve seen with so many pistils like that, I really think she’s gunna yield like crazy, looking forward to beautiful flowers!
Likes
32
Share


@ZzTooRightOGzZ
Follow
•She was started for fun.
•Not much to say about her just letting her do her.
•Week 3 fead her with 2ml off grow auto from living Soils.

Likes
9
Share


@Mr_nugs_lover_David
Follow
She has performed very good with the lst method, nice plant, fast growth, quality flowers, it's a very good choice for everyone who's looking for a good quality strain at affordable prices. Very nice genetic, this phenotype concretely has a very sweet and floral terps. You can check the other 2 phenos of ak420 here at my page

Likes
77
Share


@ctm_dzagi
Follow
Didn't get all what i can, because it's stop stretching sooner then most strains before.

Likes
6
Share


@Eaegifts
Follow
Very good run, sorry I haven’t been updating her but I broke my phone and kinda forgot about this site when I got a new one since it’s not an app. Happy growing everyone, I put pics and videos on my Instagram of her and the others I’ve been chopping recently. At least one plant a month is the goal! Eaegifts on ig

Likes
11
Share


@Chubbs
Follow
420Fastbuds
FBT2303/Week12
These twins are super duper close to getting the chop. Been checking trichs on them and still have a few clear with just a hint of amber popping up. I enjoy this point in the plants life seeing the fade of yellow leafs. They are super sticky almost to the point of needing gloves when handling. The flower sites have swollen up nice and don't think they'll get any bigger. All in all Happy Growing
Likes
26
Share


@420DeepGrow
Follow
* Actualizo 2 dias antes para cuadrar diarios.
Gracias al equipo de Seedsman y XpertNutrients sin ellos esto no sería posible.
💐🍁 Bubba Cheescake:
Bubba Cheesecake es un cruce de Bubba Kush anterior al 98 con Cheese Cake (Wedding Cake x Exodus Cheese). Se trata de un híbrido 70% índica con muy buenos rendimientos, alto en THC y bajo en CBD. Bubba Cheesecake prospera en interiores y exteriores. En interior se aconseja un corto periodo de crecimiento vegetativo debido a la cantidad de estiramiento que presentan las plantas. Las plantas pueden crecer hasta una altura de 250 a 350 cm. cuando se deja crecer naturalmente al aire libre. En interior, la floración dura entre 60 y 65 días, con rendimientos entre buenos y altos, de 400 a 550 gr/m2. Las plantas de exterior son capaces de producir entre 700 - 800 gr. peso seco. En las latitudes norteñas, en exterior, los productores pueden esperar cosechar a principios de octubre. Los cogollos son grandes y duros como piedras. Las plantas maduras muestran atractivos colores púrpuras y azules y brillan con una resina pegajosa que cubrirá las manos del cultivador si no tiene cuidado. El componente Wedding Cake agrega dulzura al sabor del regaliz y el aroma es terroso y musgoso. La producción de THC es muy alta con un nivel bajo de CBD. El efecto es intensamente narcótico, fuerte y duradero.
🌻🚀 Consigue aqui tus semillas:
🍣🍦🌴 Xpert Nutrients es una empresa especializada en la producción y comercialización de fertilizantes líquidos y tierras, que garantizan excelentes cosechas y un crecimiento activo para sus plantas durante todas las fases de cultivo.
Consigue aqui tus Nutrientes:
https://xpertnutrients.com/es/shop/
📆 Semana 4:
Continuamos la etapa de vegetación, ella se desarrolla muy bien 😎, comienza el buen tiempo, temperaturas agradables para todos.
Esta semana se aplica una solución de trichodermas para una mejor adaptación aunque realmente va genial.
Se mantiene 1/3 de nutrientes Master Root y Master Grow
Likes
28
Share

@DogDoctorOfficial
Follow
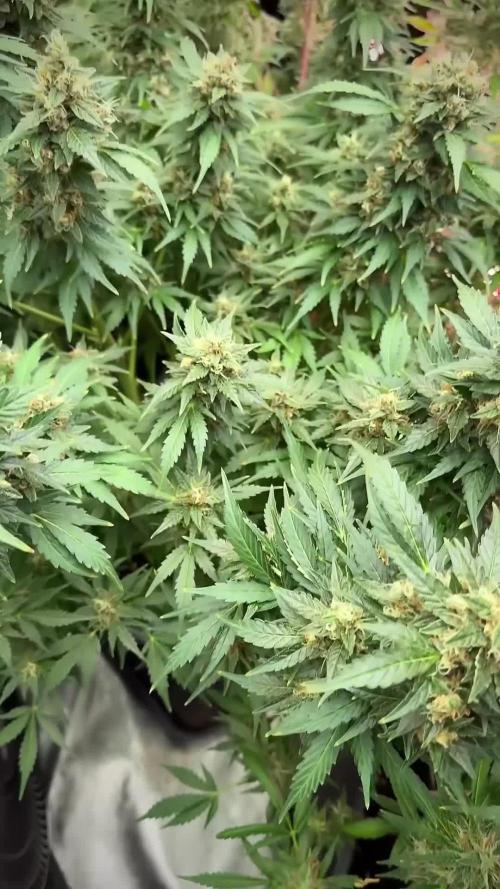
12/12 from seed. Week 12 overall. Week 8 of flower.
And Cosmic Noodles is doing exactly what a finisher should do.
No drama.
No panic.
No chasing numbers.
Just a massive plant, a controlled fade, and a very clear push into the final stretch.
She is not limping to the finish.
She is arriving with weight.
⸻
🍜 The Final Reduction
This week, everything comes out except Pure Zym.
No bloom feed.
No boosters.
No extras.
No correction bottles.
No late flower chasing.
Just enzymes.
And time.
At this point, the goal is no longer to build.
The goal is to finish clean.
She has already done the hard part.
The bulk is there.
The frost is there.
The density is there.
Now the plant is simply being allowed to use what she has already stored.
That’s the shift this week.
Less input.
More observation.
Less pushing.
More finishing.
And for a plant this far along, that is often the better move.
⸻
🌱 Why Keep Pure Zym In
Because even when feed stops, the root zone is still working.
Pure Zym stays because the medium is still alive.
Microbial activity does not stop just because bottles do.
At this stage, enzymes still help break down residual organic matter in the root zone, keep the medium cleaner, and support a softer transition as the plant begins consuming what remains available.
That matters even more when the soil is not treated like disposable media.
Because it isn’t.
This soil still has a second job after this run.
It goes outside.
It gets reused.
It feeds vegetables.
It stays alive.
And whether it is hard science, soft biology, or just grower instinct — keeping that soil active until the end has always made sense here.
Not everything needs to be sterile to be effective.
Sometimes the better approach is simply not killing what is still working.
⸻
? Living Soil, Second Life
That has always been part of the rhythm.
What finishes the room does not leave the cycle.
It just changes jobs.
Once this run is done, that soil goes back outside and keeps working somewhere else.
Different crop.
Same biology.
Same purpose.
So yes — keeping the medium active late matters.
Not just for this harvest.
For what comes after it too.
Call it practical.
Call it circular.
Call it habit.
Either way, dead soil has never been the goal.
⸻
📉 EC Down, pH Up, Eyes On the Plant
This is where the spreadsheet starts losing authority.
EC is down.
Input is nearly gone.
pH has drifted upward into that 6.8–7 range.
And right now, it is not being forced back down.
Not because numbers do not matter.
Because context matters more.
At this stage, the plant is finishing.
Uptake is slowing.
Demand is lower.
Feed has been reduced.
The root zone is doing less work than it was two weeks ago.
So yes — on paper, some of these numbers would make people uncomfortable.
In practice?
The plant looks exactly like a plant that is finishing correctly.
Still drinking.
Still praying.
Still stacking.
Still fading evenly.
Still moving from top to bottom without confusion.
That matters more than chasing a perfect chart in the final stretch.
Room VPD is a reference.
Leaf response is the truth.
And this room continues to be read by plant behavior first, numbers second.
As always.
⸻
🌡️ Conditions Stay Stable
Nothing changed in the room because nothing needed to.
Conditions remain steady.
No dramatic swings.
No forced stress.
No late-stage environmental tricks.
The room is stable.
The plant is stable.
The finish is stable.
And late flower stability is one of the most underrated parts of a clean finish.
No heroic adjustments.
No panic corrections.
No reinvention in the last chapter.
Just consistency.
⸻
️ A Proper Finisher
And this one is a beast.
Not “good structure.”
Not “nice tops.”
A beast.
Huge central cola.
Heavy side stacking.
Dense flower formation.
Thick terminals.
Real weight from top to bottom.
This is one of those plants that stops being judged branch by branch and starts being judged as mass.
Because the whole frame is carrying.
She is not finishing in isolated tops.
She is finishing as a full plant.
That matters.
The top is heavy.
The mid is real.
The lowers are still worthwhile.
And the entire plant is moving together.
That is what a complete finisher looks like.
⸻
❄️ Frost, Density & Finish Quality
And she is not just big.
She is finishing properly.
Dense flower.
Heavy resin.
Excellent frost coverage.
Strong calyx development.
Good terminal formation.
Real weight in the hands.
The important part now is that she is not only stacking size — she is finishing with quality.
That is the difference between a plant that looks impressive and a plant that actually delivers.
This one does both.
And whether part of her gets dried or part of her gets frozen, she has already made the case for both.
That decision can wait.
Right now, the only job is to let her finish.
⸻
🍂 The Fade Is Real — And It’s Everywhere
The fade is already underway.
And more importantly, it is happening correctly.
Not isolated.
Not patchy.
Not confused.
She is fading from top to bottom.
Across the plant.
Across the canopy.
Across the frame.
That matters.
A uniform fade tells a very different story than a stressed collapse.
This is not random yellowing.
This is not deficiency panic.
This is senescence.
The plant is reallocating.
The cycle is closing.
The finish has started.
And she is doing it evenly.
That is exactly what you want to see here.
⸻
💡 Canopy Light Matters
And once again, the lesson stays the same:
Canopy lighting matters.
When the full frame is finishing together, it shows.
When lowers stay relevant, it shows.
When the plant matures with less separation between top and bottom expression, it shows.
Uniform development is not an accident.
Top-to-bottom consistency like this is one of the clearest arguments for proper canopy penetration when the setup allows for it.
Not mandatory in every room.
But when possible, absolutely worth it.
This plant makes that case on her own.
⸻
📘 Week 12, Cosmic Noodles
This is what the late game should feel like.
Calm.
Heavy.
Controlled.
Predictable.
Close.
No overreaction.
No bottle panic.
No forced finish.
Just a large, healthy plant using the last of what she has and moving toward the end exactly like she should.
And that is all this week needed to be.
⸻
⏭️ What Comes Next
Next week should bring more fade.
More color loss.
Less drinking.
More swelling where it still matters.
And a clearer final read on timing.
She may finish next week.
She may ask for a little longer.
Both are still on the table.
What should not happen is panic.
No sudden overfeeding.
No late corrections.
No chasing green back into a plant that is already doing what finishing plants are supposed to do.
From here, the job is simple:
Watch the leaves.
Watch the resin.
Watch the pace.
Then cut when the plant says so.
⸻
🤝 Thank You
To the long-time followers.
To the new ones.
To the quiet readers.
To the loud ones.
To the skeptics.
To the supporters.
To the critics.
To the growers who watch closely.
To the ones who question everything.
To the ones who simply keep showing up.
To GrowDiaries.
To the community.
To the sponsors.
To the gear.
To the tools.
To the genetics.
To everyone following the process, whether they agree with every choice or not.
Thank you.
The room keeps teaching.
The plants keep answering.
And this one is not done speaking yet.📡 DELETED @ 1K Please stay tuned.we never quit https://www.youtube.com/@TheDogDoctorOfficial NEW 🙏 Thank you for your patience and continued support.
FOR DISCOUNT CODES AND MORE JUST FOLLOW THE LINK https://website.beacons.ai/dogdoctorofficial
📲 Don’t forget to Subscribe and follow me on Instagram and YouTube @DogDoctorOfficial for exclusive content, real-time updates, and behind-the-scenes magic. We’ve got so much more coming, including transplanting and all the amazing techniques that go along with it. You won’t want to miss it.
GrowDiaries Journal: https://growdiaries.com/grower/dogdoctorofficial
Instagram: https://www.instagram.com/dogdoctorofficial/
YouTube: https://www.youtube.com/@dogdoctorofficial Deleted by Youtube - https://www.youtube.com/@TheDogDoctorOfficial NEW
Vimeo : https://vimeo.com/dogdoctorofficial Under construction stay tuned ⸻
Explore the Gear that Powers My Grow
If you’re curious about the tech I’m using, check out these links:
🔆 Lighting & Environmental Control
• Future of Grow — Advanced LED lighting technology
https://www.futureofgrow.com/
DISCOUNT CODE: DOG20
• Lumiflora — Under-canopy LED lighting
https://lumiflorade.com/
• TrollMaster — Environmental controllers and automation gear (past collaboration)
⸻
Genetics
• Zamnesia Seeds — Genetics used in this project
https://www.zamnesia.com/
⸻
🌱 Soil, Substrates, Boosters & Root Support
• Plagron — Substrates, bio mixes, and supportive products
https://plagron.com/en/
⸻
🎒 Storage, Curing & Preservation
• Grove Bags — Curing and storage solutions
https://grovebags.com/
⸻
📸 Photography Equipment & Tools
(Not sponsors, but part of my creative toolkit)
• Sony A6700
• Sony full-frame macro lens + few more
• Stacking photography workflow - learning
• iPhone (for behind-the-scenes shots)
We’ve got much more coming as we move through the grow cycles. Trust me, you won’t want to miss the next steps, let’s push the boundaries of indoor horticulture together!
As always, this is shared for educational purposes, aiming to spread understanding and appreciation for this plant. Let’s celebrate it responsibly and continue to learn and grow together.
With true love comes happiness. Always believe in yourself, and always do things expecting nothing and with an open heart. Be a giver, and the universe will give back in ways you could never imagine.
💚 Growers love to all 💚
📸 P.S. – The Eye Behind the Lens
All photos in this diary (for now — except for the ones showing the camera, which I took with an iPhone) are taken with a Sony A6700 paired with a Sony full-frame macro lens and a few more.
Photography is part of the story — it’s how we share the fine textures, the glow, and the quiet details that words can’t always capture.
I’ve also started experimenting with photo stacking — a technique where multiple images, each taken at a slightly different focus point, are layered together to create one perfectly sharp image from front to back.
It’s not digital enhancement or AI; it’s pure photography — a way to reveal the plant’s beauty in microscopic depth, from trichome to petal.
You’ll even see a few shots of "ghost me" capturing the shots — camera, lens, setup — because every grow deserves not just to be cultivated, but documented like art.
FOR DISCOUNT CODES AND MORE JUST FOLLOW THE LINK https://website.beacons.ai/dogdoctorofficial
NEW DISCORD - Official Server Invite Link : https://discord.gg/ksjAkA5T74

Likes
4
Share


@IamCy
Follow
Week 2. Just the normal stretch. Nothing eventful. After this week, I'll be giving random weekly updates due to my busy schedule.