


Likes
Comments
Share


@Aldo90
Follow
I was going to upload the process, but the wiser side of me said no. So I've edited it out and some of the evaporation process can be seen. Bho/wax/honey whatever we care to call it

Likes
4
Share


@Stork
Follow
Day 127 Mon
PH 5.9
EC 0.1
PPM 40
DLI
PPFD
Water 19c
Day 128 Tue
Add Ph Down
PH 6.3 - 5.9
EC 0.1
PPM 60
DLI
PPFD
Water 18c
Day 129 Wed
PH 5.9
EC 0.1
PPM 60
DLI
PPFD
Water 20
Day 130 Thu
PH 6.1
EC 0.1
PPM 70
DLI
PPFD
Water 20

Likes
12
Share


@Jays_Not_Here_Man
Follow
Week 8, and my custom fit SCROG has been installed! ❤️
At Day 50 I separated my 7 gallon girls and my 5 gallon girl. Once done, I began the very easy process of adding my “floating” SCROG. I use ratchet straps, just like the ones that come with lights to secure the four corners of the screen to the top of my tent.
This allows me to adjust the screen height as necessary when 1) first installing and 2) once the full stretch of flower has occurred, I can tweak it a bit to balance the canopy as best as possible. It’s not 100%, I still get some over achievers, but I find it useful as another option.
I like to do a major defoliation before I set the ladies in. Typically till this time, I have done almost no defoliation, just LST and some HST techniques. I adjusted the ladies placement to allow growth out all sides of the screen, set the screen height and began tucking and bending. The defoliation and bending allows light to penetrate all those side shoots that would have amounted to nothing, and they become top shoots as they grow up and form an even canopy.
I don’t like to weave, it can damage the new shoots and cause growth problems, but the goal is to get as even a coverage as you can while allowing for plant growth in all directions.
Once complete, I will give the girls about a week to recover and grow those new shoots. I like to have about 80% coverage of the screen, before I change my light cycles to flower 12/12… and if they are healthy and strong. I’ll decide this weekend if it is time ❤️👊🇨🇦😎 Happy Gardening!


Likes
12
Share


@SamDo
Follow
Hello,,, semaine 7 de croissance.
Juste un peu de défoliation sur les parties basses, j’ai enlevé les jeunes branches qui ne sont pas à la lumière pour que la plantes puissent se concentrer sur les partie hautes. Cela a aussi pour effet de refaire baisser l’humidité ambiante.
Je continue tranquillement le scrog pour obtenir une canopé bien homogène.
Voilà pour cette semaine.
Happy grow...😎

Likes
8
Share


@ButterfliesLittleFarm
Follow
Hello Diary,
We start with a new round. I am continuing with F1 strains since I am delighted with Medusa F1.
This time I will have three different strains on the "Farm" Apollo, Milky Way and Titan.
I will keep separate diary for each strain, and this one is intended for Milky Way F1.
First, here is some information about the strain itself.
MILKY WAY F1
As one of the first true cannabis F1 hybrids, Milky Way F1 is an autoflowering variety stemming from multiple inbred lines.
The result? Unparalleled uniformity, impressive resistance to disease, great productivity, and flavors and effects that will inspire you to sow these seeds again and again.
Milky Way F1 arrived in the cosmos after breeders crossed several highly inbred genetic lines that share a heritage with Blue Mammoth, Blue Dream, and Sin Tra Bajo Auto.
Milky Way F1's parent varieties passed down a complex mix of terpenes, including myrcene, farnesene, caryophyllene, pinene, and limonene.
Together, these aromatic molecules converge to create dank aromas and flavors of metallic Skunk and citrus.
As a result, Milky Way F1 holds the title of the most aromatic cultivar in our F1 range.
As far as effects go, this F1 hybrid will catapult you into orbit with high levels of THC. Expect a warm and fuzzy body high perfect for the evenings.
Trace levels of CBG and soothing terpenes will help curb the peak of the high to keep things chill.
Flowering time - 42-45 days
SET-UP ON MY LITTLE FARM:
Box - Secret Jardin DS120W 120x60x178
Lights - MIGRO 200+
Ventilation - TT Silent-M 100
Filter - Primaklima filter PK 100/125
Fan - Oscillating Koala Fan X 2
Humidifier - Beurer LB 45
Soil - BioBizz Light - Mix
Pot - 11L Air pots
Seed - Royal Queen Seeds
Nutrition - RQS Organic nutrition
I can now officially start the journal.
20/04/2023
Planting plants. As usual, I prepare everything I need for planting in advance.
I still use Air-pots because they are really great.
For the soil, I used BioBizz - Light Mix, which I filled 2/3 of the container and then added the Organic booster in pellets, Mycorrhiza and Rhizobacter.
I mixed everything together well with the soil and filled the container to the top.
I soaked the earth well with 2 liters of water, made a small hole, put the seed and lightly covered it with earth.
The conditions on the Farm are satisfactory, the temperature is around 25 degrees while the humidity is around 50%.
I think that after sprouting I will put a humidifier to increase the humidity.
23/04/2023
I sprinkled some water on the surface of the earth to let them know where they should go.
24/04/2023
Milky Way F1 sprouted like her other two roommates.
26/04/2023
First watering. I regulated the p.H. of water at 6.0 and watered the plant with maybe 0.5 liters of water.
That's all for this week, see you soon.


Likes
25
Share


@herewegrow
Follow
Ordered a scale the other day so should have some more numbers tomorrow! Not going to sample anything until I get the scale, then I'll update with some more details.

Likes
18
Share


@TheoRehtisch
Follow
Week 2 – Rapid Growth and Key Adjustments
Another Friday, another update! It’s been an exciting week in the grow tent, and the plants are showing some serious progress. They've nearly doubled in height and are now spreading out to fill the pots, making it clear that these FastBuds seeds really live up to their name. After seeing how quickly they’ve grown, it’s easy to understand where the "fast" comes from!
-------------------------------------------------------------------------
Key Growing Parameters
-Humidity: 70%
-VPD: Max 1.0
-Airflow: Always active at level 1, auto-adjusts when needed
-Day Temperature: 25-26°C
-Night Temperature: 22°C
-Light Cycle: 18 hours light / 6 hours dark
-Lamp: IONBOARD S24 from AC Infinity (240W)
-Watering Schedule:
-Day 8: 100ml
-Day 10: 300ml
-Day 12: 500ml
-------------------------------------------------------------------------
Adjusting the Light Distance
Early in the week, I noticed two of the leaves were showing slight stress due to being too close to the light. The leaves were slightly deformed, and it was clear they weren’t happy with the intense light exposure. After adjusting the light distance to a safer height, the plants began to recover. However, while the stressed leaves improved gradually throughout the week, they’ve retained some of those early deformations. Thankfully, every leaf that grew after that has been perfectly healthy and vibrant, which confirmed that the issue was indeed the light being too close.
-------------------------------------------------------------------------
Observing the Rapid Growth
The early days were exciting as the plants seemed to grow rapidly, but at first, they felt fragile, with their thin, delicate stems struggling to hold up the weight of the new leaves. It almost seemed like they might topple over at any moment. However, by the end of Week 2, they’ve transformed into sturdy, small trees. Their once fragile stems are now solid little trunks, and it’s amazing to see how much stronger they appear.
Not only have the stems thickened, but the plants have also developed an abundance of leaves. In just a few days, they’ve gone from having four small leaves to over ten broad, healthy leaves per plant. It's incredible to witness how quickly they’re packing on foliage. Every day, it seems like there’s something new happening – more leaves, more structure, and a visibly stronger plant.
-------------------------------------------------------------------------
No Noticeable Difference Between Strains (Yet!)
Interestingly, as of now, I can’t see any major differences between the three Amnesia Zkittlez and the single Gorilla Cookies plant. As a beginner, they’re growing at a similar rate and look so alike that if I hadn’t labeled them, I wouldn’t be able to tell them apart! Luckily, everything is organized and clearly marked, so when the differences do start to show, I’ll be ready to observe them.
-------------------------------------------------------------------------
Watering Progress
By Day 10, the plants were continuing to thrive, so I increased the water intake to 300ml per plant. The plants adapted well, showing no signs of overwatering or nutrient deficiency. Two days later, on Day 12, I upped the watering amount again to 500ml per plant. Even with this larger amount of water, the plants have been absorbing it perfectly. There’s been no excess water draining from the pots, which is a great sign. The soil remains slightly moist underneath, indicating that the roots are successfully drawing water from deeper layers.
Now, on Friday evening, it’s been 48 hours since the last watering, and the soil is still holding moisture. It looks like I can wait until tomorrow (Day 15) to water again. The soil is still slightly moist at the bottom of the pots, showing that the roots are reaching deep enough to access the water. The plants themselves look strong and healthy, so everything seems to be on track!
-------------------------------------------------------------------------
PH Levels and Future Fertilization
Until now, I’ve been relying on the pH readings from our local water provider, trusting their reports to guide me. However, to ensure I have more precise control over the growing conditions, I’ve invested in a BlueLab pH pen. This will allow me to accurately measure the pH of the water myself and make sure everything is perfectly dialed in for the plants.
Even though I initially planned not to use any fertilizers, I’ve decided to start using nutrients next week. I’ll be following the Biobizz feeding schedule, incorporating BioGrow, BioBloom, and TopMax into my routine. This decision came after observing how fast the plants are growing and realizing that they could benefit from a nutrient boost to ensure continued healthy development.
-------------------------------------------------------------------------
Optimizing With AC Infinity and Looking Ahead
Throughout the week, I’ve been relying heavily on the automated settings from the AC Infinity App, which has been a lifesaver for someone like me who’s still learning the ropes. Other than reducing the air intake and airflow to keep the humidity high at this early stage, I haven’t had to manually adjust much. The system has been doing a great job maintaining the environment, with 70% humidity, a VPD under 1.0, and consistent temperatures between 25-26°C during the day and 22°C at night.
There’s still a lot to learn, and I’ve heard from other growers that AutoFlowers can handle 24 hours of light or even 20/4, but for now, I’m sticking with the more traditional 18/6 light schedule recommended by AC Infinity. I’ll keep observing and might experiment with different light cycles in the future.
As I move forward into Week 3, I’m eager to see how the plants will continue to grow and evolve. With each passing day, I’m learning more about their needs and how to fine-tune the environment to keep them happy. So far, they’ve been thriving, and I can’t wait to see what’s next on this journey. FastBuds certainly lives up to the name, and if the first two weeks are any indicator, I’m in for an exciting ride!
-------------------------------------------------------------------------
Personal Reflections
Looking back, I’m honestly surprised at how quickly I’ve become immersed in this process. What started as a curiosity has quickly turned into a rewarding experience. Every day I learn something new, whether it’s adjusting light distances, managing water intake, or monitoring humidity levels. There’s something incredibly satisfying about seeing the results of your efforts in real time – from those first fragile sprouts to the sturdy plants I have now.
As a complete beginner, I was unsure how well I’d manage everything, but seeing the plants thrive has given me a lot of confidence. I realize that growing is just as much about patience as it is about action. I’m looking forward to what’s ahead, but I’m already enjoying the journey. For anyone starting out, it’s all about learning and adapting – and, most importantly, enjoying the process!


Likes
199
Share


@CRiSPrGrow
Follow
Do you see that SWAMPMONSTER in the corner of the tent there ?? The Queen towers above the canopy and the rest of the plants lol. It's really interesting from using the Smart Proteins, i think how they work is that the plant is able to process them and compensate any kind of slight deficiency which means that each plant that gets the proteins is able to grow to it's maximum potential and at the same time grow to its **individual** potential... that's why each of these plants has so much "character", because if you look closely it's less a question of phenotype but more like "individual expression".... INTERESTING !!! Anyway that's about the visual... my main concern about these is how loud they f-ing smell !!! ITS PROBLEMATIC, so be conscious of that if you plant to grow these one day ! REALLY REALLY LOUD, honestly there should be an additional category on GD like "problematic" which is beyond the "strong smell" category. I have two large carbon filters on two 1330m3/h fans and it's a problem. Hope you understand how unusual that is for a plant in veg lol... I think the smart protein probably affects how strong the plants smell because all the plants seem more smelly than expected... TBH i'll fix the smell issue but hopefully it's a good sign and an indicator of the quality i can expect by harvest time? These also got two rounds of defoliation , and i flipped them to flower like 4 days ago. This was an exciting veg to me, but now is when it gets interesting, let's see how beautiful these flowers are !! Test genetics always have that little bit of mystery to them right? By the way, I'm often visiting this site, so drop me a message about whatever, especially if you have advice ! Thanks for following along with me, i appreciate it really ! ITS FLOWER TIME FOLKS LETS SEE! 🚀
Likes
44
Share


@Chedderbob112
Follow
Waiting on a full plant hang dry so will wait at least two weeks maybe three hope ma vegging station holds up n can dae tge damage the now as av said guys this is definitely not the perfect set up am not on good terms with land lord so basically squatting here lol and growing and a got caught with one in this house the land lord doesn’t even know lol 😂


Likes
23
Share


@lemonairlines
Follow
I finally cut my plant and she is drying in dark .I think it will take at least a week but its okey . It's been a great grow, I'm very curious about the numbers.
Processing
Likes
9
Share


@JerMeds
Follow
Added side lighting on day 10, 2X30 true watt thin led panels.
So now I got 2x100 watt, 1x70 watt and 2X30 watt LED lights for a total of 330 true LED watts. Its very bright.
I introduced them too a very light feed solution yesterday when they woke up. They seemed too perk up right after.
I have been working on trying to get a time lapse working. I have been testing it and trying to get the bugs worked out.
Maybe next week I will have some time lapse footage for you all...Maybe.

Likes
Comments
Share

@Hanfjack
Follow
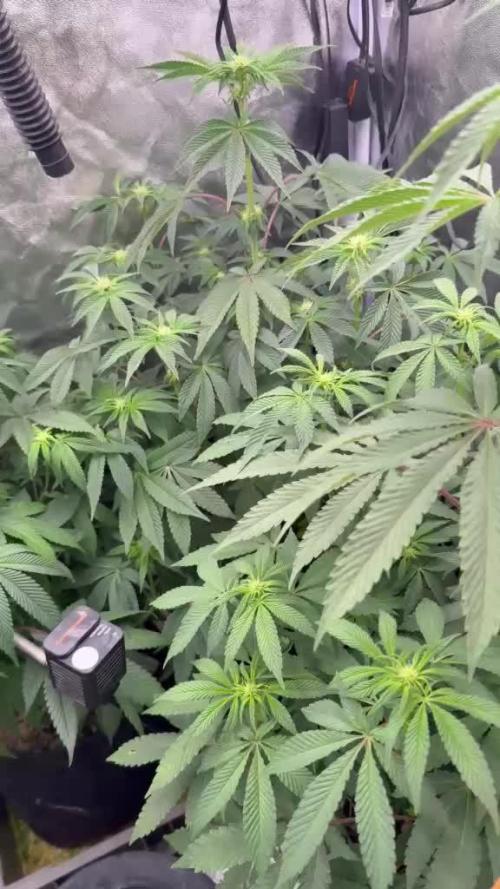
We are now in flower about the first week now. Dried Fruit is the smallest out of 3 plants. But she will have power...

Likes
13
Share


@CURATI_DA_SOLO
Follow
Questa settimana come è andata? Hehehehe è andata a meraviglia!!! LEI E SEMPLICEMENTE PERFETTA!!! cresce sempre di più le cime si ammassano e diventano sempre più dure! I colori sono stupendi e il profumo di limone mi ha invaso la villa!!! La struttura della pianta e veramente robusta ovviamente dopo un lst molto scrupoloso! Veramente una grande bella signora! Rimango sempre meravigliato con i semi di fast buds, veramente secondo me e la più valida di tutti! Ho visto i tricomi con il mio lumagny 100x e sono ancora bianco/trasparenti e si ammassano sempre di più! Deduco altre 2-3 settimane penso di fare un ultima settimana di nutrimenti e poi via con il flush! Laverò le radici per almeno 10 giorni, voglio un fumo morbido e deciso! Ringrazio voi per essere qui a vedere i miei lavori e ringrazio i ragazzi di FAST BUDS per avermi dato l'opportunità di coltivare le loro genetiche!!! Un bacio a tutti voi! 💪🏼🌈🌱
Likes
2
Share


@CannaIGrow
Follow
Trop Cherry #8 x BeeJayz hasn’t been topped, I transplanted the girls this week from a 1 gallon pot to a 3 gallon pot. Trop Cherry was in a plastic pot but now in a fabric pot. Plants seem to be growing well.
Likes
2
Share

@DerEkstaseHase
Follow
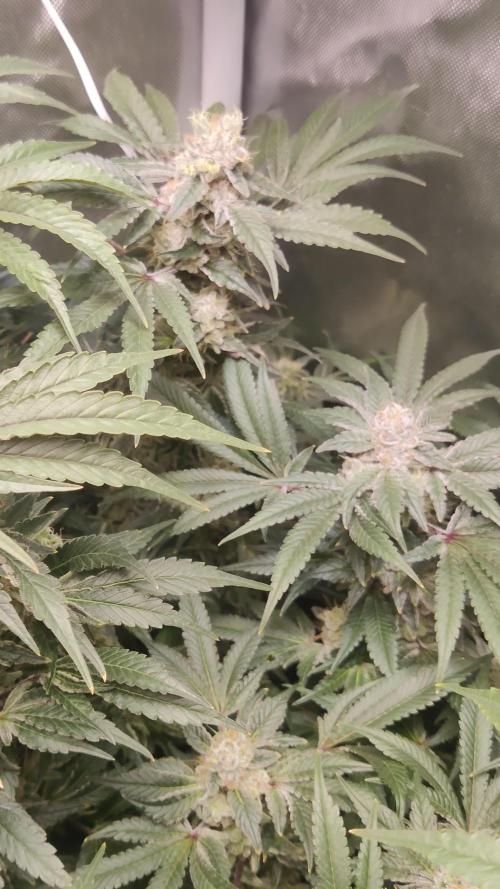
Foxtailing - temp. 26-27°C
Due to some watering issues last week we got some salt buildup.
Drain Ph has risen to 6.6 and Ec peaked at 2.9 mS/cm
This week I gave the plants more water and checked drain frequently. It went back down to 1.8 and Ph came down to 6.3.

Likes
43
Share


@TheCannaProphet
Follow
~ GG4 SHERBET FAST FLOWER by FastBuds ~
Well fam, here we go again with another epic strain from FastBuds Fast Flowering stable. After having such tremendous success growing their Gorilla Cookies Fast Flower outdoors last year, I've decided to run another of their fast flowering strains outdoors this year... GG4 Sherbet Fast Flower!
The best description of this awesome cultivar comes directly from my friends at FastBuds which is as follows:
"Bred from extremely potent and flavorful Gorilla Glue and Orange Sherbet genetics, GG4 Sherbet FF (Fast-Flowering) takes all the best traits to the next level, offering a high-yielding strain that can produce up to 600 g/m2 in a 7-week flowering time. This super resilient Indica-leaning hybrid thrives indoors and outdoors, and in all types of climates while producing mouth-watering sweet, fruity, spicy and earthy terps that translate into a delicious sugary hazelnut aroma. Expect an extremely relaxing and overall happy effect that’ll leave you with a huge smile from ear to ear. It’s the perfect strain for growers of all levels of experience seeking low-maintenance yet highly productive photoperiod varieties that deliver quality and quantity without extra effort.
GG4 Sherbet FF grows chunky buds with long dark orange hairs and spade-shaped calyxes that get encrusted with trichomes by harvest time, giving them a gorgeous silvery-white appearance. This medium-sized photoperiod can reach up to 200 cm in height and yields up to 650 g/m2 while developing that typical hybrid structure. GG4 Sherbet FF grows with a stocky, bushy appearance, developing one sturdy main cola and fat side branches that support huge yields without much effort. This super-fast variety produces distinctive light-green buds with a high bud-to-leaf ratio, making your trimming sessions a breeze. It’s a top-notch resin producer that doesn’t need much maintenance and will thrive in almost every climate, rewarding growers of all levels with extremely flavorful resin that makes for outstanding hash end extracts."
________________________________________________________________________________________________________________________________________________________________________________________________________________________________________________________________________________________________________________________
The Setup:
This is going to be an outdoor grow, but I have started the GG4 Sherbet Fast Flower indoors as our weather is still too cold to put her outside (nighttime temp's dipping regularly into the 30's℉).
The plan is simple... let her grow inside under a 19/5 light schedule until the nighttime temperatures stay above the mid 40's℉, at which point she'll be moved outside and transplanted into the soil which I have already setup and inoculated with beneficial microbes, and then let the fun begin!🤪💚
________________________________________________________________________________________________________________________________________________________________________________________________________________________________________________________________________________________________________________________
Weekly Updates:
4/11- Here we go into the second week of life for my FastBuds GG4 Sherbet Fast Flower and she's doing really well!
All I'm doing right now is making sure that her medium remains moist, watering only when necessary. I'm checking her root development daily and she will be ready to transplant outdoors any day now!
4/13- Today is TRANSPLANT DAY! I moved the GG4 Sherbet outside to her prearranged 'new home' which I had previously prepped by adding some Coco/Perlite into the soil to improve the texture and drainage. I then pre-amended the soil with Gaia Green 4-4-4 All Purpose slow release dry amendment along with 3g of Wiggle Worm castings, 2 cups of ground Alfalfa and 1/4 cup of Extreme Gardening's MYCOS. After which, I kept the soil moist to allow the microbial colony to populate for a week.
To transplant, I first made a hole then placed a Solo cup in it to make sure that the depth was adequate, then packed the medium up against the cup firmly which leaves a nice Solo cup shaped hole in the ground. I then wet the inside of the hole that I formed and coated the hole with Extreme Gardening's MYCOS root enhancer, after which I removed the GG4 Sherbet from her Solo cup and placed her snugly into her new home! After planting her in the ground all that was left to do was lightly water her in... Let the fun begin!🤪
4/15- The GG4 Sherbet FF from FastBuds is doing extremely well in her new environment. To be quite honest I was slightly hesitant to place her outside this early as we are only getting approximately 13 or so hours of sunlight daily. Based on my experience last year growing a Gorilla Cookies FF, which was placed outside at a similar time and did extremely well, I went ahead with the transplant, confident that she would be just fine.
4/17- I'm watering around every 2-3 days right now using water straight from my well through a garden hose... super simple! I do not worry about PH as long as the water isn't chlorinated and is good enough for me to drink, it's good enough for my plants and the microbial colony in the soil will adjust the PH to where they need it and at the same time provide the nutrients that the plant requires... again, nice and simple.
Well there goes two weeks for this little lady. The next coming weeks should see an increase in size and vigor as long as the weather cooperates... fingers crossed!🤞
Thank you for checking out my diary, your positive comments and support make it all worthwhile! 💚Growers Love!💚😎🙏
Processing
Likes
2
Share


@Pauwela
Follow
9/2 Sunday, Flowers appearing everywhere, 9,6 trimmed solar leaves 3rd time 47 days old

Likes
4
Share


@BirthdayBoy
Follow
This is about when the last grow died, so i m doing better than ever
I plan to keep flowering for a few weeks until i get nice big buds
