
Likes
Comments
Share


@ChitownCannaChica
Follow
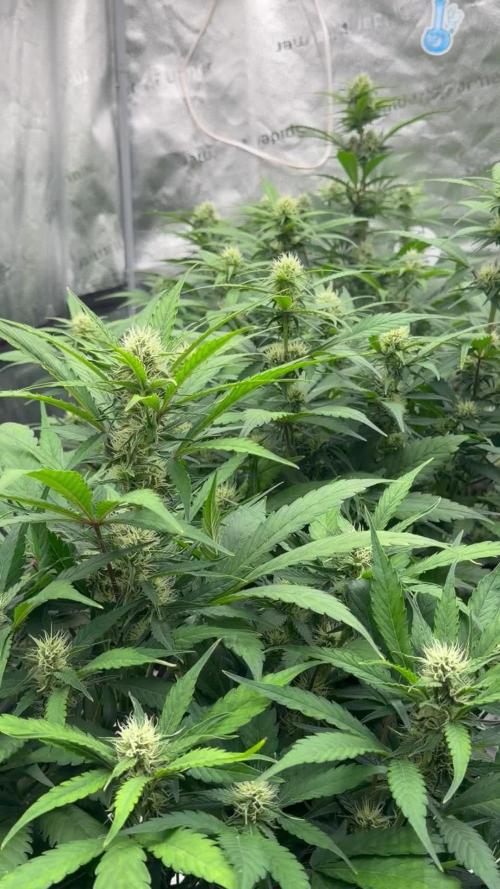
Whoa!!! She took off like a rocket from the end of the first week to the end of the second week of veg! She likes the rain and crazy weather!!! ✌️🏻💚🌿💨

Likes
1
Share


@RichworldGardenz
Follow
The girls are fading good might chop either tonight or maybe a couple of more days got to pull out the microscope 🔬

Likes
13
Share


@Terp_Djiny
Follow
Today i flip the light. 12/12 for the bloom.
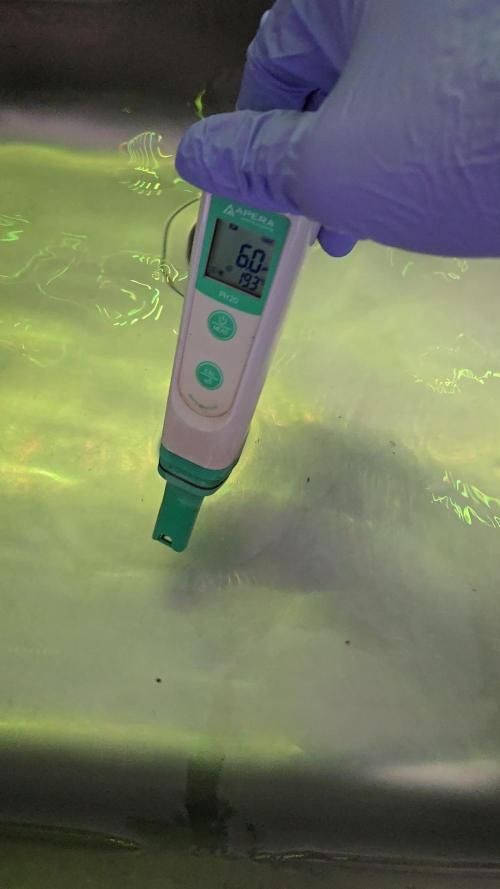
The bright appearance of the leaves and the slightly reddened stems indicate a nutrient deficit. In this case I would say nitrogen. But I have exaggerated a bit with my fertilizer use. Accordingly, I flushed the plants today. The measured pH was 4.8. I think I slightly salted the floor. Let's see if they recover.
Day 73: On the detail photo you can see very well how the stem turns slightly reddish and the stems on the leaves as well.
Day 74: The plants look better than a few days ago. They are now growing visibly from day to day. Timely flushing saved a lot, I hope.
Day 77: Last day of the first week of flower. It was a strange week. But they still grow.

Likes
18
Share


@ButterfliesLittleFarm
Follow
Hello Diary.
The second week of flowering is behind me. I did a little defoliation this week, I honestly didn’t dare remove more leaves and branches, I didn’t know how they would react to it. Maybe I needed more?
The temperature is still high, sometimes rising to 29, 30 degrees, but mostly around 28. Humidity in the air is an average of about 55% but sometimes rises to 60%. The problem is frequent rains this summer which creates high humidity in the air and this affects the humidity in the box as well. But plants tolerate these conditions very well.
The flowers are developing nicely, and they have started to smell as well, but let the pictures speak for themselves.
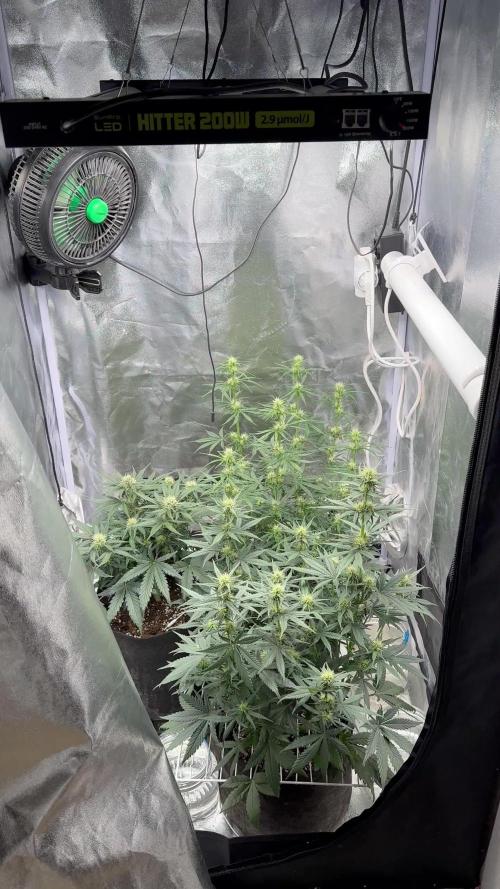
Green Gelato is twice as small compared to her roommates, but there is still a big crowd in the box. Gelato grew with very dense branches and spread more than it grew in height. The 120 x 60 box size is perhaps too small for three plants (two Hulkberries and one Green Gelato), so the real jungle is in the box.
Due to the height of the Hulkberry in the box, and the spreading branches, it has become difficult to take them out every week for photography, but I am extremely careful with them.
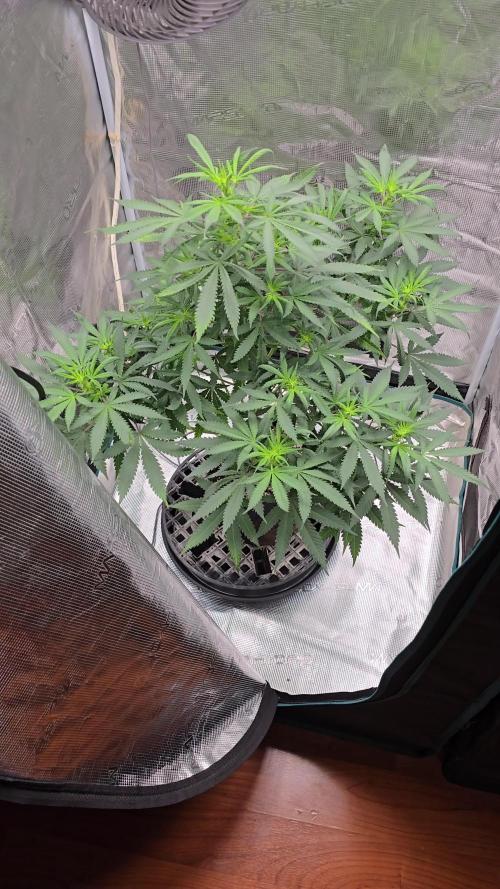
The Green Gelato has grown to 48 cm and does not look like it will grow much in height. Probably due to the excessive distance from the light, which I had to raise because of the Hulkberry which reached a height of 1m.
18/07/2020. - Day 30.
Defoliation. I removed the leaves at the very bottom of the plant to make it easier for me to water them, after that I watered the plants but this time I didn’t put BioBizz, I just watered them with clean water.
21/07/2020. - Day 33.
Watering. This time I gave them BioBizz, on schedule for the second week of flowering. I also added CalMag 1.5ml / L, preventively. While they don’t show they’re missing anything, I’ll keep adding CalMag.
23/07/2020. - Day 35.
Photography and height measurement.
Green Gelato Auto - Day 35. - 48cm
That’s all for this week, see you soon.

Likes
Comments
Share


@Growedbypepper
Follow
La planta se nota muy bonita y con cogollos grandes de característica esponjosa, sin mucho que decir presenta una presencia aunque muy poca de oidio
Likes
56
Share


@nonick123
Follow
Día 22 (11/11) Las plantas muestran pequeños puntos / zonas marrones pero... Don't panic! It's Organic!
Dejaré que el proceso del Super Soil de BioTabs siga su camino tal y como indica el manual de BioTabs!
Ajusto LST a CBD Auto 20:1 #2 aplicando una nueva atadura a la punta, que ya se estiraba hacia arriba 24 horas después! 💥😍
La idea es NO aplicar más LST y dejarla que crezca de forma natural a partir de ahora
Tal vez solo ir recolocando las ramas laterales para que no crezcan demasiado juntas, porque no quiero estresarla y que ralentice su crecimiento...
Día 23 (12/11) Subo a DLI 40
Pequeños ajustes de LST en las ramas laterales a CBD Auto 20:1 #2 para crear una estructura homogenea
No voy a volver a aplicar LST a la punta, voy a dejar que crezca de forma "natural" a partir de ahora
El resto de plantas están creciendo muy bien!
Riego con 750 ml H2O RO a CBD Auto 20:1 #2. El resto no necesitan riego
Día 24 (13/11) Riego todas las plantas con 750 ml H2O RO
CBD Auto 20:1 #2 se muestra sedienta y vuelve a necesitar 750 ml de H20 RO tras solo 24 horas desde el último riego!
Día 25 (14/11) Pequeños ajustes de LST en CBD Auto 20:1 #2
Parece que los puntos / zonas marrones se aceleran en todas las plantas excepto en CBD Auto 20:1 #1...
Día 26 (15/11) LSD-25 Auto & OG Kush Auto empiezan a mostrar muchas zonas marrones y las hojas inferiores se empiezan a retorcer...
Día 27 (16/11) Riego con 1 litro de H2O RO
El area técnica de BioTabs me confirma que lo que muestra las plantas es una quema de nutrientes... 😢
Su recomendación es regar SÓLO con agua la siguiente semana (hasta el día 35 por lo menos)
Día 28 (17/11) LSD-25 Auto & OG Kush Auto se muestran muy afectadas por la quema de nutrientes... Una pena porque estaban creciendo muy bien hasta ahora...
Después de hablar con BioTabs, parece que el error ha sido aplicar el Boom Boom Spray demasiado temprano (en día 21) cuando las plantas tenían suficiente nutrientes y acababa de añadir la 2ª (y ultima) Tab al sustrato...
Tengo que seguir aprendiendo que con el SuperSoil: MENOS ES MÁS, MENOS ES MÁS!
A seguir regando SOLO con agua los próximos días...
CBD Auto 20:1 #2 todavia no muestra el sexo (pre-flores)... es algo extraño...
💦Nutrients by Bio Tabs - www.biotabs.nl/en/
🌱Substrate PRO-MIX HP BACILLUS + MYCORRHIZAE - www.pthorticulture.com/en-us/products/pro-mix-hp-biofungicide-plus-mycorrhizae
"GDBT420" 15% DISCOUNT code for the BIOTABS Webshop https://biotabs.nl/en/shop/

Likes
16
Share

@BushDoctor740
Follow
Frostbangers are doing really well as the buds are thickening up she smells so good.They are starting to produce some heavy trichomes.I have begun to add 2ml Plagron green sensation every feeding now.The light intensity is set at 70 percent on the Se7000 which they are taking well.
Likes
7
Share


@semechkin
Follow
On the 5-6 day of the sprout, I gave a small illumination with philips UV lamps - a mini solarium for the face (140w like), literally 5-7 minutes no more
Likes
14
Share


@FourVentiFarms
Follow
pics from 20th and 22nd October
26th for lemon
It's the second year ever for me, and I talked to some people because I still get 8g per plant, and it's because of the mainlining and toppings I do at wrong times, and also because an outdoor plant doesn't always get the perfect sunlight and energy to repair itself enough. so the stress might be it.
next year I'll try bending the main stem and never doing topping
Likes
28
Share


@Dingle_Dangle
Follow
[First time on this diary? => Read "GERMINATION" tab to understand what I'm doing ]
03/01/2022 - Day 91 - First day of the 15th week.
Yoooo, anyone here?
We back after one month of silence!
Yes, she's still alive, very slowly but she's fighting cold and doing her stuff 🔥
Happy new year everyone!
Wish me good luck and let's hope in sunny mild days 🤞☀️
- DD


Likes
5
Share

@Growfather1
Follow
Hello everyone,
This week i decided to remove the peyote cookies from the dwc system because the roots kept dying and so i decided to translate her to coco soil.
I will start again after the summer with 2 dwc buckets for now i gonna continue with one, yesterday i changed the air pump to a stronger version because the spider farmer pump is way to loud and weak with the airflow.
The amnesia fast bounced back but i see the roots showing a brown color again i hope after the air pump change this will stop i will also stop adding canna rhizotonic to the water to make sure only minerals are in the water.
For the peyote cookies i gonna start a new diary.
Tomorrow i will update my other diary that grow is doing great.
Thanks for stopping by and have a nice week.


Likes
58
Share


@brownbae420
Follow
Day 95
— Currently waiting for Milk to turn Amber
— Vibe: 💪
Day 97
— Trying not to view these endlessly
— I'm ready to chop the plan on the right, She's not ready to be chopped yet...
— Vibe: 😴💤
Weekly Avg Readings
— Lights 12/12 - Level 10
— Temp: 70 (ideal) | 72.8 (avg)
— Humidity: 60% | 62.0%
— VPD: 1.2 | 1.02 kPa
"They hear the hunger in my voice, shit I went broke twice. 4,000 lights at a real low price." —Berner415


Likes
9
Share


@TrialAndErrorGrows
Follow
Ok week 5 veg. I usually just let the plants grow through the trellis net.
This time I tried a little bit of everything. I did a fairly big trim on leaves. I tied down branches with twist ties and then lowered the trellis net overtop. I may have gone a little overboard. But looking at other peoples diary’s I am seeing a lot of techniques being used so I will giver a shot. Trial and error.
**Update**
Plants growing up through trellis nicely. After tie down and trim.

Likes
29
Share

@Hempface86
Follow
Well, this is not an auto that is for sure... I have her on 12 on 12 off and that has sugar flower.. hopefully, everything works out considering how small the pot is.I don't think she was ever meant to get this big.. But i've also had pretty big plants in one gallon containers.. everybody on here uses five gallon seven gallon.Some even ten gallon... Dirt to weed ratio, if I use the ten gallon theoretically, I should be able to grow atleast at 4 pound plant 🤣 as I average a quarter pound per one gallon .. anyway, I don't know what's going on with this. I'm hoping it's purple haze.. i'm hoping it didn't get swapped around.Somehow with some bs strain . Time will tell .. hope all is well... God bless and happy growing everyone ✌️
Likes
8
Share


@JamaicanDream_420
Follow
De momento hubo dos que germinaron mal y seran repuestas por otra Gorilla cookies y la otra por una cream caramel auto,fallo tambien una northern,por lo demas todo bien,segundo riego desde germinacion con poquito de calmax y gooooo..Segundo riego de la semana a 50ml x planta aplicando algun nutriente pero sin subir mucho la Ec a 0.69,hasta la proxima semana budyyes

Likes
39
Share


@wheedtobeus420
Follow
Day 54. She’s huge and just wow that hubbabubba is coming along just like she always does 😂😂😂

Processing
Likes
8
Share


@RunWithIt
Follow
Seemingly overnight, the A.K. plant overcame Sour Ripper in growth! Been a fun week as far as the plants go, havent needed to water them at all. Ill take a peak into the tent occasionally, witnessed the growth pick up exponentially this week. I noticed the pots are getting pretty light when i was taking these pictures. Will likely water them tomorrow.
Notes for those interested: My last grow was RUINED from consistently overwatering and NEVER checking pH of feed water. Everything that could have went wrong as a result, did go wrong. Murphy's Law eh? Just trying to see to it that doesnt happen again.
For those interested in the DWC girls, their growth has been nothing less than great 👍. It was less than two weeks ago that i went to the local hydro shop to pick up some hydroguard and damn! Is that shit good or what?! Root rot has been stripped away in almost ALL of my DWC girls, tons of white, happy root growth in their place.
Ive decided that i will flip them all either halfway through this week or monday of next.
Going to mother both A.K. and S.R. 2-3 weeks into flower transition.
Again, great job @RipperSeeds and @Nirvana, really loving this stuff.


Likes
128
Share


@Tropicannibis_Todd
Follow
💩Holy Crap We Are Back At It And Loving It💩
Growmies we are at DAY 35 and she's just killing💀it👌
👉Added straws within the Tiny pot to help watering in week 4 👈
So I'm starting to see she needs watering every single day and now need nutrients 🙃
Lights being readjusted and chart updated .........👍rain water to be used entire growth👈
👉I used NutriNPK for nutrients for my grows and welcome anyone to give them a try .👈
👉 www.nutrinpk.com 👈
NutriNPK Cal MAG 14-0-14
NutriNPK Grow 28-14-14
NutriNPK Bloom 8-20-30
NutriNPK Bloom Booster 0-52-34
I GOT MULTIPLE DIARIES ON THE GO 😱 please check them out 😎
👉THANKS FOR TAKING THE TIME TO GO OVER MY DIARIES 👈

