


Likes
Comments
Share


@Miguels_Fuego
Follow
Will be flushing this week and hopefully harvesting next week. Looking good, strong trichomes production and smell is incredible for both.

Likes
13
Share


@Limelight
Follow
This week completes the first week of flower for unknown. Stretched a little bit and I assume there will be more so, I’m continuing to weave her through the net for middle and final stretch. This also starts a new 3 week nute feed (thanks to dr earth 👏👏) so honestly I’m just continuing to lower humidity and slow rolling it.
The wwa however is coming along quite well I might say. The main issue if any at all has been low ph and I’ve been watering with higher ph to correct that but, she’s been stretching and doing her own thing. Really wish I would’ve waited to see her full potential under better lighting and time but, this is a first grow (also excuse 😏) and I’m honestly more excited to get the first grow under the belt, rather than maximum yield (though max would be nice 😎) hopefully next time… Thanks for stopping by this week ✌️.
Likes
19
Share


@GoldenWeedGrower
Follow
I'm not sure why, but I don't like the way she's growing :(
I supposed that my plant problem is the over watering. So no I inserted an air pipe directly in the rockwool cube to give more oxygen to the roots and let they get more nutrients.
👍👍👍👍👍👍👍👍👍👍👍👍👍👍👍👍👍👍
Lesson Learned:
IN THE NEXT SET UP ADD A STONE WITH AIR PUMP DIRECTLY IN THE BASKET
👍👍👍👍👍👍👍👍👍👍👍👍👍👍👍👍👍👍
I will leave the pipe all night and see how the plant will look tomorrow.
Cross fingers.

Likes
15
Share


@TheCannaProphet
Follow
~ FASTBUDS TESTER #2201 ~
Well friends, here we go on another 'canna-venture' together!
The grow room has had a complete remodel and some upgrades done to it including brand spanking new 4x8 and 4x4 tents and a Trolmaster Hydro X controller along with a new Control Panel.
This tester strain is one of six tester strains that FastBuds has graciously provided me with and I'm looking forward to seeing what this girl has to offer when she's grown to her full potential!
One drawback of 'testers' is I have little to no information on it other than its number and that it's an autoflower... 🤪 But, it's ALWAYS a blast growing them for me because not knowing a lot allows me to just concentrate on the essentials: Light, Environment, Water, Nutrients and possibly a bit of LST... not complicated, just basics like keeping a constant temperature and RH in the tent at a level that gives a good VPD, watering when almost dry and maintaining proper light levels according to their stage of growth.
____________________________________________________________________________________________________________________________________________________________________________________________________________________________________________________________________________________________________________________________________________________________________________________________________________________________________________________
~THE SETUP~
~Initially seeds were lightly scuffed, then soaked for 3 hours in 78℉ distilled water after which they were transferred to moist paper towels laid out in a Jiffy Pellet plastic starter tray with lid. Underneath the tray was placed a Mars Hydro Heat Mat with Controller that was set to 78℉ where they stayed until their tap roots emerged.
~Planted into Jiffy Peat Pellets that were hydrated with distilled water warmed to 78℉ with a 7.0 ph.
~Once roots emerge from the Jiffy Pellet they're transferred to their fabric pots.
~Grown 100% organic in a 4g Gronest fabric pot and a 3g fabric pot by Wraxly filled with Mother Earth 70/30 Coco/Perlite medium and initially amended with Dr. Earth 4-4-4 / Earthworm Castings / Dr. Earth Flower Girl 3-9-4 and Coast of Maine Stonington Blend Organic Plant Food 5-2-4.
~19/5 light cycle for the entire run with supplemental UVA added during flower. Lights are controlled by a Trolmaster Hydro X controller set for a 15min Sunrise/Sunset simulation.
~Top dressing every 3-4 weeks with slow release dry amendments and Earthworm castings.
~Straight water ph'd @ 6.2-6.8 when needed and bi-weekly Compost Tea's.
____________________________________________________________________________________________________________________________________________________________________________________________________________________________________________________________________________________________________________________________________________________________________________________________________________________________________________________
Weekly Updates:
12/1- I soaked both seeds for 3 hours in 78℉ distilled water after which they were transferred to moist paper towels laid out in a Jiffy Pellet plastic starter tray with lid. Underneath the tray was placed a Vivosun Heat Mat with Controller that was set to 78℉ where they stayed until their tap roots emerged roughly 24 hours later.
12/3- Today the tap root on one of the seeds was about 1/4 to 3/8" so at 11 am I transferred it into a Jiffy Peat Pellet that was hydrated with distilled water warmed to 78℉ with a 7.0 ph using a tine off of a plastic fork as a 'mini trowel' to make a hole in the pellet and to gently cover the tap root, leaving only the seed head slightly exposed. This method accomplishes most of the initial work the seed has to do by eliminating having to orientate itself, push it's root down and head up. By 10pm the #1 seed had her cotyledon leaves opened ...calling the #2 a 'fail to germinate' and I'm not going to soak another... We'll let it ride with just one of this tester. 😉👍
12/5- Well this is Day ONE for the #1 FBT #2201! I'll keep her in the covered/heated Jiffy tray until I see her roots beginning to emerge from the peat pellet, then I'll transfer her gently into her 4g Gronest fabric pot from FastBuds.
12/7- Yesterday I checked her, she had roots starting to emerge from her pellet so tomorrow I'll transfer her into her 4g Gronest pot.
😎💚 Thank you for checking out my passion in life! Please visit as often as you wish and I hope you enjoy this journey as much as I know I will! Grow Strong! 💪😎🤙


Likes
63
Share

@cangrowz
Follow
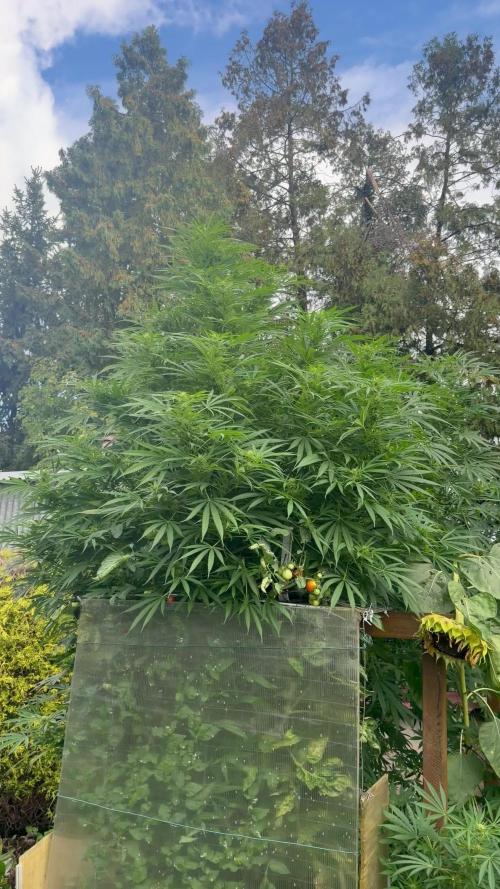
🍋🍇 Air Lemon x Shishkaberry – Mitte Woche 21 🍇🍋
Die Mitte der 21. Woche ist erreicht und im Outdoor-Projekt zeigt sich inzwischen sehr deutlich, dass wir uns langsam in der letzten großen Phase der Saison befinden. Die neuen Bilder vermitteln einen richtig starken Gesamteindruck. Die Pflanzen stehen weiterhin sehr vital und präsentieren sich mit einer beeindruckenden Größe und einer enormen Blattmasse. Gerade im direkten Vergleich zu den vergangenen Wochen wird deutlich, wie viel Entwicklung hier über die Saison zusammengekommen ist.
Die Pflanzen wirken insgesamt weiterhin kräftig und gut aufgebaut. Die Seitentriebe haben sich ordentlich entwickelt und das gesamte Wachstum ist sehr dicht und kompakt. Besonders schön ist zu sehen, wie sich die ersten deutlicheren Veränderungen durch die fortschreitende Jahreszeit bemerkbar machen. Der Sommer geht langsam vorbei und der Herbst übernimmt nach und nach das Kommando. Genau diese Übergangsphase sorgt draußen immer wieder für eine ganz besondere Atmosphäre.
Auch die Aufnahmen aus verschiedenen Perspektiven zeigen, wie gewaltig sich das Projekt inzwischen entwickelt hat. Zwischen den Aufnahmen aus der Nähe und den Gesamtbildern wird die Dimension der Pflanzen besonders deutlich. Die Blätter sehen überwiegend gesund aus und die Pflanzen machen trotz der bereits fortgeschrittenen Saison weiterhin einen stabilen Eindruck.
Jetzt beginnt definitiv die spannende Schlussphase des Outdoor-Projekts. Die nächsten Wochen werden zeigen, wie sich die Pflanzen unter den herbstlichen Bedingungen weiterentwickeln und wie sich die bereits vorhandenen Blüten noch verändern. Nach 21 Wochen Outdoor-Wachstum ist auf jeden Fall schon jetzt klar, dass dieses Projekt eine richtig starke Entwicklung hingelegt hat.
Ich bin mit dem bisherigen Verlauf weiterhin sehr zufrieden und freue mich darauf, die letzten Wochen dieser Saison gemeinsam mit euch zu dokumentieren. Die kommenden Updates werden mit Sicherheit noch einmal besonders interessant, denn draußen geht es jetzt langsam in Richtung Endspurt. 🌿?
Happy Growing Growmies 🌱?💚

Likes
10
Share


@Erickchz
Follow
Buds growing dense, this week I added 2 uvb-a lamps to help increase resin production.
Smell is also great, like sweet lemon tart.
Likes
21
Share


@Siriuz
Follow
Alright guys so here's to last week
My first time doing sweet seeds
And I must say it was really awesome
Yo, I ran my first Cream Mandarine XL from sweet seed and at the very beginning thought she was going to die, she was sad and having it rough but with lots of caring she came back to life and even better, this is also one of the longest autos and the tallest I've had with many colas, Im still learning so I should probably train them better in the long run once I get to run another one, well if you look into my profile at my grow diary I'm running gorilla XL right now and I'm training her little by little, more precisely I'm making sure she's getting plenty of light so we don't waste any single spot of energy once she's got to bloom!!
But hey we keep talking bout cream Mandarine XL and it's sad to say goodbye but it's also her time, she's got to the point of no return and we've got to take her out
Thanks a lot for everything pretty girl
You rock and I love sweet seeds
Thanks a lot for those good good smokes
Sweet smokes to all of you running them genetics also thanks a lot to the whole community who supported me in the whole process I do appreciate it
Also thanks again sweet seeds Apollo for your support letting me run your genetics and given the opportunity to show the world my farming level
Hopefully with the great people around I will become better :')
Alright now time to harvest this girl
Peace and love brothers
If you got any questions just shoot

Likes
13
Share


@rhajaed
Follow
Just took some clones from this beauty and we have about 4 weeks until i begin flower.Will increase nutrient dosage a little bit as i feel i could push them a bit more..
My feeding schedule is interchanged daily between nutrients and regular ph'd water as it is very hot and these pots dry out daily. The tap water in my area is about 250 ppms so i am working with that until i get an RO filter.. This is still my first grow so im taking it one step at a time.. all advice is welcomed and would be greatly appreciated .

Likes
35
Share


@Pietcandwcbucket
Follow
Ill be changing some more nutes later today (Liqui compost)pot4&6 . As well as more LST, HST. Pot1&3 T.A @ 600ppm 5.7ph and all doing very well after the bashing they took on friday.. Well time for some sleep.. 4AM

Likes
22
Share

@Michijardinero
Follow
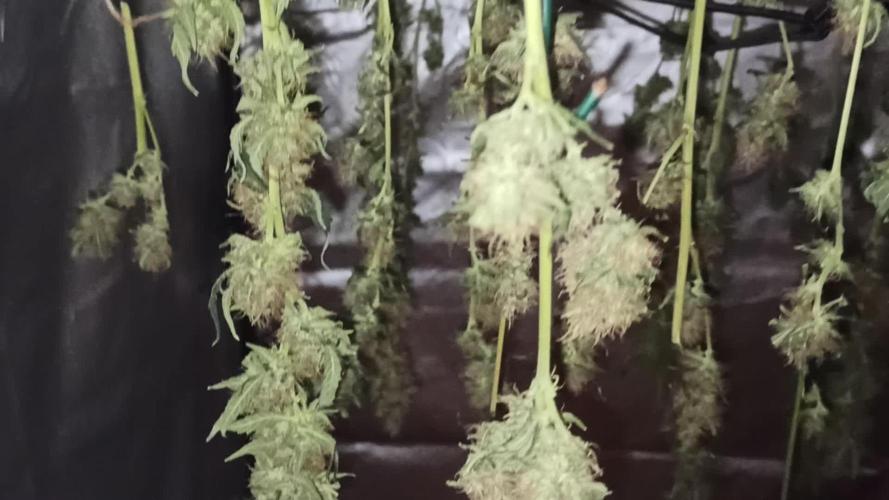
En el siguiente les mostraré cuanto quedó al final del secado y les diré que tal ha quedado la cosecha espero y estén así como se ven 😋😋😋muchas gracias por acompañarme con este cultivo los espero en el siguiente familia un abrazo
Buenos humos paz familia

Likes
27
Share


@RDWCGrowing
Follow
1/20/2023- So much to do pre grow and over the next 16 days, absolute first order of business is that I have to take down my current Grow---TIMBER-- Then I have a list of things I have to get done in order to be ready to start this grow 1 Feb.
With that said
T - 2 days until start 48 hour Flush
T - 2 days until Start 48 hours of Light
T - 4 days until TIMBER!!!
Items that need to be done before 1 Feb 2023
1. I need to clean the tent out
2. I need to clean the equipment- Proper Sanitization between grows in Hydro is a must!!!
3. I need to get the hole in the ceiling above my tent repaired- For my last grow I had a deep sink installed in my grow room, to make Hydroponics a little bit easier and have a water source in the same room. The seals on the pipes they were installing broke and leaked through the ceiling causing some damage all the way across my grow room, I was already weeks into my grow and couldn't risk them working above my tent and it would have been very awkward positon for them to be working in as well, so have to get this done quickly between chop and germination.
4. I have to install my new light- I was using a Vivosun 4000 and for this grow I am switching up to a Spider-farmer SF 7000.
1/20/23- For this upcoming grow I am working with M/F photo seeds so I ordered 4 Sex determination kits. I recieved my my 4 Sex determination testing kits from Rimrock Analytics today. I will be using these to test my plants at week 2 of Veg so that when/if I take clones I know I am taking them off females. As well as I don't want to accidently pollinate my tent during this grow I am looking for big beautiful buds not seeded buds. :-)
1/24/2023- Harvest of current grow- Started at 2:00pm and finshed wet trim and firt batch into the freeze dryer.
1/25/2023- Next batch into the freeze dryer and cleaning all my equipment for this Grow.
T-1 Day until the workers are supposed to be here to fix the hole in the Grow Room.
T-3 days until I instll my new Gorilla Grow Tent and my New Light Spider Farmer SE-7000 for this grow.
T-7 Days until Start of Germination
1/26/2023- Harvest is done ran through the Freeze dryer and dry tim completed.
1/27/2023- Grow Room repairs completed. Hole is gone Letting the paint dry before I install the new tent.
T-2 days until Install the New Gorilla Grow tent and the new Light
T-3 days until I put the hydro equipment in the new tent
T-5 days until Germination
1/29/2023- Day 0- Final Pre Germination activities
Germination Start T-3 days
The paint on the ceiling was dry and it was time to finish prepping for Germination. I got the following items knocked off my list.
New 4X4 Gorilla Grow Tent is up and ready
New Spider Farmer SE-7000 Light is installed- Thanks Moony Grows for the suggestion and for the Code that got me some money off and free shipping (Moonygrows)!! I turned the lights all the way up to max and set the timer to 18/6 0600-0000. I will keep an eye on the temperature and humidity without my plants and see how hot it gets with the new light.
I put my Hydro system back together and put in 40 gallons of water into it, time to monitor for leaks the next few days.
I Setup my cloning machine for Germination Days 3-11
1/30/2023
let me break down the situation, ROOM in the TENT.. Enough said.. No really I tried putting my exhaust system up in the new tent with my new light, The light is so big corner to corner that it really didn't give me enough room for the lights be be raised, with the exahust hanging the buckets my plants are Starting in are 2 and 1/2 feet off the ground, great for plenty of room for roots but not so great for upwards space for the plant to grow. In a 6' 11 tent with the exauhst in side and hanging that only gave me a little over 4 feet of grow room to play with. My last grow if you saw my diary, anyone could tell I was struggling to keep the buds off the lights. No good, Since space was such an issue I was running my carbon filter inside on the ground but It really needed to be up sucking the heat out not shooting the cool out. With that setup I was sucking air through the filter and pushing it out the tent at a bottom exhaust hole cold out. Wasn't doing me any good for my heat. I was hitting temps of up to 85 degrees. I bought a portable AC unit and have been running it in the grow room to try and keep temps below 85 and I have had to lower the power on my lights during grow also not ideal.. With that said a friend of mine MoonyGrows (Check out his diary) took the time to look at my issue send me a picture of my grow tent setup with detailed instructions on how to suck the air out from the top but putting my filter and fan on top of my tent so no room issue and I am sucking the air out from the top where the heat is instead of pushing the air out from the bottom where the cool is... THANK YOU MoonyGrows For taking the time to help me get this straightened out.. Now I have room and I have the exhausts working right and now my temps with everything at 100% are topping out at 80 this dropped the temp by 5 + degrees at 100% max.
T-2 days until Start of Germination
Prepped my seed tray with humidity dome
Prepped my Rapid Rooter plugs. I Used RO water, and I added a few drops of Hydrogen peroxide to Oxygenate the water. I then PH balanced between 5.7-6.0 the same that they will be getting in the Cloning Machine and when they get to thier final grow pod. I perfere the 5.8x range and I hit 5.84 for these rapid rooters. If you want to see a complete video on the process HowWeedGrow has an amzing video that shows step by step how to do it and explains it better than I ever could including how to plant the seeds. Which I will cover when I get to that step on Wed. https://www.howweedgrow.com/how-germinate-weed-seeds-cannabis-rapid-rooters/
1/31/2023
T-1 day until Germination Start
All set and ready have my Rapid Rooter plugs ready to go have my seeds out.. Have my seed tray warming up tonight. Tomorrow morning right into the Rapid Rooter then strait into the tray. I will spray the dome to start the humidity in there.
2/1/2023
Germination Day!!
Let the games begin!
0600am Put the seeds into the Root Riots. And then put the seeded Root Riots into their first home the Seed tray. I have them under the light 24/7. Sprayed the dome
7:30pm Sprayed the Dome to keep humidity going on the dome.
2/2/2023
Day 1 of Germination
Sprayed the Dome in the morning
Sprayed the Dome in the evening
2/3/2023
Day 2 of Germination
Roots are starting to come out the bottom of the root riot plugs and the heads are slowly popping out of Number 4 just below the surface.
Afternoon- Number 4 has popped up
Evening- Number 3 has popped up as well. Happy Dance!!
2/4/2023
Day 3 - Germination
Surprise Surprise Surprise- all 4 have now poked their heads up.. Happy day!! 100% Germination succeeded.
Now major milestone to track is how many are female and how many are male.
I will take look at the roots this afternoon/evening and see if they have enough root to go into the cloning machine for the next 7 days before they go into their Hydro Pods.
Day 3 - Germination - Evening..
Roots looked good and they were tall enough to make it into the cloning machine.
Now that they are all in the cloning machine I have switched the lighting to veg state 18 on 6 off.
2/5/2023
Day 4 - Germination - Morning
All the Ladies (fingers crossed) looking great stretching nicely and look nice and green, Photo synthesis underway....
UPDATE!! After a very interesting POD cast on FSTS by Dr. Bruce Bugsbee from Utah University, I have shifted my lighting to 24 hours on through seedling and then I am going to shift to 20 hours on the rest of Veg.
2/6/2023
Day 5 - Germination
While Checking on my conditions inside the new tent last night, I found that the Humidity was down to 39 Percent. I added an AquaOasis Cool Mist Humidifier, the reason I selected this humidifier is that I needed one that could be turned on and off utilizing my Inkbird Humidity Controller IHC200 that I have my Pro Breeze Dehumidifier currently running with.
Root structures are starting to get there about 1/4 of an inch.
2/7/2023
Day 6 - Germination
Everything seems on track more roots poking out of each today. They are each getting a little taller as well.
Checked in the evening and number 3 was drooping the Root riot plug on the bottome was dry and the roots were not in the water yet. I raised the water just enough that the longest root that was sticking out is now hitting the water.
2/8/2023
Day 7 - Germination
Everything looked good while checking in on them this morning number 3 is now full up and no droop again.
2/9/2023
Day 8 - Germination
T-2 days until Plant into Forever Pods and we start week 1 of Veg .. :-)
Surprising thing to me is that number 1 and 2 were later in popping then 3 and 4 but the roots are growing longer in 1 and 2.
2/10/2023
Day 9 - Germination
Number 1 and Number 2 are definitely ready for transplant today.. Based on how they were yesterday and where they are today I am hoping by tomorrow 3 and 4 are ready. Today they look to me where 1 and 2 did yesterday.. I really hope 3 and 4 catch up by tomorrow since..
T-1 day until transplant to new/ final home for grow.
Need the roots long enough to have some clay down in the basket to keep the root riot out of the water and only roots in the water..
2/11/2023
Day 10 - Germination
Today they got placed in thier forever Home, 7 days from Sprout and 7 days until Week 1 Start.
PPM- 180 this is water out of the Tap
Temp Water: 70.7
Temp Tent: 77
Humidity: 40% I have a humidifier going 24/7 to try and bring this up.. I also have Humidity Domes on each plant.
2/12/2023
Day 11 - Germination
Sprayed the domes, all are looking good.. Nothing much to do at this phase but Keep monitoring the PH level in the system and making sure they have a comfortable home.
T-6 days until Week 1 start
2/13/2023
Day 12 - Germination
Sprayed the domes, They were looking a little yellow today so I moved the light down to assist. Nothing much to do at this phase but Keep monitoring the PH level in the system and making sure they have a comfortable home.
T-5 days until Week 1 start
2/14/2023
Day 13 - Germination
Sprayed the domes, They were looking a little Florissant yellow today, with what looks like slight burn on the tips, I talked with a fellow grower and we agreed that It was probably that I was drowning them, Yes you can drown you plants even in Hydro, but only early on.. :-) It usually happens with the water being too high, which soaks not only the roots but the medium (root Riot plug in this case). I lowered the water from touching the bottom of the pot to about 1" away. This will probably take 3-4 days to resolve. I will continue my daily monitoring.
T-4 days until Week 1 start
2/15/2023
Day 14 - Germination
Sprayed the domes, continue my daily monitoring they look a little darker green instead of lime green now that I lowered the water levels in the system, so I think that I might have resolved the issue but it will take a few days for recovery to happen.
T-3 days until Week 1 start
2/16/2023
Day 15 - Germination
I looked in on them this morning, 3 and 4 look like they are doing well and recovering nicely. Number 1 not so much it has brown spots on the leaves, this very well can still be a side effect of the overwatering but I decide to go ahead and add Nutes earlier than I was planning just incase. I was going to wait until Saturday but I think intervention is necessary now especially after drowning them early on.
I added 1/2 what I am planning on adding for week 1 start. I also think I am going to adjust my chart to add 1/2 2 days after plant from now on. I don't think it would hurt it to have some Nutes to pull from.
.25ml/Gal Calmag = 12.5ml
1ml/gal GH FloraMicro= 50ml
1ml/gal GH FloraGro = 50ml
1ml/gal GH FloraBloom = 50ml
T-2 days until Week 1 start = I will drain the system and start it over on Saturday with Week 1 Nutes.
2/17/2023
Day 16- Germination
I didn't even want to post today after looking in on them this morning, 3 of the 4 are now showing signs of dronwing.. Brown spots on the leaves, the water levels were still too high.. I drained about another inch out of the tanks.. Will see how quick they recover.. I start week 1 tomorrow and will have to ensure my water levels are at least 1" away from the basket on this round.


Likes
11
Share


@RomeoAlphaWhiskey
Follow
day78: watered 6.4ph
day80:watered 6.5ph
day83:watered 6.1ph
day85: watered 6.2ph
give ζamensia a try, genetics are ON point.



Likes
209
Share


@Rock_n_Roll_Randy
Follow
Day 100 for the 54 plant grow. 44 different strains of photoperiods and 10 different autoflower strains in the:
8X8 GROW TENT WITH THE NEW FC-E6500, FC4800 AND TSW2000 AND THE NEW 5X5 GROW TENT WITH A TSW2000 👍and they are being fed GREEN BUZZ LIQUIDS all organic/vegan fertilizers🤘.
I only pinched the tops on 2 or 3 plants but I defoliated every plant ALOT. it slowed the vertical growth alot but it's exactly what I wanted. I can keep track of the plant sizes, how they grew, how healthy they were, how easy they were to grow and how good the final product is👍 every plant was given the same strength of GREEN BUZZ LIQUIDS and I'm keeping track of which plants were happy with the suggested amounts and which plants seemed to want more or less🤘
ALL THE AUTOFLOWERS ARE NOW CHOPPED.
The girls are loving their MARS MANSION and WITH THE 5X5 INLAW SUITE and everything is doing good and looking nice and getting bigger👍 They are all starting to look like buds now and the bud sacs are swelling and they are all getting nice and frosty and starting to stink ALOT. MARS HYDRO ALWAYS GETS EM FROSTY👍.I AM NEVER DISAPPOINTED With how awesome these lights are🤘. KEEP KILLING IT MARS🤘👏👏
BREEDERS AND SEEDS:
DIVINE SEEDS:
MAZAR, OPIUM, WHITE WIDOW, OG KUSH, PABLO ESCOBAR, DIVINE INDICA.
AUTO WHITE WIDOW
AUTO PABLO ESCOBAR
AUTO WHITE RUSSIAN
AUTO FRACTAL
AUTO MONTREAL
AUTO OPIUM
AUTO KABUL
AUTO MAZAR.
WEEDSEED EXPRESS:
GREEN CRACK, GHOST TRAIN HAZE, LITHIUM OG, CHEESE.
DOCTORS CHOICE:
DC KUSH, AUTO NIAGARA, AUTO ROCK MACHINE.
EXOTIC SEEDS:
HIPPIE BERRY, MALASANA GELATO, EXOTIC ANIMAL.
GENE/MEME SEEDS:
BLACK HELL.
ORIGINAL SENSIBLE SEEDS:
PURPLE PUNCH COOKIES, WEDDING CAKE, PURE KUSH, GORILLA COOKIES.
SWEET SEEDS:
BLACK JACK, GORILLA GIRL, SWEET ZKITTLES.
EMERALD TRIANGLE SEEDS:
GORILLA GLUE, MASTODON KUSH.
SEEDSMAN SEEDS:
BLACK SUGAR, PEYOTE FORUM, PEYOTE WIFI, BADAZZ COOKIES OG, PURPLE GHOST CANDY, STRAWBERRY BANANA GRAPE, L.A. PEYOTE KUSH, PEYOTE WIFI CBD, FUEL DOG, CRITICAL PURPLE KUSH.
AMSTERDAM MARIJUANA SEEDS:
GIRL SCOUT COOKIES EXTREME, GREEN CRACK.
QUEBEC CANNABIS SEEDS:
BRUCE BANNER, GREEN CRACK, QUEBEC CBD 20:1.
I 💚 GROWING MARIJUANA:
SKYWALKER OG, BANANA KUSH, BLUEBERRY CBD.
FOR EVERYTHING MARS HYDRO VISIT:
www.mars-hydro.com
www.marshydroled.ca
PROMO CODE: rocknroll
VISIT THE ALIEXPRESS STORE:
@marshydro_aliexpress
Instagram: @marshydropenny
https://youtube.com/channel/UChU5ZWwNi-DvnO3oWVU3ceA
https://greenbuzzliquids.com/
#greenbuzzliquids
@GreenBuzzLiquids
https://greenbuzzliquids.com/en/shop/
PROMO CODE: rocknroll
https://www.youtube.com/watch?v=8hEqyS1jPpI
https://growdiaries.com/diaries/112437-grow-journal-by-rock-n-roll-randy/week/593118
Thanks for taking the time to read and check out my diary🤜🤛
FC-E6500 LED GROW LIGHT:
FC-E6500 grow light with 3978pcs OSRAM BridgeLux Diodes & Moso Driver, market-leading PPF 2.7 µmol/J, Max 2.5g yield/watt with 30% higher Average PPE, more cost-effective when compared to same style type lights. Only consumes 650W, perfectly cover 5x5ft (personal), 4x4ft (commercial) grow space. Innovative Precise Uniform Lighting-Built-in removable bars interval & dimmability enable the exact & dynamic PPFD control over each of the plant growing stages, FC-E6500 detachable bars deliverSuperior Heat Dissipation: Real Aluminum heatsink together with 6 slim profile passive cooled bars (THINNER & LARGER surface) and detachable Meanwell Driver, create less heat. save 50% hydro than other old grow lights! Driver can be mounted remotely on the side of a grow tent/rack or on an adjacent wall to remove heat from grow space. Full Spectrum UV IR LED: With Yield Max spectrum (660nm Osram enhanced Deep Red,2800k-5000k,730-740nm IR,380-410nm UV LEDs), Average PPFD the FC-E6500 LED grow lamp enables cultivators to produce BIG FAT Dense Buds, perfect for full-cycle hydroponic, soil, grow tent/grow room.
Dimmable Commercial Grow Light: Cost-efficient, easy dimming & daisy chain With a max up to 20 lights, IP65 Waterproof, master light easily controls the rest. Perfect for commercial & home horticulture.
FC4800 LED GROW LIGHT:
GET THE MAX FROM MARS👍: Welcome one of the newest members of the Mars Hydro family🤜🤛🤘. The Mars Hydro FC 4800 480W LED Grow Light can accommodate up to a 4' x 4' area for flowering. It has OVER 2000 LED chips consisting of the best selling Samsung LM301B diodes which has a Luminous Efficacy of: 220 lm/W
0.2 W, 3 V mid power,
Osram 660nm Diodes, Infrared light and UV LIGHT👍. It boasts the incredible efficiency of 2.8 µmol/J, maximum 2.5gram yield per watt with 30% higher Average PPFD. This High-intensity spectrum is beneficial for plants at all stages - from veg to bloom, and creates Big dense Buds👍. achieve 50% higher yields & quality compared with the old lights! Only consumes 480W for 4x4ft personal grows, and 3x3ft for commerical grow. It comes with a dimmer and daisy chain function with a maximum of up to 15 lights, the master light controls the rest👍. Wide 6-bar design offers even & wide canopy coverage and can maximizes your grow space. slim 180° FOLDABLE DESIGN... YES I SAID FOLDABLE🤘🤣 , making it compact and easy to install, it's IP65 WATERPROOF and will give you no worries while growing in a humid environment and makes it a flexible high performance commercial grow light for enormous SUPER FROSTY yields.😛😛😛. MARS GETS EM FROSTY BOYS👍
AWESOME HEAT DISSIPATION: The Low energy consumption FC4800 growing light has 6 passive-cooled bars and an aluminum heat-sink a removable driver you can upgrade later or have it outside your tent. with zero noise you can save up to 50% in your electricity bill compared to HID's or HPS lights!
It also has a removable driver so you can upgrade it in the future or have it outside your grow space for better heat control in your growroom👍
UPGRADED FULL SPECTRUM: Yield Max Spectrum with enhanced red (Top-Bin Samsung 3000k-5000knm, Osram 660nm Deep Red), speed up blooming & fruiting, perfectly suited for full-cycle growing. The FC4800 LED grow lamp was born for Big Buds, perfect for commercial, grow tent, grow room, hydroponics, and all soil grows.👍
THE BEST SAMSUNG DIODES: THE FC4800 has Top Bin genuine Samsung Osram Diodes, combined with remarkable 2.8 µmol/J Efficacy, 30% higher Average PPFD, 50% less energy consumption, to maximize your yields. They give you a TRUSTED 3 years warranty 100% Satisfactory guaranteed!!!
X2 TSW2000 LED GROW LIGHT:
INCREASE YIELD AND CROP QUALITY WITH MARS HYDRO LED GROW LIGHTS: NEWEST SMD LED technology provides the highest PAR/LUMEN output (1122umol@18") and can make you get 30% higher yield compared to OLD blurple led lights. Max 2.5g yield per wattage and achieve maximum quality and quantity, much better than traditional HPS grow systems
LOW ENERGY CONSUMPTION LED GROW LIGHT: Consuming only 300W true output with 684 LEDS! It saves up to 50% energy than other led grow lights. Perfect for 3.5x3.5ft bloom stage, 4x4ft veg stage. Over 90% light energy can be absorbed by plants, it will have higher intensity in a MARS HYDRO grow tent with diamond design mylar, or by crossing over using multiple TSW2000
HIGH EFFICIENCY FULL SPECTRUM INDOOR GROW: 3000K 5000K and IR 660nm 760nm RED, makes it close to natural light, highly engineered to provide improved growing performance for plants at all stages of growing, rapid plant response from seed to flower; Uniform and wide-beam light distribution for your plant's optimal growth
8x8 GROW TENT:
The MARS HYDRO 8x8 Grow Tent interior is made of a unique diamond design mylar which is highly reflective. (Other companies mylar and reflective rate is as low as 50%, and it won't provide efficient light. They use thick 1680D oxford canvas, and being double stitched, it is tear proof and perfect for locking in the light. Their grow tent keeps 100% of the light inside the tent and helps your plants absorb more light. EXTRA-THICK material means No light leaks or rips at all.👍
Strong Stable metal corner adapters and poles are the trustful supporters of the tent. It's very sturdy, neither rusting or paint flaking off. quick and easy tool-free setup. They use heavy-duty metal zippers, with double layer black lining, by far the best on the market which creates a light-proof seal.
Processing
Likes
1
Share


@nausicaahime
Follow
week 5
when the thrips first showed themselves.
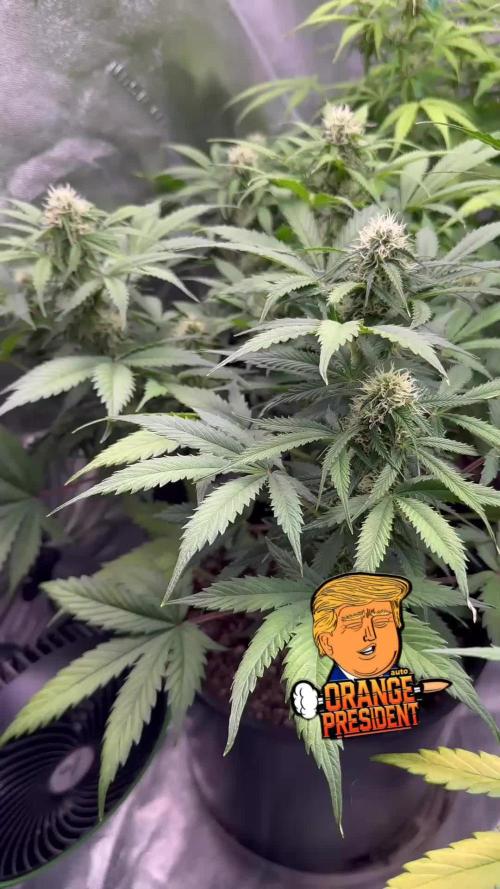
I noticed them cuz some silver stains started appearing on some leaves. you can see them better under LED light. So, I sprayed Neem Oil all over the plant. I could notice that if you don't do it well, spraying and rubbing the leaves with a piece of cloth, the oil will also create some stains.
2nd topping.
killed some thrips this week, they're cute and didn't seem to harm the plant seriously. Neem oil worked fine to control them. No other pests that I could notice
+ Defoliation + LST
Flowermind (4ml + 0.5g)



Likes
3
Share


@WeedM8
Follow
Hello m8 welcome to this journey with me in this diary will have very interesting strains hope u find something useful
O.G. Kush Titanium
- [ ] 1st week Veg: germinated in substrate lighting very close so it jets medium high humidity after the 3rd day they started sprouting
- [ ] 2nd week Veg: this week my ventilator broke down and as the temperature stayed very warm nothing developed much
- [ ] 3rd week Veg:fortunately this week i had fixed the ventilation and the temperature has go down a bit allowing the little plants to develop and reinforce
- [ ] 4th week:very good developments in this week I already started feeding a bit two times but i didn’t have to…once was enough
- [ ] 5th week Veg:this week they were very strong green i only had to water them good and keep the ventilators going no stop .They have good hight already ,but as i have to strains together. I want to transplant them when the hight of the other one have stretched… I’m thinking to transplant next week if not the next one
- [ ] 6th week Veg: this week it went great fortunatly i dont have pests that eat my buds i’ve givven a fed once the substrate is very rich already the plants streached very well i will transplant today so be ready m8 i cant wait to show you the progress
- [ ] 1st week Fl:they started stretching and looking very healthy just transplanted
- [ ] 2nd week Fl this week I’ve been away i had a friend taking care of them they stretching very well i hope that she starts putting energy into the flo
- [ ] 3rd week Fl:they are streaching very well ..getting the light very well
- [ ] 4th week Fl:there we aree guys the good stage is heree good high hope dosent effect de prod
- [ ] 5th week Fl:pumping very good this week a lot of changes started already being frosty
- [ ] 6th week Fl:this diaries its not daily updated this week its going’s so great we are close to harvest between next week and the other one . Ill harvest them at diffrent time just because they are not all at the same point of flowi
- [ ] 7th week Fl
