


Likes
Comments
Share


@LoganatorDude
Follow
I did her second tie-down on day 22 actually.
Day 24- I’m okay with the fan leaf laying on the surface for *now.* Just because I live in a high, dry desert with a consistent RH at around 20-25%. And also, because the top quarter inch of soil is dry. However I will probably be propping it up with something tomorrow morning.
Day 25- finally I decided to fold down the rim of the pot for more light!

Likes
2
Share


@Nebula
Follow
Looking forward to this yummy strain. Seems like she is slow to push her leaves out. I am hoping that some more air will get things going. Organic Grow on this run using GreenGro.


Likes
Comments
Share
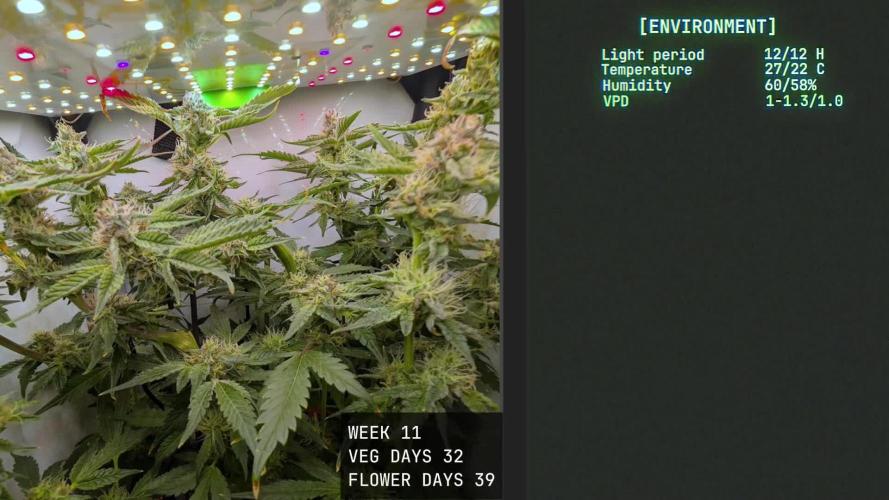

@TyRun
Follow
Appreciate the support 🙏 I’m also documenting the grow on YouTube: https://www.youtube.com/@TyRunGrow
Likes
28
Share


@Southofheaven
Follow
Just letting it do its thing. not having any problems, just another week of fattening. No ripening pistils, calyxes are swelling, trichomes have decent clear/cloudy heads on them....happy days


Likes
1
Share


@DrBud420
Follow
Today is the end of the fourth week for the plant.
In a couple of days I will transplant it and top it off, the good weather is finally coming...
The plants spent most of the day outside today, and at some moments there was a very strong wind, and I was not there, so now they are protesting a bit and probably angry that I left them..to apologize, I played them half an hour of quality reggae music, so I hope we'll be fine by tomorrow lol
Stay high and keep growing my brothers ‘n’ sisters!!!
Likes
12
Share


@Jays_Not_Here_Man
Follow
The Cookie Girls are doing great 😊 Overall, I’m very pleased with the results so far.
At day 8 I stopped tucking the branches and allowed them to grow up. In hindsight, I probably should have kept going for another couple of days. They continued to stretch rapidly all the way up to date 12 or so.
At day 10 I cleaned up some of the small bud sites and leaves that were below the 1st trellis. These sites do not get enough light to make anything good, and take away energy from the main tops as they grow and compete.
At day 12 I decided to add a second trellis net to provide support to the tops that came up so fast. They seem to have stopped their main stretch faze, and are looking happy and healthy now. I’ve continued my water, water, feed schedule and have not seen any cause for concern. The girls are taking a little over a gallon of water every 72 hours at this point.
Humidity is being controlled automatically with my in-line fan and humidifier. RH is set to 57% and temps hover between 77-80 degrees with lights on, and about 70-72 with light off thanks to my furnace being back on for the cooler temps.
The 2x4 5 gallon girl is doing great as well. 😊During the stretch, while I tucked, I snapped more than a couple of tops off, but the plant continues to thrive. She is going to have some great bud, the branch structure is nicely developed with tight node spacing.
I’ve been plucking off all the lower growth, and tucking leaves as they block bud sites. Will be doing a defoliation next week. Happy Gardening 🇨🇦👊❤️

Likes
11
Share


@Grimreefer420
Follow
One plant is flowering a few days later, this particular seed grew a bit different then the other 2 stronger and minus the 4th one "that went through shock due to the accident during transplant." Aka tipping over 😞..... The back 2 plants will be the prime crops, but some open sesame and TLC on the front left plant will amake difference,.Stay tuned....40 days left...aprox

Likes
14
Share


@Slurpy_Terpy
Follow
Note:
At time of writing the Runtz has had 2 weeks cure, will update the review and rate it after 2+ months cure.
Hermied a bit, has very few seeds so not too bad.
Growth review:
- vigorous grower during veg
- solid stretch
- medium internode distance
- small sized buds
- lower buds not too airy
- very easy/not fussy
- medium amount of smell
- 80+ days flower (12/12) in hydro DWC under full spectrum led
- responded well to various lst techniques
Ease of growth rating: 9/10
General note:
--> For me personally this strain NEEDS a good cure and is not worth smoking yet... It has a bit of a citrus grassy (not hay) taste, with some 'special' fruity smells to it that remind a bit of grapes/cassis. When grinding/opening the curing pots there is a pretty dank heavy weed smell so I think the quality will come out after a few months of cure... In its current state not worth smoking for the taste or effect after 14 days cure.
--> Currently the effect is not very strong, easy to handle and I need a lot to feel a bit. The effect lasts for short compared to the average strains I smoke. Should develop more character with a longer cure.
Hash making notes:
- water extraction of the trim yielded 16g of hash (45mc-220mc)
- rosin has a bit too much of a weird spicy grassy taste which make it a bit unpleasant, waiting till the buds improve with cure to try again
- rosin color at 80c is yellow/white/beige creamy waxy, with hard consistency
- rosin color at 95c is golden with hard consistency

Likes
21
Share


@Brick_Bazuha
Follow
Неделя очень медленно прошла, но с кустиком всё хорошо, правда запах сильно не выделяет, та и трихомы вот недавно только выкинула, скорее всего сроки у меня очень не совпадут с паспортом

Likes
7
Share


@CannabisAprendiz
Follow
Esta cosecha fue muy buena con excelentes resultados de flores muy compactas y demasiado resinosas , la genética en sí es muy resinosa con olor muy característico , con sabores terrosos muy marcados .
Likes
13
Share


@einamio
Follow
Day 36 I guess I can call it bloom. Nice strong pistils shooting all over. She is the tallest so far making me raise my lights a little more.
Day 38 Now Californian Snow is the tallest :) Ztrawberry stopped at a perfect height, it looks like she's gonna develop into a beautiful lady. Fat white pistils all over 😻
Day 39 Happy girl got 2500ml cm bg bb bh 6.3ph ~1EC She is perfect, symmetrical, stopped stretching at about 50cm, flowers are mostly leveled, branches are strong, leaves point up unless I water. I think she's also turning purple. Beaut 😻
Day 42 I think I saw some burnt tips but she still looks super happy and healthy. The most vigorous plant I've had.
Likes
57
Share


@AsNoriu
Follow
Day 15 since seed touched soil. All is going amazing.
Yesterday topped them up a bit. Stems looks lanky, would expect stronger by now, but generally girls fly ! Off course i watered them straight after goodies were rubbed into top soil.
Great White - 4 g sprinkled around for each plant
BioSys same amount.
Ecothrive Bio Blend - 200 grams added to each pot.
Devil biggest, nicest and is happy camper at the moment.
Lights are still on 40%, Mars as always has great products for growers.
Think this week i will start some training.
Day 19. Yesterday girl got 800 ml of 6.3 ph water. She is flying 4sure, thinking to train her tomorrow.
Day 20. First LST. Watering straight after, plus Biobizz Leaf Coat shower. Approx 2.5 liters went in, first big saturation.
Happy Growing !!!


Processing
Likes
Comments
Share


@Cannibalgardens
Follow
Well what can I say the genetics in this one are spot on it's a monster of an autoflowers would love to grow this one out indoors full run to see what I could pull off of her .. The autos from @originalsensibleseeds are amazing .. can't wait to see how she finishes outdoors ..

Likes
9
Share


@ZalySk
Follow
F39: growing well. Hasn't really faded, but then again the plant isn't too big so it probably doesn't need to consume itself to get bigger. Still no smell when I touch the plant and the growth is still nice and nug like.
Going to be the easiest trim of my life.
There's a slow swell on size, I think next week I'll break out the Nikon to get some good up close pics so I can start to follow the trichomes.
Likes
4
Share


@IslandTerps
Follow
Strain: Fast Buds – Mendo Frost
Grow Type: Indoor
Nutrient Line: Athena
Harvest Update ✂️🌿
Honestly, I can confidently say Mendo Frost is one of, if not the best strain I've grown to date. These girls were an absolute pleasure from start to finish, and seeing the final product made the entire run worth it.
The buds came out reallly nice, dense, chunky and absolutely terpyyy. Sometimes you get plants that look great until it's time to trim, then you're left doing a ton of work around loose or awkward bud structure. Not these. The flowers were well formed, easy to work through and looked even better once cleaned up.
And the smoke? Sweetttttttt. Everything about this strain came together nicely for me the growth, the bud structure, the frost, the terps and finally the smoke. It's one of those strains where, once you've finished the grow, you immediately understand why you'd neeeeeed to run it again.
I genuinely highly recommend Mendo Frost, 100%. This wasn't just a plant that photographed well; it delivered in every area. If you're considering adding it to your garden, I'd definitely say give it a shot. Mendo Frost has officially earned a spot among my personal favourites 🔥🌿
Drying Conditions
🌡️ Temperature: 18–20°C
💧 Humidity: 55–60%
🌬️ Airflow: Gentle indirect airflow never blowing directly onto the buds
Dry Time: Approximately 10–14 days
ISLANDT – 15% off Fast Buds strains 🌿🔥
Likes
21
Share


@STAYINGONMYMAINCBATORUNTWO
Follow
I have made this week as it’s the 4 week mark (28 days) I’ve made a video to show the progress she has made! This is my favourite baby girl! She has shown so much vigor from the beginning! I have only had to adjust the ties this week was considering another top but I won’t as I may not have space! I’ve added a picture of the base of my Airpots and I’m proud to say the roots are all coming through nice and thick (photo example) I have also added my ppm results now and am going to be filtering my water so I lose the initial 200+ in my water already! I will 12-12 when she hits 6 weeks! Hope you enjoy buddies!
Processing
Likes
17
Share


@HolyTrout
Follow
Getting a bit worried, only grew 3cm this week. Was supposed to harvest this coming Tuesday but looks like she might take an extra 2-4 weeks.


