


Likes
12
Share


@Solidstoner
Follow
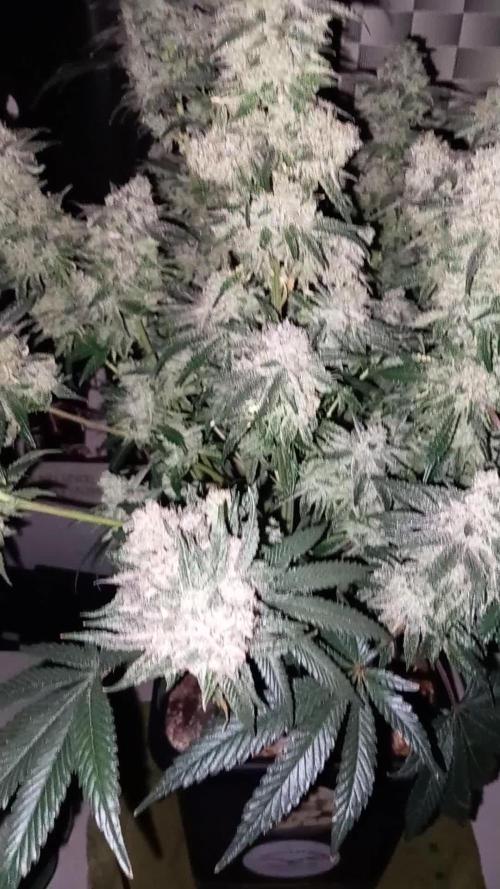
Week 3 of flower has come & gone without too much stress.
Gave the ladies a big last defoliation to help with light penetration and airflow at end of week as they were pretty leafy
Runoff was a lot lower than feed so have upped the nutes for this week.
Blumats got blocked and have been a pain so whilst I'm not too busy with work over holidays will just hand water them.
Pretty much no smell at all coming off them yet which is quite strange as normally by now all my other grows have been starting to, I'm sure it will come.
1st video is before big defoliation
2nd video is after
Photo is 24hrs after big defoliation


Likes
17
Share


@YorkshireGardeneruk
Follow
They popped up 2nd of January after germination. Biobizz soils mixed just using oxy plus for first couple of weeks as well as silicone


Likes
7
Share


@Willy_Balls
Follow
Maturing fast.
Some botrytis unfortunately . Have to dig in to incoming air filtration to limit spores.
Ac infinity terraform just been released maybe it could help with more sterile air.

Likes
5
Share


@JackDaniel
Follow
Diese Woche bekommen die Kleinen erstmals Plagron Power Roots.
An Tag 3 dieser Woche sind sie 7,5, 7 und 5cm hoch. Die Kleinste wurde etwas tiefer eingepflanzt, wächst aber auch etwas kompakter als die anderen. Weiß nicht ob es daran liegt.
In dieser Woche wird umgetopft und das erste Topping durchgeführt.
Es bleibt nur eine Pflanze im Zelt. Die Auserwählte kommt direkt in den finalen Topf.
An Tag 7 wurden die Pflanzen getoppt.
Der Plan war erst eine Pflanze auf 60x60 zu growen,
Demnächst werden die 3 aber in ein 80x80 Zelt umziehen.


Likes
6
Share


@Terpio1500
Follow
Pistils are getting fatter just consistent growth throughout I moved the light closer to it so that it can get more light through the plant & it helped a lot.
Week 5 check out my other grows (The New, Gelato Cake)
& follow my IG @therealterpio
Likes
92
Share


@DogDoctorOfficial
Follow
Week 7 Flower Report – The Masterpiece Garden Unfolds
🌱 Introduction
Welcome back to the most thrilling chapter of our journey yet! Week 7 of flower is here, and the garden has transformed into a paradise of unique beauty and diversity. Every plant has its own personality, showcasing the results of all the hard work, dedication, and love poured into this run. Let’s dive into the details and celebrate these girls like never before—because they deserve it!
🌸 Plant-by-Plant Breakdown
Papaya Zoap
The rebel queen of the garden, aiming for the stars with her towering structure. Her dense, frosty white nugs sparkle like diamonds, and her leaves are fading to a stunning yellow hue—a clear sign she’s ready to shine. Her aroma is captivating, leaving no doubt she’s going to be a showstopper.
Gorilla Melon
Standing tall as the second in command, this beauty is all strength and vigor. Her vibrant green foliage cradles thick, frosty buds that exude a fragrance worthy of her name. A true contender for the title of MVP.
RS11
This one’s a frost factory! Long, elegant buds dripping in trichomes, with leaves gracefully fading to yellow as she transitions toward the finish line. Her balanced stature and impeccable structure make her a dream to cultivate.
Green Papaya
The frostiest of them all, her sugar leaves are curling under the weight of so much resin. Every glance reveals a shimmering coat of trichomes that’s hard to believe. If frost were a competition, she’d already have the gold medal!
Mandarin Squeeze
Dark and mysterious, this beauty stands out with her rich, deep green tones and impressively dense buds. Her flowers feel like rocks, and her aroma hints at a citrusy explosion waiting to happen.
Punch Pie
What can we say about this heavyweight? Her large, dense buds are jaw-dropping, and her presence in the tent is commanding. She’s proving to be a genetic masterpiece, delivering beyond expectations.
🌞 Environmental Mastery
This week, we’ve begun the slow decline of PPFD to 750, keeping reds and UVs strong while easing back on whites—a calculated move to guide these girls into the final stages. The room’s stats speak volumes:
• Temps: 27.8°C with RH at 64.8%.
• CO2: 800 ppm for consistent growth energy.
• Reservoir: PH 6.16, TDS 791, temp 21°C.
• Soil Stats: TDS 669, temp 22°C.
Even the fun facts are worth noting: leaf temps are ranging between 26.6°C and 24.2°C, while the LED bars are holding steady at 38°C, and the ICL-300 at 35.6°C. Aero Fan at 23°C and the filter output at 24.7°C highlight the precision and control in this room, all thanks to the incredible TrolMaster ecosystem.
💧 Feeding and Nutrient Update
Our transition from organic minerals to a solo mineral approach has been a game-changer. These girls are thriving! Here’s the recipe this week:
• System Clean: 0.25 ml/L.
• RO Water Conditioner: 0.8 ml/L.
• All-in-One Liquid: 1.75 ml/L.
• K-Boost: 0.5 ml/L.
• Regulator: 0.15 ml/L.
This blend is bringing out the best in each plant, delivering unparalleled frost, density, and aroma. The stability of the pH, thanks to minerals, has made life simpler while pushing the plants toward peak performance.
🌟 Reflecting on Progress
It’s a joy to walk into this room and witness the results of months of effort. Each plant is delivering on its promise, and the smells, colors, and trichome production are truly next-level. The journey has been demanding, but the rewards are sweeter than ever. The curiosity to see how they finish is at an all-time high!
💬 Shoutouts and Community Love
As always, massive gratitude to the sponsors that make this possible:
• TrolMaster for precise environmental control.
• Aptus Holland for top-tier nutrients.
• Cannakan for their unwavering support.
• Pro-Mix Soil for a robust foundation.
• Seed Banks for the incredible genetics.
To the Grow Diaries community, our followers, lovers, haters, and everyone in between—thank you for being part of this journey. Your engagement fuels the passion to keep growing, learning, and sharing.
📣 Call to Action
If you haven’t already, check out our YouTube and Instagram for exclusive content and updates. Don’t forget to hit that like button, subscribe, and ring the bell so you never miss a beat. Join us for the next episode, where we’ll dive into super-cropping and give the room another round of defoliation as these girls keep reaching for the finish line.
Let’s keep growing, learning, and celebrating this beautiful process. 🌱✨
Growers Love,
Your Grateful Gardener
Discount Codes so you can save big on your next check out 💚💚💚
Kannabia - DOGDOCTOR 30% off
SeedsmanSeeds - DOGDOCTOR 10% off
CannaKan- DOGDOCTOR 15% off
terpyz.eu - DOCTOR 15% off
The Neutralizer - PORKIT5-DOG 15% off
Fast Buds - DOGDOCT 15% off
As always thank you all for stopping by, for the love and for it all , this journey of mine wold just not be the same without you guys, the love and support is very much appreciated and i fell honored and so joyful with you all in my life 🙏
With true love comes happiness 💚🙏 Always believe in your self and always do things expecting nothing and with an open heart , be a giver and the universe will give back to you in ways you could not even imagine so 💚
Friendly reminder all you see here is pure research and for educational purposes only
Growers Love to you all 💚💚💚


Processing
Likes
8
Share


@BigBaby420
Follow
She got a compost tea this week of nature’s living and blackstrap molasses. Other than that “minimal effort”

Likes
Comments
Share


@ceroporcientoalcohol
Follow
Una verdadera californiana! la verdad sin palabras al cruzarnos con esta cepa ya hace 2 años manteniendola..
Aveces afrutada,aveces muy amaderada pero siempre intensa..!
Likes
17
Share


@CanadianFillmore
Follow
Week 4 begins for Mandarin dreams and Divine storm. Both ladies are looking happy and I increased their feed by 1 liter each.
Thank you Mars-Hydro for the TSW2000 light, very happy with the light performance so far.
Thanks for stopping by growfessors 👽 tune in next week for another episode of growfessor theatre!


Likes
25
Share


@Mrs_Larimar
Follow
When I started this Grow, i never expected such a vigor Plant, and i havent been reading about the
XL-Versions.
But now its clear, by incrossing the Ruderalis, the Plants grows explosive and extremly Strong
I had to move them out of the small Cabinet
after i took them into the Floweringroom, they continued to Grow and in the End the Plants got
130 cm Hight
I wished i had grown them in bigger Pots
But i started them into 5l ( fitting into my Growbox)
and it was to late to transplant them
3 of 4 Plants turned darkpurple-one was pink.
Harvesting was an easy Job, because of those lovey Budshape, they are growing symmetric konic
along the Branches
they were Smelling like Peach, and some musky Undertone
while Harvesting them ,i got a Smell of fresh pressed Applejuice and some " green smell"
Plants were covered with sticky trichomes,
very courious to the endproduct
Its an easy to grow Plant, if you know about her vigourness 😂
Iam very pleased with the grow
welldone @Sweet_seeds
Likes
5
Share


@eldruida_lamota
Follow
Que pasa familia, vamos con la tercera semana de floración de estas Papaya Zoap F1 de Sweetseeds.
Vamos al lío, me quede con 3 por espacio, siempre pongo alguna semilla de más por si no abriese alguna por no perder ese hueco del indoor.
También se trasplantaron a su maceta definitiva, en este caso de 7 litros.
Y también superaron el shock por el trasplante se recuperaron 100%.
El ph se controla en 6.2 , la temperatura la tenemos entre 20/22 grados y la humedad ronda el 50%.
El fotoperiodo esta a 12/12 para floración. Las jodidas estiraron bastante, y es algo que no me gusta de todas las F1, que cultive hasta ahora.
Hasta aquí todo, Buenos humos 💨💨💨


Likes
6
Share


@E5Jackalope
Follow
The seeds popped and are looking good in the humidity dome. I didint use rockwool. I wrapped a paper towel around the tap root and wicked it to the water
Likes
106
Share

@Prof_Weed
Follow
Hail Satanas!
Madame Devil's Cookie is on the road to hell!
She is a little fat demon, sticky and healthy.
The smell is creamy and fine, not too strong which is Not bad.
she produces good chunky buds as there is no tomorrow...
She can handle everything without problems, a nice dutch genetic crossed with some USA stuff.
I will grow her again.
Bedankt!
Likes
23
Share


@Ferenc
Follow
Day 73, 25th of November 2020:
Hi! Here we go atbthe beggining of the 4th week of flowering.
She is beautiful check out the main stalk crazy haha....
I was hoping about red colour but not appeared yet. The bonsai version is nicely getting purple :)
Not much to say anyways just need to wait :)
Fertilization is still the same every second day with the rationand mixture above stated.
The lamp is on 11.15 min and off 12.45 min.
Last week was 15 min longer light cycle....
So every week 15 min shorter light cycle until the 5th week. So far -45 min. It switches on at 6 am and off at 17.15 pm.

Likes
5
Share


@CannabisAprendiz
Follow
Segunda semana de floracion , se aplica tierra de diatomeas como preventivo de plagas de marca nacional de chile GeoBoost. Se Logra apreciar formaciones de flores a una gran velocidad de estas indicas / Second week of flowering, diatomaceous earth is applied as a preventative of Chilean brand national GeoBoost pests. It is possible to appreciate formations of flowers at a great speed of these indica

Processing
Likes
9
Share


@Yummynugz
Follow
Havent had time to update the grow, but things are going great! Im in week 13 of veg and ready for flower finally! The girls are all ready except for one runt but im.not worried as the others are all pretty big rn.
Just got a hydro x system by trolmaster to serve as complete environmental controller for me and also remote control via internet while im.away at my day job.
I added a second net as a scrog 12inches above base of plants and have increased my original 4x8 tent to a 5x9 by cutting off tent and expanding the net surace area.
Im afraid to veg any longer as i know the stretch is alawys more than anticipated. Also, the roots are getting massive in the 13gal pots.
Safe time to start flowering now. Im excited and looking forward to the changes to come :)
Thanks for taking the time to read this and check out my journal. Any comments are welcome and appreciated!
Til next time,
Happy Growing!!!


