


Likes
Comments
Share


@JBoBz
Follow
I didn t expected nothing from this plant, because of the slow and stunt start, but after the 3rd week it start to get "bigger" i m gonna try it again while i have another seed!💪
Anyway the result wasn t much, but amazing!
Thanks for who followed the process, happy grow to everyone!👽


Likes
17
Share


@Dunk_Junk
Follow
She's chugging through flowering!
I notice she's not very tall at all. But very bushy!

Likes
92
Share

@Natrona
Follow
Straw-Lectric Lemonade-STRNG Seed
W10 F1 01/11-17
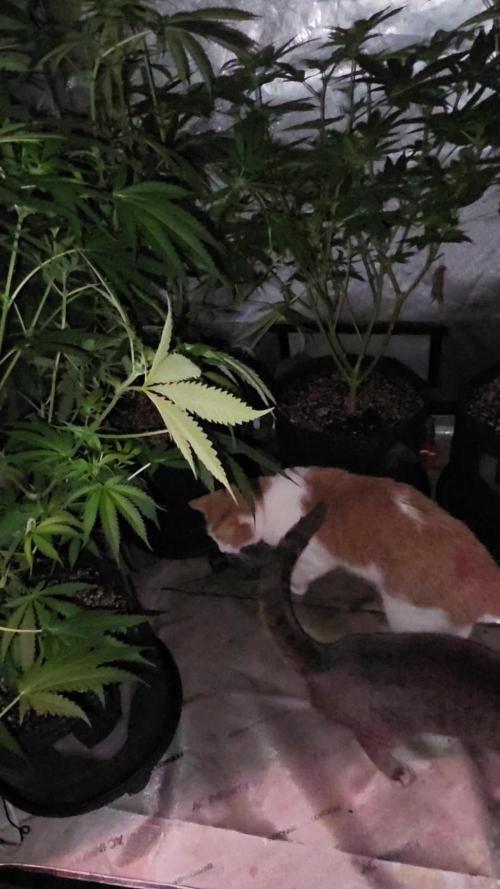
These strawberry collection gals are taking off like rockets during this early stretch.
Cadillac1 and S. Trop Cherry 2 have grown at least 15 inches this week. I cannot push them to the edge anymore. Pics show them pressed up against the light. What to do? My hubby suggested cutting them off-you should have seen the look I gave him. I decided to do more super cropping of the tallest branches. These girls were 56 and 57 inches from the soil to their tops. As tall as me but an additional 15inches due to the pot. I tried to bend the stem by about 10inches, so the tops are about the same as the other plants in the tent. Fingers crossed they slow down.
Since the dots did not arrive before the transplant, I decided to use TPS1 and start during the first week of flower. That’s now. The mix for early bloom is as follows:
TPS1 14ml/g
Silica Gold 3ml/g
I needed to add 3ml/g of Calmag to raise the pH after accidentally lowering it too much.
1/10 66.5F, 6.22 ph & 1023 ppm
1/14 70.3F, 6.42 ph & 1007 ppm Pics
1/11 !st flower week defoliation and lollipop for all the Strawberry collection.
1/16 More super cropping of Cadillac1 and 1st time Trop Cherry2.
General observations: I usually use Air pots but these can be messy when water squirts out the side holes. I decided to use the 5Gal fabric pots AC Infinity provided when I got the tent. The fabric pots hold moisture longer than the air pots and since I have to water with at least a gallon, the humidity increases to 85%. This is way out of range for early bloom. Also, the ventilation fan increases to 10 which is very loud and only helps a small bit.
I noticed that after defoliation the RH came down to the upper 60%. Not optimal but better.
I should have defoliated in week 3 of veg to reduce the humidity in early flower.
The only time my environment is optimal is when it’s close to the next watering day. Then it goes right back up after watering. It has been very cold here and the tent temperature barely gets above 73f. Increasing the tent temperature would help the VPD. When the plants were touching the lights, I held the lights at 80%. I just increased to 100%.
1/16 Strawberry Cadillac #1 56 before super crop 46”after #2 44“
Strawberry Trop Cherry #1 28” #2 57” before 47” after
Straw-Lectric Lemonade #1 38” #2 45”
Important dates
11/9 Germination
11/25 Transplant to 1.5 gal,
12/1 Topped, Pinned and removed 2 large center leaves
12/5 Repositioned pins and removed lowest fan leaves
12/16 Topped 4 tops on each plant except Cadillac1 (first topping) and put manuka honey on the cut.
12/24 Transplant to 5 gal
12/27 Defoliate all
12/28 Flip to 12/12
1/05 Supercrop Cadillac #1 at the joint where I topped her.
1/11 !st flower week defoliation and lollipop for all the Strawberry collection.
1/16 More super cropping of Cadillac1 and 1st time Trop Cherry2.
Stay green, growers love 💚🌿
💫Natrona💫


Likes
12
Share


@EmeraldLakeCannabis
Follow
Another good week inside the tent. The girls have kicked into flower, and are throwing out an absolutely gobsmacking amount of pistils at current. Also, leaves are starting to get a little dusting of frost. Very good signs this early.
Timelapse is out and updates will be posted as things happen. Keep eyes peeled for some EOS rebel shots this week.
-10/15- Eos Rebel shots are out, showcasing the huge masses of white pistils at each budsite.
Likes
4
Share


@adam_pawloski87
Follow
At a total of 79 days this Sangria is a beautiful one! A cross between The GOGO and Ogreberry she is super delightful, Dense resiny heavy covers trichome buds , with the smell of Gassy rotten fruit funk on the nose! She a stanky one ! Other then that she was a pretty easy grow , y’all don’t sleep on it an better get your hands on it , at @Twenty20Mendocino they got you covered


Likes
2
Share

@MrWeeedWorld
Follow
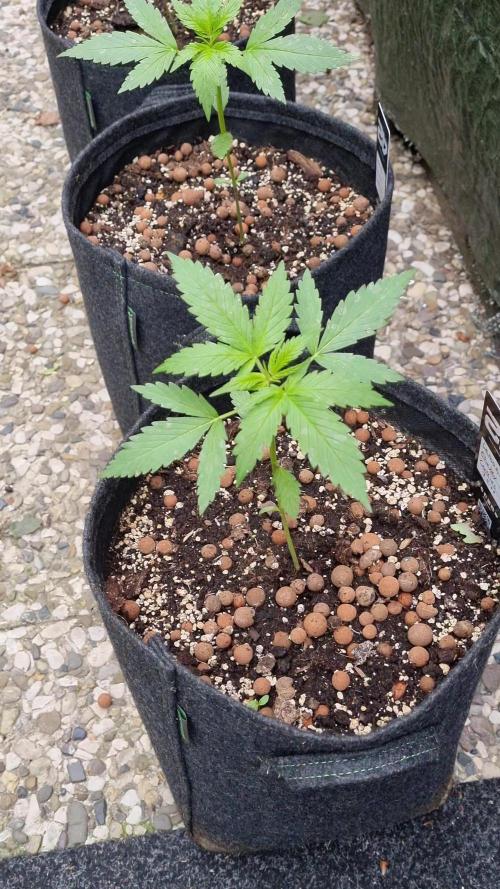
Die Lemon Cherry Cookies entwickelt sich weiterhin sehr gut unter freiem Himmel. Die letzten sonnigen Tage haben für ordentlich Wachstum gesorgt und die Pflanzen zeigen eine gesunde grüne Farbe sowie kräftiges neues Wachstum. Besonders erfreulich ist die gute Vitalität aller drei Exemplare, obwohl sich bereits leichte Unterschiede im Wuchsbild zeigen.
Während eine Pflanze etwas kompakter und buschiger wächst, zeigen die anderen beiden einen stärkeren Stretch. Das ist bei Autoflower-Genetik völlig normal und verleiht jeder Pflanze ihren eigenen Charakter. Die Stämme sind aktuell noch etwas schlank, werden aber mit zunehmendem Alter und etwas Wind deutlich an Stabilität gewinnen.
Die kommende Woche dürfte entscheidend werden, da nun die Phase beginnt, in der sich die Seitentriebe stärker entwickeln und die Pflanzen langsam ihre spätere Struktur aufbauen. Insgesamt bin ich mit der Entwicklung sehr zufrieden und freue mich darauf zu sehen, welche der drei Damen sich am Ende als Favoritin herausstellen wird.
🌱 Jeden Sonntag gibt es neue Updates auf meinem GrowDiaries-Profil!
--------------------------------------------------------------------------------------------------------------------------------------------------------------------
The Lemon Cherry Cookies continues to perform very well outdoors. The recent sunny weather has encouraged strong growth, and all three plants are showing healthy green color and vigorous new development. It's great to see such strong vitality across all three individuals.
Some phenotypic variation is already becoming visible. One plant is growing more compact and bushy, while the other two show a bit more stretch. This is completely normal with autoflower genetics and gives each plant its own unique character. The stems are still relatively slender at this stage but should strengthen significantly over the coming weeks thanks to outdoor conditions and natural airflow.
The next week will be particularly exciting as side branching begins to accelerate and the plants start forming their overall structure. Overall, I am very happy with their progress and can't wait to see which of these ladies becomes the standout performer.
🌱 New updates are posted every Sunday on my GrowDiaries profile!

Likes
10
Share


@BodyByVio
Follow
This week I transplanted all the clones from 1 gallon plastic pot into 5 gallons fabric pots.Probably 10 more days of Veg and will switch into flower.

Likes
8
Share


@JohnnyBarrel
Follow
The outcome of the flowering was very surprising. Flowers pumped up the last 2 weeks, became hard without leaves inside the buds, developing an amazing rancid and musky smell .
During the vegetative phase; the plant grew vertically with pretty good ramifications..I did a topping very late, just before flowering like in emergency to stop the stretch: the plant was a little bit shocked but never stopped growing with a big internode’s distance.
The opérations finally gave a good result: forming and developing more blooming sites. But the whole stability of the structure was changed and the plant was bending dangerously till the harvest.

Likes
3
Share

@tony_kiffton
Follow
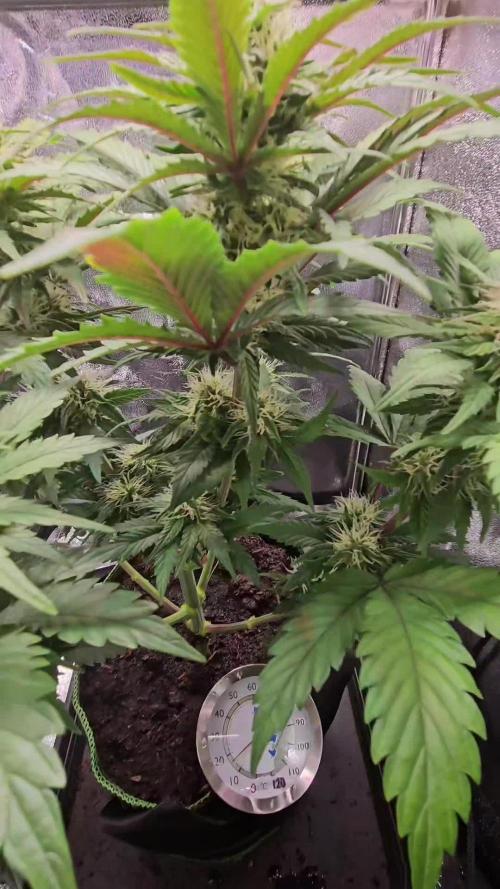
Die Speed Queen purpelt ... und die Buds wachsen weiter - immer noch kein Dünger !
Likes
25
Share


@Grower_Of_Persia
Follow
week intel:
we reached the peak of flowering stage and need to cause a little more e.c stress from this week so e.c stress is twice a week
i reduced the amount of Nitrogen and calcium and stopped feeding silicate in other hand i raised the amount of base nutrient and booster
short story version: more K & P - less N
stresses :
a little E.C stress around 1.6 and 1.7 twice a week from this week
feeding:
i feed them 3 times this week with this order :
day 1 : i feed them high with base nutrients(calcium & micros (half dose) + Bloom) about 822 ppm - 1.6 e.c to cause a little stress.
day 3 : i feed them low dose of Top-Max + B-52 around 525 ppm - 1 e.c to let them recover a little but not fully recover still a little stress will caused.
day 5 : i feed them high dose of Feeding Booster around 850 ppm - 1.7 e.c to cause e.c stress again
guide of the week :
from this week we can cause more E.C stresses.
e.c stress if done correctly is one of the very few ways to increase quality in all aspects ( color , aroma , taste , bud structure , resin contents ) but if you over do it , listen carefully brother : it can reduce quality in every aspect so always look for signs and never reach the red line.

Likes
44
Share


@AumShanti
Follow
ॐ
GORILLA ZKITTLEZ from BARNEY'S FARM
1.2m x 1.2m x 2m tent, 720w led Lazer Lite Pro, REMO NUTRIENTS
3rd week of flowering from 17.3. to 23.3.
Chill week
This week i water them only two times, and at first watering i did defoliation again,
but on second watering i proudly saying i didnt remove even a single leaf from ladys,
it was rly hard hahah there was few big ones poking my eyes hahaha
No more heavy training, and girls are flowering nicely,
i just removed wires from bigest branches and pulled them to the middle to fillout midle section of plant,
and also from smallest branches i let them loose from wire to even up with others.
They drinking 1.7l-2L every two three days
This one labeled with no.5 is still my favorite hehe
so dense and she showing a bit faster maturing then others.
20 branches of love fruity and flowery already hahaha
Had to make short video of her this time :)
Take care and much love
ॐ

Likes
12
Share


@magicUmbrella
Follow
Didn't realise my syntetic nutriton had so bad NPK for flowering (3-5-7) so my biggest girl got some nitrogen toxicity (dark and shiny leaves). This resulted in creating small and compact buds and slowing down the growth. Therefore i went back to my biobizz (organic) with better NPK (altho' still not optimal ratio). On the third and smallest Zkittlez i cut of the lowest 2 nodes during this week to promote some stress and therefore some seeds, she will produce max 20-25gram of dry weed anyways (maybe naive, but hey why not).
Never actually smelled the terpenes of this lineage (grape) and yeah... I would use this as my perfume if possible. Really makes it rewarding to grow your own stuff.
- 12L air-pot with 15% perlite
- X6 COB LED Full Spectrum (303.5W±5%)
Good vibes 🙏
Likes
53
Share


@DogDoctorOfficial
Follow
Hey Grow Diaries fam,
Welcome back to another update on our PCR adventure! We're at Week 9, which marks Week 4 of the flowering stage, and things are getting exciting!
Overview
The PCRs are flourishing, and the transformation is nothing short of spectacular. The tent is buzzing with energy, and every day brings new developments. The buds are swelling beautifully, and the trichome production is off the charts. This week has been all about maintaining optimal conditions and ensuring our ladies get everything they need to reach their full potential.
Environment and Conditions
Tent: 3x3, cleaned and prepped from top to bottom to ensure a pristine environment.
Lighting: ViparSpectra P2000, delivering a perfect spectrum for this stage of growth. The balanced PAR output and efficient energy use keep our girls happy and thriving.
Watering: TDS at 410, pH 5.8, and water temperature at 21°C. This ensures the nutrients are perfectly balanced and readily available.
Nutrient Regimen
We’ve kept up with our Aptus Holland feeding schedule, and it's paying off big time. Here's the current mix:
Nutritional Spray: Aptus Holland NutriSpray to keep those leaves lush and healthy.
TopBooster: Replaced StartBooster with TopBooster to promote flower development.
P-Boost: Added to the mix for that extra phosphorus kick, crucial for blooming.
K-Boost: a must for them to go fat as we like.
The results speak for themselves – lush green foliage and robust bud formation.
Defoliation
At the end of this week, we performed a mass defoliation. It's always a bit nerve-wracking, but the results are worth it. Removing excess leaves ensures better light penetration and airflow, reducing the risk of mold and pests. Plus, it allows the plant to focus its energy on bud production. And let me tell you, after the defoliation, the PCRs look sexy as ever with their long legs and sculpted structure!
Clones Update
Our clones are thriving, showing the longest and whitest roots I've ever seen. We treated them with a water mix that included K-Boost and Mycor Mix at 1 gram per liter. This combination has worked wonders, promoting vigorous root development and overall plant health.
Reflections
This week has been a testament to the importance of a clean environment and precise nutrient management. The PCRs are responding exceptionally well, and I couldn’t be more thrilled with their progress. We're well on our way to an incredible harvest, and I can't wait to see these beauties in full bloom.
A huge shout out to:
Aptus Holland: For the top-notch nutrients and constant support. You guys rock!
Art Genetix: For creating such an incredible strain. The PCRs are truly something special.
Grow Diaries Community: Your support and feedback are invaluable. Keep the positive vibes coming!
Here’s to another fantastic week of growing! Stay positive, keep pushing forward, and enjoy every moment of this beautiful journey.
Genetics - P.C.R. @Art_Genetix_Team https://artgenetix.world/
Nutricion @aptusholland https://aptus-holland.com/
LED Power @Lumatek and @viparspectra
As always thank you all for stopping by , for the love and for it all, i fell blessed to have you all with me for one more love journey Thank you Thank you Thank you , you guys are great and have been amazing , thank you for everything !
#aptus #aptusplanttech #aptusgang #aptusfamily #aptustrueplantscience #inbalancewithnature #trueplantscience #dogdoctorofficial #growerslove
With true love comes happiness , Always believe in your self and always do things expecting nothing and with an open heart , be a giver and the universe will give back to you in ways you could not even imagine so !
Growers love to you all

Processing
Likes
8
Share


@eldruida_lamota
Follow
Vamos familia, volvemos con las candy caramelo y es que pronto nos pedirán un trasplante y con este caos veremos cómo conseguimos sustrato.
Ph controlado a 6,5 siempre hay que controlar este parámetro.
Temperatura y humedad correcta En la 2 semana de crecimiento.
Os dejo la web y el código para compras en mars hydro.
web: http://bit.ly/2uJAjgy
ts600: http://bit.ly/3cnv0Ev
code: an420
Ya tengo ganas de ver como florecen estas niñas en las próximas semanas las vemos un saludo fumetillas.

Likes
23
Share


@Kingseeds
Follow
#Terple bred inhouse Genetic ready for the chop at day 56. She came out very pretty this round. The smoke on this is smooth, sweet, and complex. A good mix of #tropicannacookies and #Slurricane with Oranges and Lavender notes. Stretchy girl with long legs but she's a quick finisher with respectable yield. If you can find beans of this strain you need to get them asap.

Likes
23
Share


@Kakui
Follow
V30, se hizo un riego con 1.2 EC y pH 6.2, ya se ha hecho el último LST a la rama principal de cada planta, ahora solo queda esperar que crezcan hasta una altura aproximada de 25~30 centímetros para pasarlas a 12/12.
V31, creciendo. También, Luffy xD
V34, riegos de 1.2 EC y pH 6.2, en los próximos riegos se incluirá líquido estimulante de floración, ya que en unos pocos días más se cambiara la luz a 12/12. Actualmente están de 25cm de altura, a los 30cm se cambiará a floración.

Likes
16
Share


@valiotoro
Follow
Hello everyone 😎
Week 9 of flower for the strawberry banana auto from Fast Buds 🍓🍌
One was ready !
She grew fast with beautiful color,for the nutrient 4ml/L terra bloom & 1ml/L power buds next week i will introduce Green sensation at very low doses from Plagron ✔️
Now only plain water💧
Amazing smell 🤤super fruity 🍓🍌
The buds are super sticky ✂️
Mars hydro SP-6500 100%
Have a nice day 😋
Likes
21
Share


@Hazeberg
Follow
Day 78: Nothing to do today.
Day 79: Nothing to do today.
Day 80: I lowered the light intensity to 6. Nothing else to do today.
Day 81: Today I pulled up some branches with some strings, as buds are too heavy and fall against the tent.
Day 82: Darkness.
--------------------------------------------------------------
You also like to get some seeds from Fast Buds?
You like a 15% discount?
Just use the following code on your next order: CSYIJC
Happy growing
--------------------------------------------------------------
🙏 Thanks for visiting and follow for daily updates 🌱