
Likes
Comments
Share


@Skinnytalls420
Follow
Day 38- 18/01/22 and we are now in flowering everything is looking good I’m still cutting down the plants from my last grow Afghan kush and once I’m done with that I’ll be moving everything that isn’t chemdawg into the HPS tent!!! Day 41-21/01/22 plant is finally in the hps tent and doing well!!!

Likes
9
Share


@PrinceOfHerbs
Follow
Started with flushing pure water.
Trichomes getting milky and amber colored
Flowering Day: 78


Likes
4
Share


@DatGuyGrows
Follow
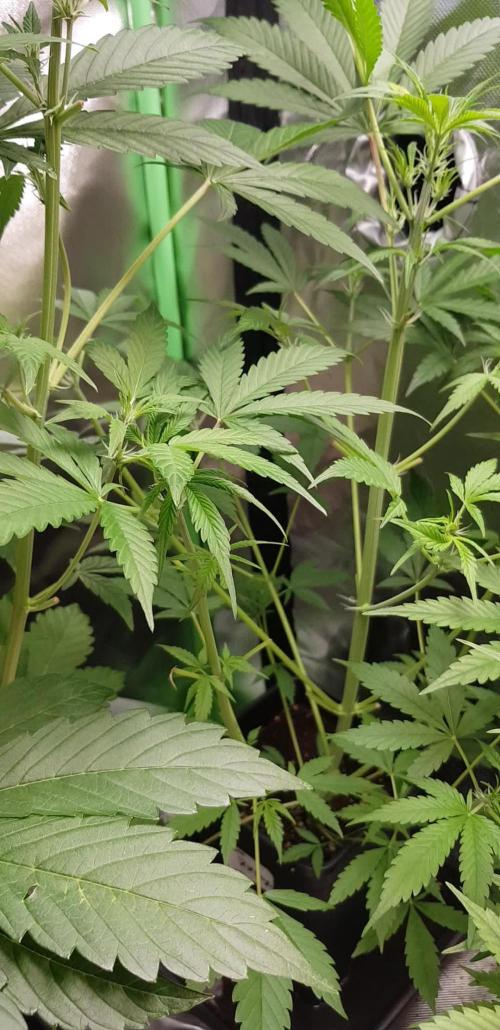
Grown out this week and got them ready for the early flower growth. Trimmed heavy and wired all branches away from each other. LST in full effect. Hoping it’s not too much trauma for them.. they proved me wrong. Bounced back with vigor and bright excitement! Eager to see these buds start forming 👀

Likes
57
Share


@ClubRiot
Follow
Start week 7 , Bio Grow 2 ml/L + Bio Bloom 4 ml/L + Sensi Cal-Mag Xtra 2 ml/L + CarboLoad 2 ml/L + Top Max 4 ml/L (Ph 6.7).


Likes
10
Share


@Mr_nugs_lover_David
Follow
The plant looks absolutely gorgeous, I had to reduce her height drastically due to her big size already, I want to avoid my plants from being seen from outside so let's see how this lady keeps developing guys

Likes
4
Share


Likes
2
Share


@Ultraviolet_
Follow
Topped once, turned off IR @ nights, slowed vertical growth back down, and took off both of the very lowest internodes on each plant.
Eisenia fetida
Stratiolaelaps scimitus
Armadillidium vulgare
Red wigglers (Eisenia fetida) are highly beneficial. They are considered an ideal choice for "no-till" or container-based organic growing because they live in the upper layers of soil, feeding on organic mulch rather than the plant's root system. Red wigglers accelerate the breakdown of organic amendments and produce high-quality, nutrient-dense worm castings directly in the root zone. Clover is another exceptional component of an organic rhizosphere, offering a sustainable, self-sustaining alternative to synthetic nitrogen fertilizers produced via the energy-intensive Haber-Bosch process. By forming a symbiotic relationship with Rhizobia bacteria, clover converts atmospheric nitrogen N2 into ammonium NH4, providing a steady, slow-release nutrient source that enhances soil health and reduces environmental impacts. Red clover offers superior nitrogen fixation and biomass production compared to white or yellow clover, making it the premier choice for maximum soil vitality, particularly for improving soil structure and providing a high-volume nitrogen credit for subsequent crops.
If it is fully functional and efficient soil, the rhizophagy cycle is superior long-term than any synthetic delivery when it comes to preventing deficiencies, not because it's "better," per se. The medium will require a very high CEC to make it to harvest without re-fertilization. The rhizosphere acts as a dynamic, interactive exchange where plants and soil microbes trade resources based on immediate needs. When a plant lacks a specific nutrient, it changes its physiology and releases specialized chemical cocktails—root exudates—into the surrounding soil. These exudates, which include sugars, amino acids, and organic acids, serve as a "shopping list" to attract specific microorganisms, which in turn return higher levels of desired nutrients. There is nothing in comparison when using synthetic delivery, which can cause plants to stop producing exudates, effectively "starving" the beneficial soil life, over time turning the soil barren and void of microbial life. Responsible use, applying the right amount at the right time, can minimize these negative effects. Relying solely on synthetic fertilizers without replenishing organic matter is what typically leads to exhausted soil. The use of synthetic fertilizers can utilize the Cation Exchange Capacity (CEC) of the soil, but without a robust rhizosphere and active microorganisms, the efficiency of this process is significantly reduced. This makes synthetic growing more difficult to prevent deficiencies overall compared to an efficient organic living soil with a robust rhizophagy cycle, as there is no "one size, fits all" when it comes to different nutrient profiles of strains/genetics, making it trickier to "guess" and prevent creeping deficiencies.
CEC does not contribute towards EC. Add more CEC using biochar, problem solved. If you keep pH between 6.3 and 6.7, hydrogen is exudated to cycle the medium's CEC for its needs. Keeping the pH between 6.3 and 6.7 creates an environment where plants release H+ to displace positively charged nutrients (like Ca2+, Mg2+, K+ held on soil particles or within artificial media this cycle through nutrients via the medium's Cation Exchange Capacity (CEC)
Microorganisms generate a stable potential of approximately 0.5 V EC. The rhizosphere creates its own food, similarly to chelation, using 1000's of varying combinations to create its own food.
Start to finish, just add water. Eventually, more materials will need to be added at the beginning of each new grow, but very attainable to go from seed to harvest without ever fertilizing.
ATP is important when it comes to biomass accumulation. Cellular root respiration and cellular respiration are essentially the same biological process, the breakdown of glucose to create usable energy (ATP) in the presence of oxygen, just taking place in different parts of the plant. Synthetic (salt-based) grows have significantly lower levels of total rhizosphere respiration, often referred to as root-zone activity, compared to organic living soil grows. While the plant roots themselves may respire in both systems, the surrounding soil ecosystem in a living soil setup is vastly more active, teeming with bacteria, fungi, and beneficial microorganisms.
2 pools of ATP, it won't double in growth buuuut, but improving root respiration by ensuring high oxygen in the soil is crucial. Good aeration ensures roots can fully utilize glucose to generate the ATP necessary for nutrient uptake, leading to healthier and more productive plants, even if growth isn't exactly doubled. The ATP created using root respiration is dedicated to rootzone growth; the ATP created using regular cellular respiration in a synthetic system would have to dedicate a lot of ATP to the roots when there is little or no root respiration. It's true that there is less of an initial ATP cost in breakdown when nutrients are already in their final form (synthetic), but you lose a solid chunk of ATP when the entire plant is reliant on cellular respiration alone; a large portion of ATP is dedicated to root zones for "forced" nutrient uptake rather than traded. Making it overall less efficient, even if the initial cost of breakdown is higher. Not sure if I butchered that but one can hope It makes sense.
Oxygen is of critical importance when growing in living soil compared to synthetic soil because it supports the metabolic needs of the microbial, fungal, and insect ecosystem, rather than just the root respiration required by the plant itself. While synthetic grows can survive in lower-oxygen environments with precise mineral feeding, living soil systems rely on aerobic microbes to decompose organic matter (microbial mineralization) to create plant-available nutrients, which is an oxygen-intensive process. While a specific fair percentage is difficult to guess, my experience points to a massive, compound difference between the two methods and the amount of oxygen required. All the ATP spared is used on more biomass, not only that, but the extra root respiration can achieve a much higher CO2 compensation point naturally than you could with synthetic and atmospheric CO2 alone.
As a plant grows faster and increases in size, its demand for nutrients to support that growth increases, requiring a higher rate of nutrient uptake. As plants enter phases of rapid vegetative/floral growth, their metabolic demand for nutrients increases exponentially. Without a robust buffer zone—whether in the soil (cation exchange capacity) or in a hydroponic reservoir—deficiencies will occur rapidly because the instantaneous demand for specific nutrients can quickly exceed the rate of supply.
A growing body of evidence suggests that organic living soil provides superior long-term soil health and environmental benefits compared to synthetic fertilizers, which are often criticized for promoting a cycle of dependency and degradation. While synthetic fertilizers offer short-term convenience and high yields, they often come at the expense of long-term soil health, sustainability, and increased corporate control over growers/ farmers. Organic living soil, while slower and requiring more care to establish, creates a sustainable, resilient, and, ultimately, more fertile environment.
We don't really grow; we facilitate energy conversions, and energy is just numbers. Because the universe works the same way today as it did yesterday, there is a single, fundamental mathematical quantity that remains constant. We call this quantity energy. You cannot put "energy" under a microscope. You observe matter and forces (like heat, motion, or light), but energy is just a scalar number calculated to help predict how these things will change and interact. When an object falls, or when a battery powers your phone, matter shifts and changes form. Through it all, the universe ensures the "total score" of the numbers remains exactly the same.
Once all water is removed, approximately 95% to 97% of a plant’s dry matter consists of carbon, oxygen, and hydrogen. These three elements form the structural backbone of all plants. NPK & all the rest 3-5%.
Indigenous Amazonians created, or at least significantly enhanced, the fertile, dark soil known as Terra Preta de Índio (Portuguese for "Indian Black Earth") by incorporating biochar and other organic materials into the soil. This anthropogenic (human-made) soil technique, which dates back roughly 2,500 to 8,000 years, allowed ancient civilizations to flourish in regions with naturally poor, acidic, and nutrient-poor tropical soils.

Likes
14
Share


@Grandillustrator
Follow
Happy with how they are going now still just giving plain water not much smell except after touching to defoliate smells unreal very orangey , defo needing a bigger tent & pots for next time

Likes
14
Share


@Esoteric_growing
Follow
Did a final defoliation and now should see some decent swelling of the buds over the next couple of weeks
Likes
38
Share


@J_diaz420
Follow
Enamorado totalmente de cada una de estas genéticas, ésta me tiró 4 monstruos de plantas 😍
Likes
19
Share


@Alice_in_Wonderland
Follow
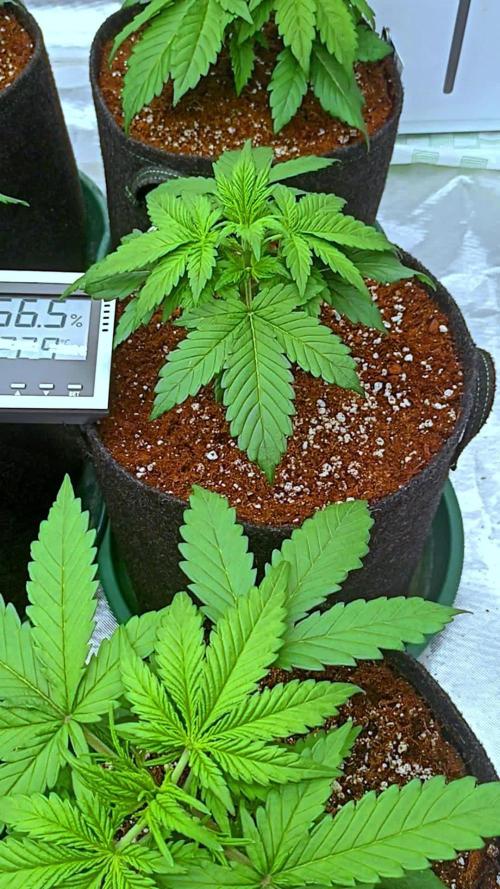
Day 15 - First day in the second week of veg cycle and I am generally happy with both ladies. Cheech is looking like she is bending over a little with the weight of her leaves, so I’ve given her a bit of help to keep her steady and strong.
I’ve also noticed that the roots on Cheech are sticking together and a bit darker than I would like. This could mean that the air stone left a “dead spot” where the water wasn’t circulating properly. I’ve adjusted the air stone to be more centre in the bucket and made sure that the water is cold enough to prevent potential root rot. Will need to keep a close eye for the next week or so.
Lights have been not been adjusted (still at 60cm from seedlings) because there has only been about a 2cm growth in the last week. Changed the water (10L), buckets and nutrients to keep everything healthy. The tubes for the air bubblers are wiped down because the nutrients stick to the pipe. Milwaukee PH controller is running for about 1 hour to bring the PH down again from the addition of the nutrients and change in water.
Day 17 and we have a clear front runner in Cheech. Her third node is open with a fourth clearly visible. Venezia has a clear third node, but it isn’t fully open yet with the fourth just barely starting.
Day 20 - Cheech has a clear fourth node now and the fifth is starting to show whereas Venezia is one node behind. They are looking healthy and they will be ready to be topped in the coming week of veg
Likes
6
Share

@Marijuanaut
Follow
Things are coming along nicely! 😍
Started the feeding with aptus premium line leftovers from the previous grow for the Dognabis Cup. 😎
Will start the LST soon. 😉
💚💛❤️

Likes
7
Share


@Cannabees_grows7691
Follow
Week three in flower 🤪 bud candy definitely getting great results from it. Highly recommend this product! Upped PH and dropped 10 degrees when light off.

Likes
141
Share


@Anonymous_2022
Follow
Thanks for stopping by.. Please hit the like button if you like what you see and ill be sure to check you out too Growmies 🌱
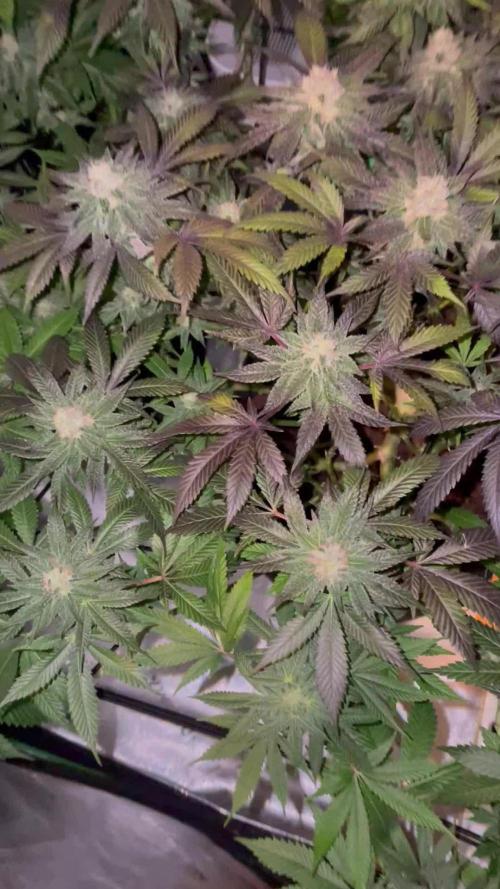
Week 5 of flower things are starting to get frosty and stinky … exciting times,
Temps 24-29 ✅
Humidity 60 % 🤔
Added a Dehumidifier and slowly bringing that humidity down ⬇️
Stretching seems to have slowed down so overall all good, Moving nicely, Roll on next week 👍👍👍
Likes
2
Share

@Kardo
Follow
Die Blätter sind lila und die buds sehen sehr gut aus sie macht gar keine Probleme
Likes
10
Share


@6toecat
Follow
Using a Rhaspberry Pi 4 to automate the watering and a TP-link 105 smart plug to automate the Viparspectra P2000 LED grow light.
You can see how I automated it here: https://hackaday.io/project/188129-rhaspberry-pi4-basic-watering-system-for-balcony
Basically, this is an "Automated Watering how-to Guide for Dummies" - as simple as technically possible. You still require some basic command line expertise, but the steps have been proven and I provide links to the gear I used AND the Node Red code, making this EASIER than anything else I've seen online.

Likes
17
Share


@EXZELENS
Follow
D71 - SEP 22: Looking and smelling great. Haven´t seen much growth since the last 5 days or so, but it fattend up really well and it´s really dense, insanely dense. Thricomes developing, soon to be harvested :)
D72: Now it´s time to mature, I don´t see any significant growth, only thricomes developing. No watering, it still has a lot. Humidity is really high these last 2 days, being around 50 - 70% rH.
D73: No watering yet. No signs of any more thrips, thankfully. Seems to have fattened a little.
D74: Maturing well, thricomes getting mostly cloudy and amber. No watering, tomorrow probably.
D75-D77: Been a little off of GD for these past days. The tent is looking good in general, no thrips anymore, temps and rH are good. Watered with nutrients on day 76. Thricomes are really close to harvest and I´m really impacient but I´m trying to wait for it to get more amber 😄
Likes
2
Share

@GERGrowDesigns
Follow
Welcome to Veg Week 4-5 of Divine Seeds Auto 77 Days
I'm excited to share my grow journey with you all as part of the Divine Seeds Autoflowering Competition 2025. It's going to be an incredible ride, full of learning, growing, and connecting with fellow growers from all around the world!
For this competition, I’ve chosen the Feminized Automatic strain: Auto 77 Days
Here’s what I’m working with:
• 🌱 Tent: 120x60x80
• 🧑🌾 Breeder Company: Divine Seeds
• 💧 Humidity Range: 60
• ⏳ Flowering Time: 56 Days
• Strain Info: 21%THC
• 🌡️ Temperature: 26
• 🍵 Pot Size: 0.5l
• Nutrient Brand: Narcos
• ⚡ Lights : 200W x 2
A huge thank you to Divine Seeds for allowing me to be a part of this amazing competition and Sponsoring the Strains. Big thanks for supporting the grower community worldwide! Your genetics and passion speak for themselves!
I would truly appreciate every bit of feedback, help, questions, or discussions – and of course, your likes and interactions mean the world to me as I try to stand out in this exciting competition!
Let’s grow together – and don’t forget to stop by again to see the latest updates!
Happy growing!
Stay lifted and stay curious!
Peace & Buds!

Likes
4
Share

@GERGrowDesigns
Follow
Welcome to Flower Week 3 of Sweet Seeds Strawberry Cola Sherbet F1
I'm excited to share my grow journey with you from my
Sweet Seeds Project . It's going to be an incredible ride, full of learning, growing, and connecting with fellow growers from all around the world!
For this Project , I’ve chosen the Feminized Photo strain Strawberry Cola Sherbet F1 :
Here’s what I’m working with:
• 🌱 Tent: 120x60x80
• 🧑🌾 Breeder Company: Sweet Seeds
• 💧 Humidity Range: 50
• ⏳ Flowering Time: 7weeks
• Strain Info: 18-22%THC
• 🌡️ Temperature: 26
• 🍵 Pot Size: 16
• Nutrient Brand: Narcos
• ⚡ Lights : 600W x 2
A huge thank you to Sweet Seeds for allowing me to try my Best with this amazing collection from Photo Strains they managed to Sponsore . Big thanks for supporting the grower community worldwide! Your genetics and passion speak for themselves!
I would truly appreciate every bit of feedback, help, questions, or discussions – and of course, your likes and interactions mean the world to me as I try to stand out in this exciting competition!
Let’s grow together – and don’t forget to stop by again to see the latest updates!
Happy growing!
Stay lifted and stay curious!
Peace & Buds!


