


Likes
Comments
Share


@GirlGoneWeed
Follow
Clones got transplanted into my organic recycled soil in solo cups and under the dome.
Under 300w LED QB dimmed at 50%
Watering with tap water. My live soil is packed with nutrient's and minerals so there’s no need to add nutes for now.

Likes
4
Share


@AestheticGenetics
Follow
5/21/25 beautiful plant. Yellowing is starting. Thinking it may be a magnesium def from using new Nutrients.
Took some clones and should be putting her into flower soon
5/22/25 not sure whats going on with her but shes nooot happy at all.
Sprayed with spinosad.
Top dressed uprising foundation which is a calcium magnesium sulfur and iron amendment. Hoping that may be helpful


Likes
12
Share


@Sundance
Follow
The weak plant is a disaster but learning making the masters, right. The healthy plant is fantastic, smell well and flowers are growing.

Likes
17
Share


@MoneyGrowup
Follow
Transplanted into a 3 gallon fabric pots. Cut off couple of the dried tips off the blue gelato, not sure what's up with it, the other two girl got topped left the gelato alone you can see why other than little blue everything is looking as I expected

Likes
18
Share


@Grow4Releaf
Follow
Just feeding the botanicare pure blend pro grow now , her soil ppm has been pretty steady on the one lady.
he lighter color bigger girl has been super hungry . She's gonna be a monster the nodes swelled up to support some monster branches. Can't wait to see how they fill out.
Gotta water them later so I'll snap some photos of the stalk and limbs just to show how bulky they have gotten.
But they are looking great , been stupid easy so far just keeping the soul free of salt building up aswell as trying my best to not over fertilize .. (nitrogen is pretty high I've noticed the darker green on the other girls. Besides the smaller plant it's PH is low from the automatic watering thing im trying out)
Really trying to get more time so I could be alil more detailed. New growers ask about my water routine but it's hard for me to explain atm . Gonna work on it and see of I can do these any better.
If ur reading these and have any kind of input please comment and let me know. I'm always looking for constructive criticism/ feedback..
But I appreciate anyone's time checking my mess out lol.
Week 7 underway getting closer to seeing these girls finish !!


Likes
10
Share


@russrahl
Follow
So here are a bunch of photos/vids of the first 4 weeks of flowering. This girl really took off and has filled out the 4’x4’ net on top of her nicely, and my 1000w hortilux eye HPS bulb is really kicking ass! Got her in the same tent/RDWC system as 1 other Cement Shoes and so far she’s loving it. Got a massive root system backing the 5 gal bucket and spread out beautifully. They are really drinking up the water now too, putting 2 gallons in everyday. Another 4-6 weeks to go! Cheers 💨
Likes
3
Share
@Chrisandweed
Follow
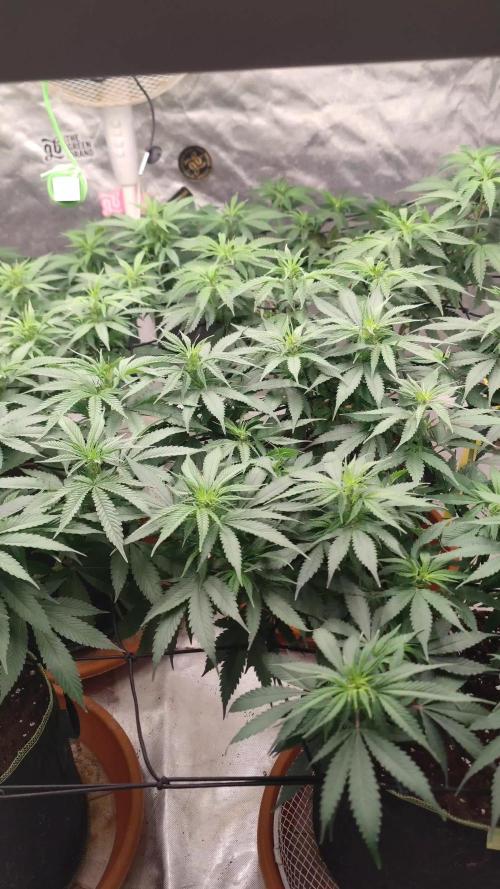
Pues HOY, miercoles 22 de abril, hago el cambio de fotoperiodo, a 14-14! De momento todo va según lo planeado, main lining hasta este punto, vigorosas y recias, se sienten muy sanas y beben muchisimo, de momento 3 litros por planta cada dos dias, veremos a ver ahora con la floracion.
Ahora esta primera semana voy a hacerle diferentes aplicaciones buscando cosas jajajajaja hoy la voy a hacer aplicación foliar del delta y no recuerdo si tocaba tambien a riego. Luego, algo que tengo ganas de ver, es usar el calcio ahora entre esta semana y la siguiente de aplicación foliar, pero en esta ocasión no solo para fortalecer la planta, sino para activar la hormona Ca²+ creo que se llama, que en sí es el mensajero de la planta que le dice, eeehh, haz mas resina que estás tirando poca! Y así la fuerza.. habrá que ver jajaja pero bueno, hoy arrancan las 14 horas de luz y 14 horas de oscuridad 🔥🔥
Las plantas, el dosel lo tienen sobre los 40cm, espero no tener que hacer super cropping, no soy fan.
Actualización jueves 23-04-2026: el video es del despertar tras sus primeras 14h de oscuridad. Aún no hay porqué ver nada respecto al cambio de fotoperiodo, lo interesante es lo vigorosas que están en el momento del cambio 🔥🔥🔥🔥💪🏾💪🏾💪🏾

Processing
Likes
17
Share


Likes
22
Share

@Bread_n_Buds
Follow
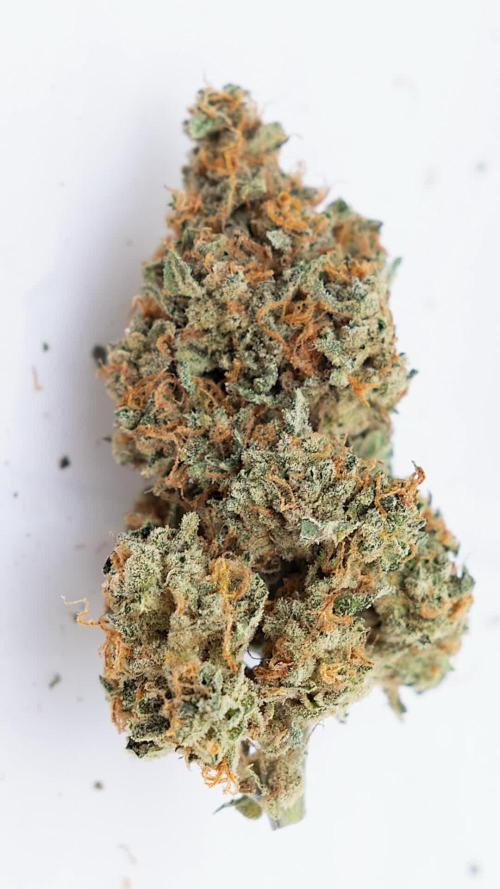
Here is the second Fruit Punch Automatic, the main lining has given it a very beautiful shape and high quality flowers.
** We remind all users that we grow two plants per variety, one worked with techniques and the other left to grow freely and beautifully to preserve its speed.
Description // This plant has undergone the first cut and then we went to create the Mainfold at the second internode. In autoflowering plants I choose to cut very early to lengthen the vegetative phase as much as possible and give the plant a lot to make as much cannabis as possible.
She is a plant with a low internodal distance so she remained low but the quality believe me is high.
I can't let you smell it, smoke it, vaporize it, put it under a press but I can show it to you, take a look at how juicy it is.
The flowers are big, large, very hard like Carrara marble and very very full. Really excellent quality of buds.
Do I do it with techniques or let the plant grow? They are really two beautiful plants with excellent quality flowers. Maybe this one has a little more quality of flower and the other a little more production, however they are both around 50gr clean, without stakes and no residue, only dry buds.
Trichomes and maturation // We carried out a careful observation under the microscope at 10x (and 10x x 1.6) and we noticed a good percentage of amber trichomes, mostly milky and a few transparent; for us it is a great time for harvest. I do a lot of daytime use, so I do not want to over-mature the plants, oxidize the THC and make them relaxing. Even the best sativa matured on the palate becomes more indica. I have to monitor the effect of daytime use a lot.
Fertilizers and soil // We used the organic line of Plagron fertilizers the whole time, all the recommended additives and the unfertilized and organic Pro Mix soil. Calculate everything according to your needs on the website ------ https://plagron.com/
The nutrients are available in convenient packs on the Zamnesia website
--------- https://www.zamnesia.io/en/11457-plagron-easy-pack-natural.html
One of the best in recent years with a very high THC level
------------------------------------------------------------------
https://www.zamnesia.io/en/10965-zamnesia-seeds-fruit-punch-automatic.html
A short description of Zamnesia // Sativa strains are very rewarding to grow, but their long flowering times and greater susceptibility to disease and over-fertilization can make them a little more difficult to manage. Additionally, their imposing heights are less suitable for indoor use and can attract unwanted attention when grown outdoors. However, with the arrival of Fruit Punch Automatic, growing sativa strains at home just got a whole lot easier. Combining Skunk #1, Haze and ruderalis, Fruit Punch Auto is a 70% sativa-dominant strain that produces up to 21% THC, along with a delicious blend of terpenes. Plus, it can be grown indoors, outdoors and in a greenhouse. With bright green hues, golden pistils and a thick layer of resin, Fruit Punch Auto buds always have a great appeal. When you smoke her, you will be amazed by her flavours, aromas and effects! As the name suggests, Fruit Punch Auto boasts delicious tropical aromas reminiscent of banana, pineapple, mango and citrus. Opening the jars will make you feel like you are in a tropical cocktail bar on an exotic beach. Fruit Punch Auto will delight your palate with pungent fruity notes followed by light notes of Skunk and spice on the exhale. Within minutes of taking your first hit, this potent sativa will stimulate your mind, leaving you in an energetic and carefree state, ideal for morning or daytime sessions, as well as social settings or creative pursuits.
The whole world of growing and much more is at Zamnesia: just take a look at the site and you will find "all the best that nature has to offer" in various shapes and colors.
---------------
www.zamnesia.com

Likes
12
Share


@Greenshift
Follow
Hallo zusammen!
Sie wurde die Woche 2x mit 1,2 L abgestandenem Leitungswasser (PH reguliert) gegossen.
Sie wird jetzt noch für ein paar Tage ins Dunkel gestellt und dann geerntet.
Nächsten Sonntag gibt es wieder mehr :)
Bis dahin:
happy growing u awesome people!

Likes
9
Share

@FireAntTheGrower
Follow
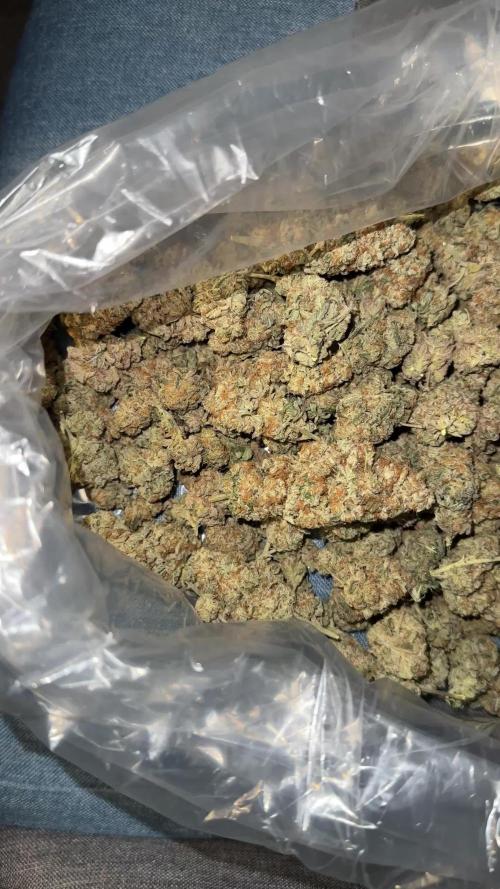
I definitely enjoyed and having cool cure definitely a game changer . Bout to test it out some more by leaving the buds or recent harvest inside the system. Thinking cutting down the time 4 weeks in veg and 8 to 9 weeks in flower to keep it coming and posted..
Processing
Likes
11
Share


@OriginalRay
Follow
Both seem to be slowing down as far as stretching goes. They both are getting slightly taller every week. There were a few weak fan leaves and stems near the bottom of both plants so I defoliated a bit more. Bud sights look nice and healthy and are have a nice slight smell.

Likes
10
Share


@Andres
Follow
I already imagine it with a lot of summer sun ... 100% recommended ... I will grow one of them again ....
Likes
9
Share


@Mr_nugs_lover_David
Follow
Very nice smell coming from this buds guys! Very good strain to grow, let's see how those buds keep developing, they still have a long way to go! I just cannot wait to see this flowers in a couple of weeks more, I'm only watering using pure water, the FLO Living soil blend provides everything the plant needs and you only have to apply h2o and that's it!. Hope you guys enjoy my work! 🤗👨🌾🙏💚💛🧡

Processing
Likes
37
Share


@TheIceCreamParlour
Follow
Hey! Welcome to my next grow. Decided to give autos a swerve for a while for a few reasons. I've had a bad run of germination from my last few attempts. Also some of the plants I have been growing have flowered far too early which would be a huge waste of valuable tent space.
Big shoutout and thank you to the team at RQS. James contacted me and asked if I could run one of their strains in my setup. I'm a big big fan of blueberry strains so decided to give the Haze Berry a go! James sent me 5 seeds out along with a sweet box of goodies.
To my delight all 5 seeds have germinated in water so all 5 are now in the tent. Seeds in soil today (11.02.19). They will undergo the full Ice Cream Parlour experience meaning topped at the 3rd node. Supplemented with 1200ppm co2. LST and Scrog under the usual Maxibright 315w laps and an extra LED to boost them along mid flower.
Keep checking back for updates. I'll be giving this strain my complete attention aiming for a big yeild and quality buds.
Update - I put seeds into water on 8.02.19. Moved the sprouted seeds to 20 litre pots on 11.02.19. Now 13.02.19 they have broken the surface of the coco and showing their cotyledons. I will start supplementing 1200ppm Co2 from tomorrow.
Processing
Likes
5
Share


@Ensign420
Follow
Week 02 Introduction
This week has been a bit of a struggle. Had my first experience dealing with slime and brown algae. But I think adding enzymes and increasing the beneficial bacteria helped to fix the issue. Also experienced nutrient burn for the first time. My nutrient solution strength got as high as 671 PPMs. So backed it down to about 430 PPMs during the end-of-week reservoir change. Also cut Hydroguard (expired?), CaliMagic, and Superthrive from this grow. Now she's still stunted, but is starting to recover. Hopefully...
[START OF WEEK 02]
Day 01 - Monday - 08/10/20 - Total Days: 008
-----------------------------------
- [0830]: Still looks a bit yellow. But getting larger!
--- Solution strength was at 248 PPMs.
--- Just topped off with a bit of distilled water
--- PH went up to 6.1 so PH'd down to 5.8
--- Ran the top feed for a bit to wet the hydroton.
- [2130]: She's looking even more yellow now.
--- Even the new leaves are really yellow.
--- Decided to add more base nutes.
--- Added 4ml of Sensi A
--- Added 4ml of Sensi B
--- Now at about
--- Solution Strength went up to 304 PPM.
--- PH was at 6,
--- Also raised the water level a bit more.
--- I really hope it's a nutrient deficiency and not an over-watering issue.
--- Please live!
Day 02 - Tuesday - 08/11/20 - Total Days: 009
-----------------------------------
- [0830]: Looking less droopy. But still yellow.
--- Decided to do a reservoir change.
--- 4.5gal of distilled water
--- 8ml of Sensi Grow A
--- 8ml of Sensi Grow B
--- 8ml of Voodoo Juice
--- 4ml of B-52
--- 4ml of CaliMagic
--- 4ml of Hydroguard
--- 4 drops of Superthrive
--- PH'd down to 5.8
--- Solution strength: 302 PPM
--- Since I didn't want to risk over-watering the rockwool, I did not to do a top feed, may do one tonight after the sleep cycle (lights are still set to go off at 10am and back on at 4pm).
--- As I was doing a reservoir change, I noticed that the tubes and bucket were a bit slimy. Didn't really stink or anything. Is this normal? Maybe due to the Hydroguard and Voodoo Juice?
--- I hope she gets better soon!
- [2215]: Getting larger! But still yellow.
--- Also can see a root growing through the net pot! Tiny little thing but it's there! Will have to start dropping water once more appear.
--- After looking over a few DWC diaries using AN nutes, seems like my solution strength is still too low. Most around this stage average around 500 PPMs with about 4ml per gallon.
--- Top fed for a minute to wet the top of the hydroton.
--- Solution strength went down to 263 PPM.
--- Added 8ml more of Sensi A
--- Added 8ml more of Sensi B
--- Now base nutes are at 16ml for 4.5 gal of water.
--- PPMs went up to 411.
--- Still lower than 500 PPMs, but that's okay.
--- PH was at 6. Not sure if I should adjust PH using AN nutes. So going to not ajdust unless PH goes above 6.1.
Day 03 - Wednesday - 08/12/20 - Total Days: 010
-----------------------------------
- [0830]: Looks like more root growth!
--- She still looks yellow. But leaves are perky.
--- PH was at 6.2 so lowered down to 5.8.
--- Solution strength was at 394 PPMs
--- Since roots are still growing, I decide to lower the water level a bit. Now water level is a bit below the net pot.
- [2200]: Root is getting longer!
--- Slime is returning. Not sure why.
--- Solution strength: 357 PPMs
--- PH: 6.1
--- Decided to add an enzyme along with more beneficial bacteria to hopefully cure the slime.
--- Added 16ml of Sensizym
--- Added 5ml of Hydroguard
--- Added 8ml of Voodoo Juice
--- New solution strength: 430 PPMs
--- New PH: 6.1
--- Top fed for a minute.
--- This slimy residue is really freaking me out! I hope the added enzymes will help eliminate the slime.
--- Going to do a full reservoir sterilization/nutrient change over the weekend. Please survive until then girl!
Day 04 - Thursday - 08/13/20 - Total Days: 011
-----------------------------------
- [0930]: I think the enzymes worked! There is little to no slime now!
--- Although I think the root was also dissolved in the process. It's now just a little stub sticking just below the net pot. The enzyme is also suppose to dissolved dead roots too but guess that root was too weak? Not sure what happened there. But I think the slime is cured!
--- Solution strength went down to 395 PPMs. Decided to add more base nutrients.
--- Added 8ml of Sensi A
--- Added 8ml of Sensi B
--- Added 4ml of B-52
--- Solution strength went up to 598 PPMs.
--- PH was at 6.1
--- As long as the PH is between 5.5 and 6.3, I'm not going to use PH Up or Down. But still will monitor PH levels.
- [1715]: Checked up on her after her nap and shes looking alive but stunted. But no slime!
--- Decided to add some sugars to help maintain the enzymes and beneficial bacteria.
--- Solution strength was at 587 PPMs.
--- PH was at 6.2
--- Added 8ml of Bud Candy
--- Solution strength went up to 671 PPMs.
--- PH also went up to 6.3
--- Lowered water level a bit to hopefully promote more root growth.
--- Top fed for a minute.
--- She is getting bigger, but still looks yellow.
Day 05 - Friday - 08/14/20 - Total Days: 012
-----------------------------------
- [0915]: Leaves look a little burnt on the tips. Still no slime.
--- Going to back off on the PPMs to hopefully fix the nutrient toxicity.
--- Solution strength was at 632 PPMs
--- PH was at 6.3
--- Added/Removed water until PPMs were at 536.
--- PH was still at 6.3
--- Raised water up a bit, then top fed for a minute.
- [2200]: Looking better. Still yellow though.
--- Solution strength: 514 PPMs
--- PH: 6.5
--- Added PH down.
--- New solution strength: 518 PPMs
--- New PH: 5.2
--- PH was kind of high. So decided to PH down. Had to use quite a bit to bring it down. But eventually got it to drop down to 5.3. A little low, but so far, the PH has always gone up so wanted to start it really low.
--- Ran the top feed for a minute to re-saturate the top of the hydroton.
Day 06 - Saturday - 08/15/20 - Total Days: 013
-----------------------------------
- [0830]: She looks stunted. leaves are still yellow.
--- Solution strength: 514 PPMs
--- PH: 5.6
--- Top fed for a minute.
--- Not sure what to do at this point. Going to do another reservoir change soon. Hoping she lives until then.
- [2145]: Looking pretty much the same.
--- A bit of slime has returned. Since I've been diluting the nutrient solution, the enzyme ratio has dropped. So I guess this is expected.
--- Also noticed that slime build up was on the air-stones. Never really checked the stones so not sure how long that has been there. Looks brown too, which can't be good.
--- Going to do an H202 sterilization of the system (minus the net pot) tomorrow so did not add anything.
--- Lowered the water level to below the net pot.
--- Then top fed for a minute.
Day 07 - Sunday - 08/16/20 - Total Days: 014
-----------------------------------
- [0900]: STERILIZATION DAY!
--- Decided to skip today's night cycle for a deep clean.
--- I'm hoping that skipping a night cycle won't be too stressful.
--- Temporarily moved her to a new bucket.
--- Used about a half of gallon of straight distilled water to flush out the net pot.
--- Drained the system and wiped up all the brown sludge. Also removed the air stones and cleaned up all the goo.
--- Filled the system with 2 gallons of distilled water and at least 30ml of food grade hydrogen peroxide (35% strength).
--- Yea its a lot, but since I'm not going to sterilize the system overnight, I went with a really high doseage. Basically I kept adding until I started to see little bubbles start to form.
--- Then I ran the water pump.
- [0915]: Boiled the air stones in tap water for about 10 min. Then reconnected them to the airlines.
--- I let the air stones and hose soak in the sterilization solution for about 5 minutes so the peroxide can absorb into the stones. Then ran the air stone to help mix and agitate the solution.
--- Occasionally, I'd repeat the process of turning the air pump off for a few minutes to let the stones soak.
- [1000]: Covered the top two row of holes of the net pot with some aluminum tape. Hopefully this solves the light leaking in through the hydroton.
- [1200]: Used an old toothbrush and scrubbed the pump clean. Then drained the system.
--- Refilled with more distilled water and peroxide. Again added a lot.
--- Ran system again to sterilize even more.
- [1530]: Drained the system and refilled with distilled water to rinse.
--- Ran the system for a few minutes, then drained and rinsed again.
--- Did this a few more times over about an hour.
- [1630]: Added 4 gallons of fresh distilled water.
--- Added 15ml Sensi Grow A
--- Added 15ml Sensi Grow B
--- Added 12ml of B-52
--- Added 16ml of Voodoo Juice
--- Added 16ml Sensizym
--- Solution strength was at 430 PPMs
--- PH was at 5.6
--- I was going to add Hydroguard, but I think the bottle is expired. Since 2017 or 2018!? I think Hydroguard is good for up to 2 years from the date on the bottle or 6 months after opening. So not going to use from now on. I wonder if this could have contributed to the slime build up.
--- Also removed the CaliMagic and Superthrive too. Going to only use AN products to eliminate the chance of incompatible nutrients.
--- Placed her back in the bucket and top fed for a minute.
--- Here's hoping for the best. Going to let it ride until morning! Please feel better!
[END OF WEEK 02]

Likes
15
Share


@hinterhofgrower
Follow
🌱: Opend up the canopy with garden wire on day 65. Patial harvest by accident on day 69, 73g
💧 : 12l SIP
💡 : Dli: 45 mol/m²/d
🤔: "There is rarely any harm where there is no benefit," my grandmother would have said. This gives me the opportunity to test the taste and effect of an early harvest. Now I have a triangular plant!
Likes
16
Share


@eldruida_lamota
Follow
Esa familia , estamos otra vez y aquí actualizo la quinta semana de floración de las BlueBerry Cheese del banco de semillas ZambezaSeeds.
Estas tienen buen color y el proceso de floración es el correcto su progreso es increíble.
Ahora empezaré a aplicar el ExplotaCogollos de Agrobeta que es Brutal como compacta las flores , palabra.
Que ganas ya de acabar estos proyectos y empezar con cosas serias.
Os adelanto que lo próximo que que viene son Gelato y Lava Cake, y después Titán F1.
Agrobeta:
https://www.agrobeta.com/agrobetatiendaonline/36-abonos-canamo
Mars hydro:
Code discount: EL420
https://www.mars-hydro.com/
Las maximas de temperatura no superan los 26 grados y las mínimas no bajan 20, así que no me puedo quejar.
Los niveles de humedad también son los correctos van entre 50%/65% de humedad relativa.
Por supuesto el Ph lo estamos dejando alrededor de 6.
Hasta aquí es todo, buenos humos 💨💨💨.

Likes
28
Share


@MadeInGermany
Follow
Hey everyone 😃.
This week she has done great 👍.
It was done again on all the drifted topping and sprayed one last time with neem oil so that the last trips are finally gone 😁.
We haven't had any pests for so many years and all of a sudden we have such little shit parts 😅.
This week it was poured twice with 1.2 l of water.
GHSC enhancer was added during a pouring (1 g per l)
The tent was cleaned every day this week and the plants were checked for health.
The humidifier is filled once a day.
Next week I will decide how I will continue the training because I have space again in the flower tent 😀.
This week I'll decide whether it goes straight into the flower tent or is pruned again.
Until then, I wish you and your families a good start into the new year 2021 🙏🏻.
Stay healthy and let it grow 🍀
You can buy this Strain at :
https://www.royalqueenseeds.de/feminisierte-hanfsamen/115-amnesia-haze.html
Type:
Amnesia Haze
☝️🏼
Genetics:
Original Amnesia Haze
👍
Vega lamp:
2 x Todogrow Led
Quantum Board 100 W
💡
Bloom Lamp :
2 x Todogrow Led
Cxb 3590 COB 3500 K 205W
💡💡☝️🏼
Soil :
Canna Coco Professional +
☝️🏼
Fertilizer:
Green House Powder Feeding
☝️🏼🌱
Water:
Osmosis water mixed with normal water (24 hours stale that the chlorine evaporates) to 0.2 EC. Add Cal / Mag to 0.4 Ec Ph with Organic Ph - to 5.5 - 5.8 .