


Likes
Comments
Share


@boneyjones77
Follow
Hey guys, hope all is well !
Nothing much going on except the fact I have to break ice to get my water now lol . I’m just letting them try to find themselves a little on their own this week. I find one of the biggest advantages of indoor growing could also become a problem is that you spend way to much time staring through the window then opening it back up and playing with stuff !!!

Likes
9
Share


@rhodes68
Follow
9/4 Day 135 of the grow, wow 20 weeks
Plants doing well all depends on weather now I guess
9/4 Keeping tabs from here out in terms of day of flower, total grow length has no bearing.
Poly Day 55 of Flower 9-14 days remain
Zona Day 45 of Flower 19-24 days remain
9/7 Re-adding Big Bloom (Fox Farms) to nuet mix, plants seem to be missing it and I agree. Once a week at 3 tps/gal

Likes
3
Share


@Muxa752
Follow
Цветение скучная пора, ну оно и к лучшему , походу дела гров получится. без серьезных ошибок) шишки набираю вес . пытался рассмотреть трихомы , получилось не очень , вроде уже мутные . но спешить не будем . удобы убрал вообще , побольше промою водичкой . напомню , все делается без измерений PH. на видео показан состояние грунта , корневая развита , аэрации помогают мелкие существа )

Likes
4
Share


@Rele99
Follow
Couldn't take care of her personally thi s week as I wasn't home, so my roommate did it. I'm very happy with the results, especially considering that the growing conditions aren't the best (it's been raining constantly this past week). I thought that she would've stop growing since she started the blooming phase, but she's actually growing faster that she was before. I'm not really sure how to properly do LST, still I did my best


Likes
53
Share


@AutoCrazy
Follow
It was a fairly busy week for this fine lady. No one likes their lady too bushy, right, 😉 so I have been cleaning up lower growth every 2-3 days as of late.
I also put her in a 20 gallon pot this week and that was a bigger challenge then I anticipated 😅😅. First I had to get her untied. Then I didn’t quite get her tied down as well as I had her in the 10 gallon pot but she is still nicely laid out IMO.
I may have to adjust how she is tied down in the weeks to come as these genetics can really stretch out!!
Stay tuned
😎🍿🍻🌱

Likes
209
Share


@BioBuds
Follow
This strain is performing like crazy. My god, she just wants to go and go and go. See the difference with the previous week, it's going crazy in this tent. I had some space to fill because one of her roommates turned out male. More about this in my Xtra Kush diary.
But fill up they did, I turned her around, for the change of scenery, but also to let the longer side branches fill up the space in the scrog. And did she. With all these bud sites, the rapid growth of flowers, this strain is having a good time.
Very happy with how my soil recipe is performing (see the yellow image in earlier pages), none of the crazy stories of going hermie when stressed. Just some T. L. C. and this strain outperforms anything I have recently grown.
But this SP-3000 is just a beast of a light and we owe much of this success to @MarsHydroLED, who was so kind to let us try their light. Check www.mars-hydro.com for the Black Friday deals!
What I did to prevent this strain from going hermie:
- No defoliation. Will start a little after the third week of flowering.
- Little extra flower feed in the waterings, no amendments yet, I have no yellowing at all.
- As little stress as possible
- Reassuring them in their gender, be proud of your female qualities, no need to go all masculine on us.
See you next week, thanks for checking in again!!

Likes
3
Share


@Barcelona_Farmers710
Follow
Booom! Ya tenemos los cogollos formandose Farmers!! Ya casi no se nota la falta de magnesio por problema con el humidificador pero en breves ya empiezo lo buenoo!😜 mis favoritas las de Barneys Farms!!! espero que os guste farmers buen comienzo de semana!!💚

Likes
39
Share


@AestheticGenetics
Follow
5/8/25
Chopped at day 65 of flowering. Will update more soon.
Not sure if the plagron product did much of anything.
Thank you to Zamnesia and Plagron for sponsoring this Grow.
5/9/25 first day/night of drying and temps are at 67.8 and humidity is at 61%
5/12/25 i had left for vacation for the weekend but when i came back the whole house smelled like a dispensary lol and the humidity was down to 55% sadly
but i have it back up to 60% and 67°F. tonight will be day 4 of drying and i suspect theyll be done in the next couple days around day 6 or 7
Eternity Grow Cup 2025 🤙💣🤘


Likes
57
Share


@BudBoutique
Follow
! this is my current status, gonna upload my last veg weeks within the next week - got a bit busy around Spannabis - thank you for your understanding! 💚
Welcome to Bud Boutique Grow Diary - really appreciate all your love and support :)
Dont forget to check out my other current grows!
🗓️ This Week:
after 48 hours of complete darkness (important for seedlings to make sure all plants switch into flower same time), I finally switched my lights to the 12/12 schedule and sent my ladies into the flower.
- both Phenos super strong and praying up,
- more than healthy and going well
- Day 3: Foliar spray with APTUS Regulator and APTUS Nutrispray to give them extra micronutrients and give them a little shell for protection.
! always use APTUS Regulator first and mix well with your water before adding any other nutrients for Feeding or Foliar!
Thank you for still staying with me 💚
___________________________________________
--- 🌱 Strain (Sponsor) 🌱 ---
🏷️ PEACH GIRL by Art Genetix
https://www.artgenetix.world/product-page/peach-girl
--- 🥗 Nutrients and Feeding (sponsored by APTUS: APTUS Ambassador) ---
🍸 APTUS: full nutrient schedule extreme
-- Regulator, N-Boost, P-Boost, CaMg-Boost, K-Boost, Allin1 Liquid, Startbooster, Topbooster, Enzym+ every feeding
-- Fulvic-Blast, NutriSpray as Foliar each once a week
🔗 https://aptus-holland.com/
--- ♻️ Grow Control (Sponsor) ---
TROLMASTER: TENT-X + LM14 Light Adapter to dim/sunrise/sunset lights + Temp & rH Sensor all remote on App
🔗 https://www.trolmaster.eu/
--- 🏭 Grow Setup ---
💡LUMATEK Zeus Pro 600
* 🏠🌿 Indoor: Homebox 120x120x200cm (4x4)
* 📐🌀 PrimaKlima exhausting Fan 1180m3/h (running on 60-80%)
* 🌀 Can Light Filter 800m3/h & 1x Fanbox 1x Dyson fan for Air circulation
🔗 https://lumatek-lighting.com/zeus-600w-pro-29/
🔗 https://primaklima.com/de/shop/ventilatoren-de/ec-ventilatoren/pk160ec-tc/
🔗 https://canfilters.com/products/filters/
All Likes and comments are highly appreciated!!!
👨🌾 don't forget to check out my Instagram for daily educational content: budboutiquee
- Bud Boutique

Likes
49
Share


@hawkeye_diesel66
Follow
She is truckin right along. I love this stage of flower when little buddlets are all over her. If the genetics of fast buds are all like this, I may have found a new autoflower place, I do want to try some memphosto genetics though. I'm always hearing and seeing those big plants they throw out. Not many picture's this week got busy and had to play catch up.

Likes
15
Share


@Lordviper28
Follow
These lady's have formed very nice buds even have a few show purple 😍 this strain has been very good can't wait to see war other color pop off right it's the start of 6th week flower

Likes
2
Share


@eldruida_lamota
Follow
Que pasa familia, vamos con la quinta semana de crecimiento de estas Gorilla Melon feminizada de fastbuds.
Vamos al lío, de las 3 plantas, me quede con 2 por espacio, siempre pongo alguna semilla de más por si no abriese alguna por no perder ese hueco del indoor.
También se trasplantaron a su maceta definitiva, en este caso de 7 litros.
Y ya superaron el shock provocado por el mismo trasplante.
El ph se controla en 6.2 , la temperatura la tenemos entre 20/22 grados y la humedad ronda el 50%.
Hasta aquí todo, Buenos humos 💨💨💨
Processing
Likes
25
Share


@TegridyCal
Follow
The "Gelato" grows in a very particular way, an irregular bush with the right brunches in the right place, we have also patched the sides and placed something dirty in the regrown central.
Likes
Comments
Share

@Cruzito
Follow
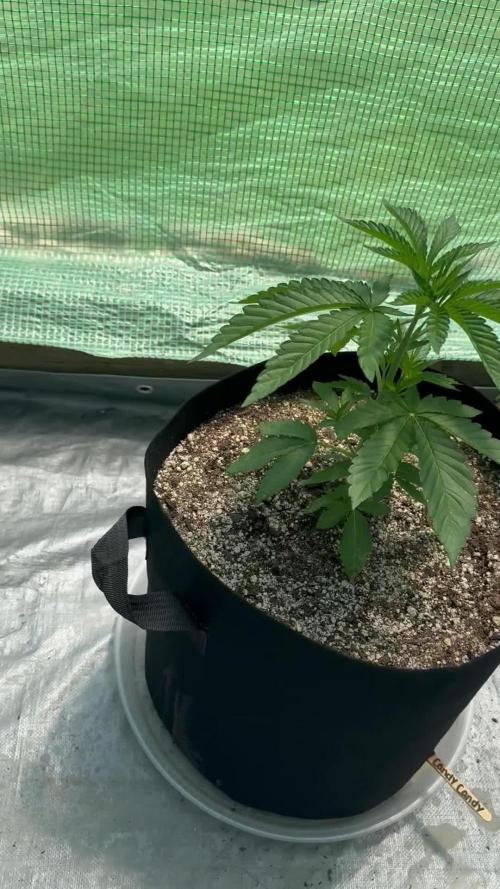
Almost killed one of the candy candy plants today by watering too fast ended up LST-ing all of the plants with the exception of the other candy candy which I am letting grow natural.


Likes
73
Share


@Roberts
Follow
I am dropping a Deep Forest Auto for a coco coir grow in a air pot. First time using a air pot. It should not be any different then using a fabric potter. I scuffed both seed ends lightly. I then dropped it in water. Within 24 to 48 hours of seeing the tap root start I will plant it in the coco. I will then dome it till sprout. Thank you Doctors Choice, and Medic Grow. 🤜🏻🤛🏻🌱🌱🌱
Thank you grow diaries community for the 👇likes👇, follows, comments, and subscriptions on my YouTube channel👇.
❄️🌱🍻 Happy Growing 🌱🌱🌱
https://youtube.com/channel/UCAhN7yRzWLpcaRHhMIQ7X4g

Likes
10
Share


@StickyFingah420
Follow
Planta hermosa, por problemas de respaldo no tengo sus fotos finales y es una pena :( pero puedo decirles que es una planta que rinde bien, entrega frutos de calidad y no es para nada exigente.
Likes
56
Share


@Cannabeast40
Follow
Let´s get this going asap 😎
See you again very soon 😍
____________________________________________________
If you want to see more macro and micro photos, don’t forget to visit my Instagram page 🙂🙏🏻
https://instagram.com/cannabeast40?igshid=YTQwZjQ0NmI0OA%3D%3D&utm_source=qr
