
Likes
Comments
Share


@Silverback_Guerilla
Follow
10/31:
I fed today with one, signal, sweet & sticky, beastie bloomz, and silica.
The taller one is gonna have a really nice fat cola, but the other one split off when I tied her down early on and she's a tri-spire now...a little paler than the big fattie too.
11/4:
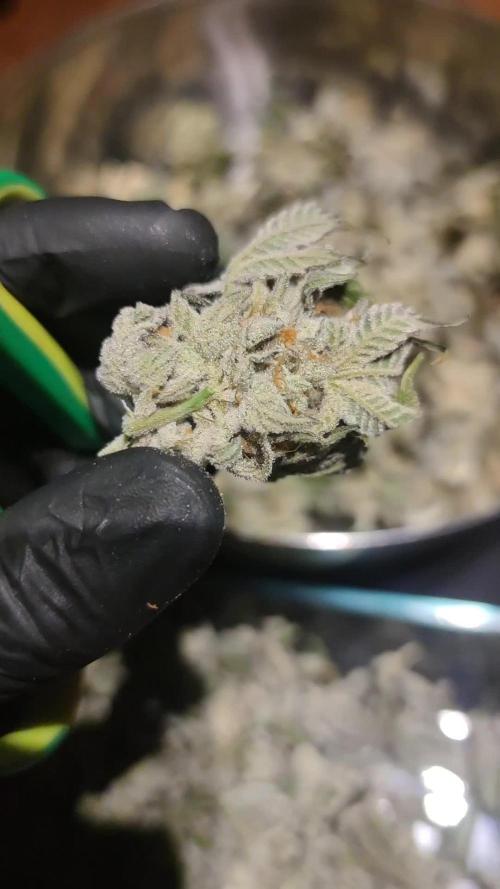
Fed with one, signal, sweet & sticky, beastie bloomz, silica, and humic acid.
The big one smells like a candy shop now....delightful!👍

Likes
7
Share


@FruitBud
Follow
Un video della moby mi scuso per la qualità e il rumore fastidioso sotto,devo dire che sta fiorendo bene sono contento comincia a brillare come piace a me.🐋❄️


Likes
7
Share


@Nikkov
Follow
Well, another week has passed and the end of the second week has come and the pistils have already shown themselves and I continue watering with top crop bloom, first time testing this fertilizer and I'm only using two of them, top veg and top bloom, next cycle I'm going to use General Hydroponics fertilizers because I have a friend who uses them and he's having great results, I still want to talk to my friends about this strain because I think it hasn't grown as it should, but anyway we're studying to improve ourselves for the next ones, the rest is all experience for the next ones it grows. =D
Likes
6
Share


@OrionSparkles
Follow
🍨👤
-Van floreciendo super.
-Apliqué PKBooster compost tea..
-15 gramos x 1L,más,5ml de Orgatrex,aireando la mezcla 24 horas antes del riego.
-Es el primer riego con esta mezcla,seguidamente daré dos más,aplicando en las dos siguientes semanas.

Likes
21
Share


@KrautFabrik
Follow
Day 28: nutrients like plan
---------------------------------------------
Not much to say, we are in bloom now.
Happy growing 🕷️✌️
Likes
4
Share


@GODAXE
Follow
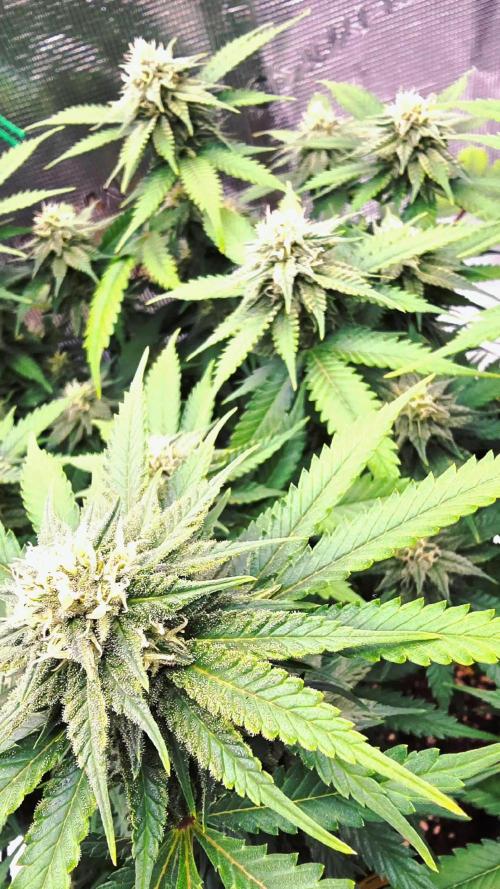
27.08.2024
D48 since cutting,
lady starting to bush like their mother, as i did nt have place for 8 massive bush in the tent i proceed to some pruning and set some bud clip.
overall look
GBC #1
16 inch, flowering
GBC #2
16 inch, flowering
GBC #3
16 inch , still in veg, 😰
GBC #4
18 inch, full bud mod 😍
GBC #5
18 inch , full bud mod 😍
GBC #6
19 inch, flowering
GBC #7
20 inch, start flowering👍
GBC #8
18 inch, flowering
i will not weekly uptade, but keep you tuned

Processing
Likes
9
Share


@Nookandplant42o
Follow
Earlier watering was fed with nutrients, and my temperature is not low so I should go with minimum to medium quotas with more water avoiding burns, without much runoff mixing with soil compounds and mycorrhizae for better performance I know they need a calcium magnesium for better performance the problem is money I will continue with the use of salt Epson the option I have at the moment, direct sulfur in the soil mix has helped me hear a noticeable change.
watering ph 6.2 solution temperature 20 ° - 0.50 g of large white microreceptor 2 days earlier sprayed with ppm-free water via leaves - lights off to serve as a cool-down shower is great for stomata .
Simple led panel added as main light source 260watts being divided to 3 plants in the fullspectro tent model, did not get much difference in temperatures compared to HPS, is more the same spectro ratio and UV to reach more directly in the trichomes and terpenes. Moc medium leaves look more like Indica while larger leaves bring one more sativa a set a nice strong sweet smell, I prefer to conclude in the end the true tone I feel, she drinks more water than others the soil is easier to drain So I see in her an ability to take more quotas of nutris, slowly being able to take if necessary always try to avoid burns ...


Likes
10
Share


@KushManF
Follow
Some of the leaves are yellow/ brown. Did a bit of research, looks like soil might be dry (especially due to high temps during this time of year) and possibly leaves being burnt by sun.
Watering with a little bit more volumes of water, based on extra heat. Will track and see how week goes. The 2 bad fan leaves which looked really bad, I cut them off. Increase in volume of water for plants really helped due to really hot temperatures.
Week 10 no nutrients (only used on 1st day and 2nd day of week 10) , just straight water.


Likes
19
Share


@Kannamar
Follow
16/03/22 Refill 4L, and add nutrients in recommended proportions (except a bit more Flora Bloom, and a bit less Flora Grow) I set the EC at 1.75 and pH was at 6.
14/03/22 I did a gentle defoliation
12/03/22 Refill 4L, and add nutrients in recommended proportions (except a bit more Flora Bloom, and a bit less Flora Grow) I'll stay at EC 1.65 this time and pH was at 6. Lately I don't have really to adjust pH, may be PH Down 1ml for 12L of bottom tank to drop 6.1 to 5.9 every 4 days.

Likes
2
Share

@in_a_few_weeks
Follow
Topped them after 2 weeks. We’ll see how they handle it. After week 4 i put them on 12/12. Im looking for a Midday Strain and this is one of them. Small plants creates strong buds. Im curious what the taste and effect really is.

Likes
5
Share


@AestheticGenetix
Follow
5/27 this may be the last week?
5/31 the lowest branch has a thick lollipop nug on it. This plants starting to explode
Likes
24
Share


@TheIceCreamParlour
Follow
Sorry for the poor quality photos this week. I will update it at some point when I can get some photos in the dark with the flash on. With the tent being so packed and the plants under a net it's very difficult to get any quality pictures.
Powering on and fattening up. They've had roughly 30 flowering days and I'm expecting mabey 20 more. Some of the biggest buds have foxtailed but I'm not too upset. They are so huge and I'm only expecting them to get thicker from here on out.
Updated photos with an A4 sheet of paper behind them to try and show how wide the buds are on these girls. They are a bit airy at the moment compared to the Pinapple Express next door but with 2-3 weeks left I'm expecting them to bulk out.
Likes
37
Share


@rhodes68
Follow
12/2 Week Ten Blondie comes of age 😏
She has twice the light now and plenty of room, color it girl
12/5
To help you with perspective on Blondie she is about at week two of full flower just past the stretch.
Seemed to go into hibernation when sick so clock does not seem affected as she had a good veg run after recovering.
Just about a 2 week pause in her so looking at 3-4 weeks for her harvest.
So about week 7 growth
Increasing Koolbloom to 2.5ml/g she is in the fast building phase give her all she wants
12/6
We are adjusting all the diaries to end weeks on Sunday, this is for our convenience as really this grow with Blondie being behind somewhat doesn't really matter.
Thanks
Likes
10
Share


@Jozef_Balcerek
Follow
Dziewczyny zdecydowanie mniej pija wody. Obniżyłem wilgotność do 45-50%. Staram się nie przekraczać 25C. Powoli uprawa zbliża się ku końcowi. Może jeszcze raz zostaną dokarmione a potem do końca już tylko woda.

Likes
23
Share

@Arcadium
Follow
Warmed up again, 34c highs, but cool nights down to 14c. Flowering has really sped up, this F1's flowering response is very fast, just tons and tons of pistils and the start of trichomes already.
Did another compost tea this week, few hours of drip irrigation and a weekly spray of LCPT, easy going this week.
Rains coming next week, but fingers crossed for some good weather over September to finish. Would like to push another 6 weeks if possible, but anything after the first week of October is really hard due to the constant 95% humidity.
