
Likes
Comments
Share


@Original_Growers
Follow
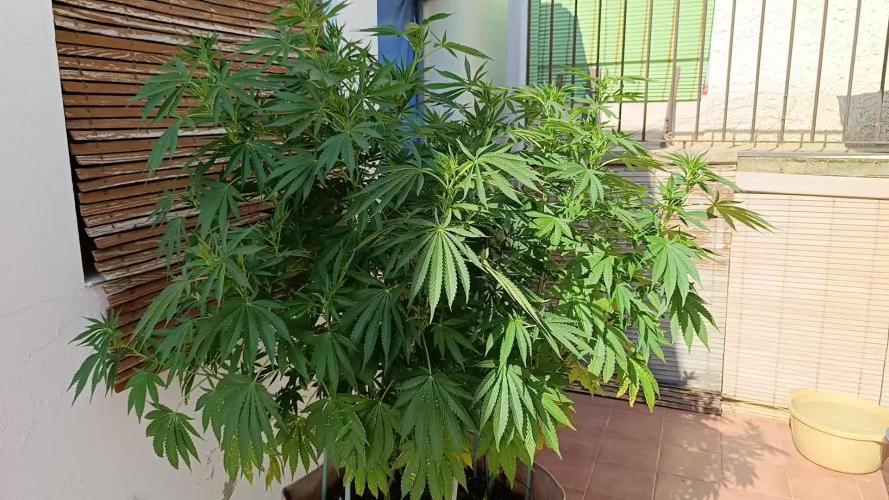
Day 21 of flowerig going great. Gelato strain was too much bushy, so we had to defoliate it. Now all the works are done, only have to wait buds to get fat 😁.


Likes
35
Share


@Chedderbob112
Follow
It was a roller coaster ride guys but I started with four harvested I earlier got two ounce quick dry wasent flushed properly but these ones hav been there a some nice buds here n a hopefully will get a decent seed harvest stoned @chedderbob112 s2340420 don’t hav dry weight bud av went for fullness plant


Likes
100
Share


Likes
13
Share


@dbCooper7
Follow
KONG BREATHE - MEPHISTO
GRAPE WALKER KUSH - Mephisto
Samsquanch OG - Mephisto
Auto Pina Rbx2 - Ethos Genetic


Likes
3
Share

@myterpygarden
Follow
Bueno pues ya entramos en flora!!! Concretamente en la fase de strechting!!!
Va como un 🚀
Tenemos carencia de Ca y Mg, es la primera vez que mido el agua base y sale a 0'35ms de Ec, el próximo riego tendrá Cálmag
Por lo demás genial!!!!!
Riego con aminoácidos solubles y un poco de PK orgánico!!!
Hemos regado hoy también (7/07) con toda la gama Atami VGN + Biotabs Bactrex
Ec 1.05

Likes
2
Share


@GemansGoGreen
Follow
Week 2:
Both plants are currently in a 4-litre pot. The substrate consists of 40 % coconut fibres and 60 % BioBizz All Mix. I have also added 3 g/L Greenhouse BioGrow and 0.5 g/L BioEnhancer to optimise the nutrient supply.
Both plants appear vital and healthy overall. However, plant #2 continues to show deformed leaves. I assume that this is due to a genetic defect that unfortunately cannot be corrected.
Light Power 40% (76W)


Likes
23
Share


@SkunkyDog420
Follow
Hallo zusammen 🤙.
Sie wächst sehr schön und macht keine Probleme.
Die Buds sind jetzt schon steinhart
Rabattcode für den BIOTABS-Webshop https://biotabs.nl/en/shop/ GDBT420, damit erhalten Sie 15 Prozent

Likes
170
Share


@Tropicannibis_Todd
Follow
👉Alrighty Then👈
49 days in flipped at 28 days
It's been a great week all plants are killing it ......... 👉The Strech Is On and we are in full flowering 👈
There all gonna get a slight defolation over the next few days to let air and light get in there 👈
👉So I topped all but Babba Kush and Slurricane they didn't require it ... 👌 Got some nice level tops 👌
I've now started there nutrients program ,for the flip so we are set to go ......
Persian Pie from Greenhouseseeds
Full Gas from Greenhouseseeds
Babba Kush from Greenhouseseeds
Rainbow Melon from Fastbuds
Papaya Sherbet from Fastbuds
Weddingcheesecake FF From Fastbuds
Purple Oreoz F1 From Seedsman
Slurricane From Premium Cultivars
Soil by Promix
Nutrients by Cronks
Well this should be fun 🙃
Thanks to all my growmies out there for stopping by its much appreciated 👈
👉Happy Growing👈


Likes
39
Share


@MrSpooky882
Follow
Wie man sieht hatte ich viel zum wegschneiden, das erste mal wurde gedüngt die Woche, ansonsten läuft alles ganz gut denke ich, bin sehr zufrieden bisher 😊
As you can see, I had a lot to cut away, fertilized for the first time this week, otherwise everything is going quite well I think, I'm very satisfied so far 😊


Likes
72
Share


@BodyByVio
Follow
This week I finally completed the RDWC system. Everything is working how it suppose to. The chiller is set to 66 degrees Fahrenheit. Also I start adding 1000ppm CO2. Lighting intensity ( Fluence Spydr 2i) is set to 75%.
Likes
3
Share

@GermanNoob
Follow
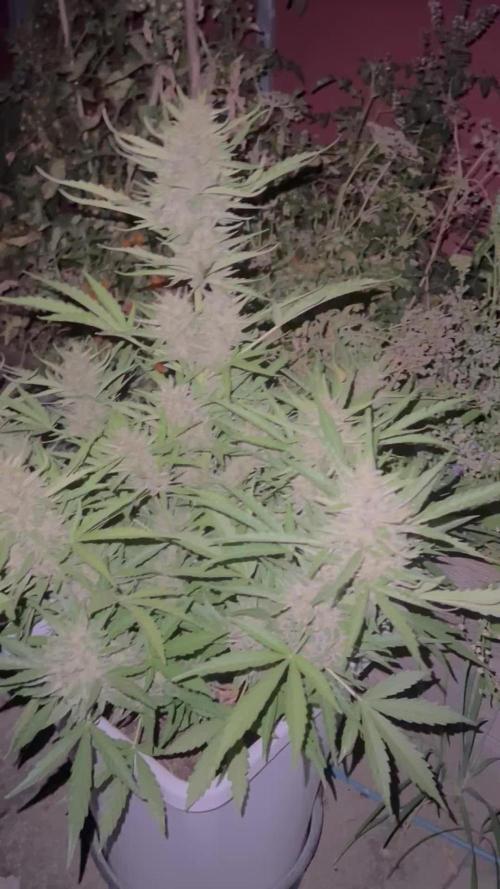
This plant is perhaps the best autoflower I grew so far. Despite my limited experience i think the genetic performed exceptionally well.
I did basically nothing to it in terms of nutrients or training and it turned out so good. Especially at night the frost is so nice.
I harvested the top part, because a lot of amber trichomes were visible already. The lower buds still need at least a week I think.
Will keep you posted with the rest of the harvest and a smoke report
Happy growing


Likes
121
Share

@Tropicannibis_Todd
Follow
💩Holy Crap Growmies We Are Back💩
Code Name FBT2307
Well growmies we are at 28 days in and everything is going great 👌 except for the fact I burnt the sit out of her 😅 I've since fixed the issue 😅
👉 Started to do some light low stress training and its looking good👌Let the stretch begin 💪
Lights being readjusted and chart updated .........👍rain water to be used entire growth👈
👉I used NutriNPK for nutrients for my grows and welcome anyone to give them a try .👈
👉 www.nutrinpk.com 👈
NutriNPK Cal MAG 14-0-14
NutriNPK Grow 28-14-14
NutriNPK Bloom 8-20-30
NutriNPK Bloom Booster 0-52-34
I GOT MULTIPLE DIARIES ON THE GO 😱 please check them out 😎
👉THANKS FOR TAKING THE TIME TO GO OVER MY DIARIES 👈
Likes
70
Share


@Insaniac_0
Follow
All feeds with nutes use either a whole ratio or combination of "Veg Mix" and "Bloom Mix"concentrates DILUTED in water until a total ppm of add in is reached using a (Total Dissolved Solids)TDS Meter measured in PPM (parts per million). The "Veg Mix" concentrate will eventually be added in smaller ratios and "Bloom Mix" concentrate what will eventually replace the "Veg Mix" concentrate entirely with the ppm and ratios listed when I feed. Veg mix recipe is on week 3. Bloom Mix recipe is on week 5.
Day 42
Morning check after defoliation. PH solution seems to be working!
Almost no new spread of the issue/deficiency (regardless of what it was)
Checked ppfd and got UL470, LL460, UR450, and LR440 over each of the colas. Temp/humidity steady still at 1.0 VPD 74F/63%RH/33% IL Vent
scraped a little soil off the top to see that it's still really moist so I likely wont be feeding until tomorrow morning.
Soil seems somewhat compacted, and ph readings were slightly lower, but still perfect in the safe zone
3 readings: 6.44,6.57, and 6.42 for avg 6.476
Day 43
Normal stats on VPD - same 74F/63%RH/33% IL Vent. ppfd over colas UL 490, LL 480, UR 470, LR 460
Still showing a slow progression of spots and yellowing on oldest leaves (like day 5 from initial occurrence, so very slow compared to past spread) I feel ph on a stressed plant was the biggest factor. Soil is still mostly damp to about an inch from the top but will be feeding tomorrow morning.
Day 44
Normal status with VPD 1.0 - 74F/63%RH/33%ILVent -- ppfd (after dunk) UL490, LL480, UR470, LR460
Calibrated meters and tested - prepared feed water- started with 3.5 gallons of 274ppm de-chlorinated tap- used 500ppm of 80/20 veg/bloom mix, pinch of epsom salt and squirt of h2o2.
Checked soil ph got 3 readings of 6.55, 6.65, 6.52 for avg of 6.573 so I ph balanced my feed to 6.3ish
Weighed pot for reference and saw 13lbs 10oz- dunked pot for 10 secs, lifted and hung over drain container - recorded the stream and drip videos when I then replaced and checked ppfd again.
Runoff showed 6.3ish ph and 2000 ppm (lower than my normal ppm of 2500 to 2600 my hypothesis is she's using them up so good time to feed)
rare side view of main-line base included with end of process pictures.
Did some LST with binds to train colas to position - I plan for 6 to be tied to ring and 2 in the center but at the same height by the time they grow past the support ring - I have them tied at the base of the first node and the pot - the center 2 colas are being trained too, but are tied off to the opposite side directly to the plant. looks like a hot mess for now - hopefully my vision will come through in a few days.
Day 45
Morning check after extensive LST yesterday - VPD is all stable 74F/63%RH/33%ILVent - not taking ppfd readings as she's still under the ring and I seen these readings yesterday and the day before - I plan on taking ph readings later today, but for now this is what I got.
Took ph readings - think I discovered hot spots of the woodash washing around the top - not detrimental since they are all with-in the range Im okay with (6 to 7) but worth note since I retested several times and got the same readings in these locations.
also did a little more LST with slightly adjusting for level
Day 46
vpd was normal 75F/64%RH/33%IL Vent - ppfd needed adjustment as the outside limbs were down to about 460 - so I moved the lights down to about 30 inches from 32 - and now the light measured 480 at lowest 490 around most limbs and the center is up to 530 - I will watch for light burn in that space
other than that all seems normal today, binds are still holding as placed and tops are turned/growing. the previous stress and nute issues seem to be in hindsight now.
Day 47
Soil ph was 6.54, 6.38, and 6.55 for an avg of 6.49 (last 2 readings were taken at yesterday's hot spot, seems to have cooled a bit now.)
VPD normal with temps/humidity about 74F/63%RH/33%ILVent --defoliated today so ppfds were taken after that, outer ring showed lowest at 470, and most at 480 with highest 490, and center colas 500 and 510
Defoliation of 16 oldest leaves at first node where my ties are bound. I left the growth tips for last.
the leaves showed what I hope to be the last of the ph issues scared on them... very much better than the last ones I took off
LST of the branches to ensure that ties are still under the first node and level the tops with the ring as much as possible - I feel the better I get this part the less there will be any need for LST or HST later
so, last thing - I topped again for 16 total colas - I might be reaching too far, but am also thinking ... 1st time gains experience that I can adjust later in future grows.
Also removed the growth tips from the first nodes.
So what's left?
a single branch into 2 into 4 into 8 into 16 with all of the tops cut at the first node except the last set of tops were taken at the 2nd node and first was at the 3rd node - there are no growth tips or fan leaves between the roots and the 16 colas (hopefully providing all resources to those points only from this point on)
fingers crossed it doesn't kill her and she recovers better than in past toppings.
Day 48
The tent is a little hotter than usual so I increased ILVent to 50% and reduced the heater by 2 degrees. So far there doesnt seem to be any issue showing on the plant but dont want it to become one either. So I will monitor the temps throughout the day as well.
ppfd was nearly same as yesterday with 470 as the lowest and mostly 480 to 490 around the ring with 510 and 520 in the center
no signs of stress so far from yesterdays barber visit but keeping a close eye on the burnt tips from before - I suspect that if there's any place for stress to show up, that would be where to look first.

Likes
5
Share

@GorkedOut
Follow
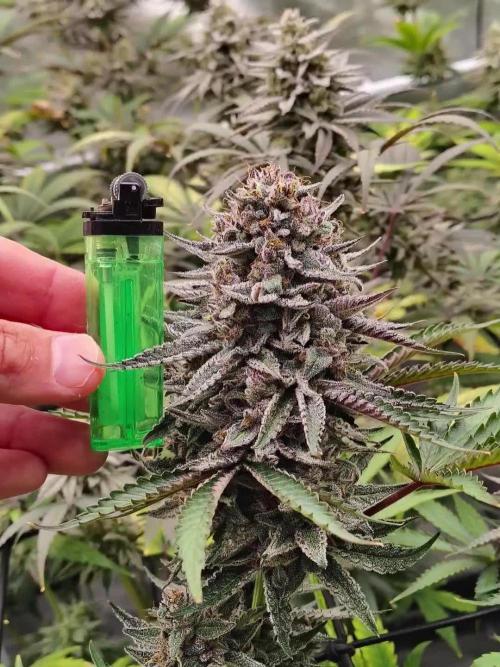
Day 91 of Life, Day 56 of Flowering. Very start of week 13. I checked the trichomes and im going to give them another week. My carbon filter is working Overtime.
Likes
4
Share


@DocGreenjeans
Follow
It's all about the soil. I love my soil I've cultivated it and in turn it cultivates my ye yo's


Likes
25
Share


@PrairieFrostGrow
Follow
******Week 5 Veg - Jan 6 to 12, 2020
This was a week of growth. She grew up and did very well with a couple of her side branches thickening up. She is a very healthy girl but she is not flipping. I wrestled with this weeks journal because I wanted to get it started to show her great growth but all along I was not sure if I call this week a flower week or not. In the end I waited and I am calling it a Veg week😥😥 She is not flipping......freaking wants to though by all signs.......I got a suspicion but I hope I am wrong......I don’t want to run two flower cycles!
IPM spray with Lost Coast Plant Therapy.......recent thrips experience and staying with a preventative cycle💀👻
Some branches are stiffening since the introduction for silica but others are still very pliable. The main stem is still very “bendy” and perfect for LST right now. Too soft for entering flower given the silica. Why?
She has handled the light intensity fine.....she has not been going to sleep early. She has handled the nutrients well given the amount being put in anticipating her switching and wanting the flower dosages.
She is beautiful little girl at first glance but she has some oddities in her growth......keeping the grow interesting she is young Skywalker😎 👍
More detail:
Jan 6/20 - Day 29
- 2L RO water pH 5.7.
- Run-off: 1150ppm, 6.1pH in try from last. After feed 800ppm, 6.0pH
- Pot light today. Wanted plain water but she is feeding
Jan 7/20 - Day 30
= life was busy........nothing done today for watering.
- Pot was the heaviest of the bunch......enough to wait.
- She was more droopy today.......cold in the tent though....75 degrees?????
Jan 8/20 - Day 31
- Feel she is hungry so fed in AM today.
- AM: full feed except no CalMag
- AM run-off 900ppm, 6.2pH
- PM: full feed with CalMag.
- PM run-off 430ppm, 6.1pH
- No time tomorrow morning and pots were not heavy so decided to feed again in evening.
- She is green and happy.......no bud sites though?
Jan 9/20 - Day 32
- Life busy......noting done......heavy feed yesterday.
Jan 10/20 - Day 33
- Water only. 1L pH to 6.0
= IPM tonight so keeping it light today. Hit her tomorrow with full feed.
= She is looking AWESOME today. Up and happy and still no buds😨😕
- Spray with Plant Therapy from Lost Coast for bug prevention. Fortunately no signs of any issues.......and this will keep it that way😁👊
Jan 11/20 - Day 34
- 2L feed. Upped the base nutrients, Dual Fuel, today to 2ml/L. Wanted to break 1,000ppm and see what happens.
- With Advanced Nutrients I am usually over 1100ppm at a similar stage.
- Played with light intensity in the tent today by giving them all more.
- Pulled 2 fan leaves today.
- Limbs are growing funny. Soft and narrow and not typical symmetrical pattern of growth.
Jan 12/20 - Day 35
- huge growth night....side branches bushed out and got taller!!
- Supplemental focus on this feeding.......help root zone again.
- Voodoo and Piranha for two weeks again at the start of flower and promote growth. Sensyzime to help clean up the roots for better uptake.
- she is 13" tall and 18" wide now.
- 4 large leaves removed and two smaller nodes.
Pictures all added 😀.....fought the website for network connections tonight😡.........update the comments tomorrow now👌........cheers!👏